Archives

Way

This entry is part 1 of 6 in the series IPP 31

Way by Dr. Volker Latussek is an interesting wooden puzzle which was entered in IPP 31 Design competition in Berlin. Not long after IPP, I was talking with Volker regarding my thoughts on the puzzle, and he offered to send me a copy to play with. Shortly after our discussion a fairly large package arrived in the mail, and there was the copy of Way that he promised me.

Way boxed

Way boxed

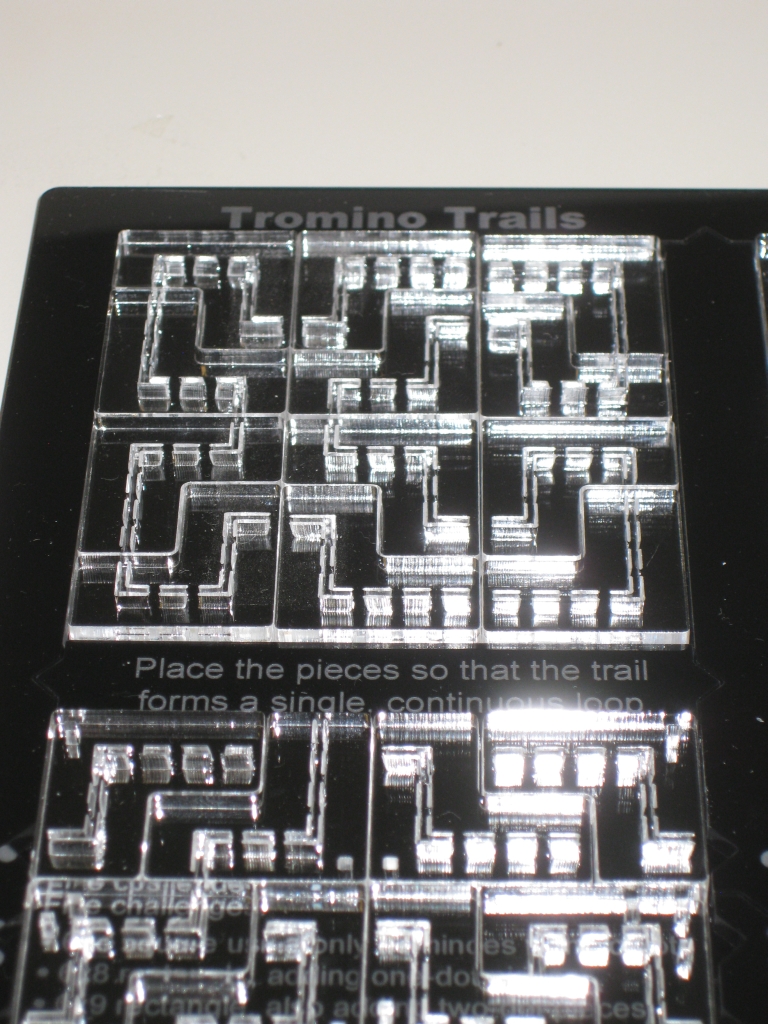
The goal of the puzzle is to create free standing circuits which form a single complete loop from start to finish, using the pieces noted on the challenge card. The circuit does not need to be flat on the table, and can be a three dimensional circuit. If fact, thinking upwards is needed to solve many of the challenges presented. One of the unique points of the puzzle is that there are no pegs or magnets which hold the pieces together, and each of the solutions is stable when the correct solution is found.

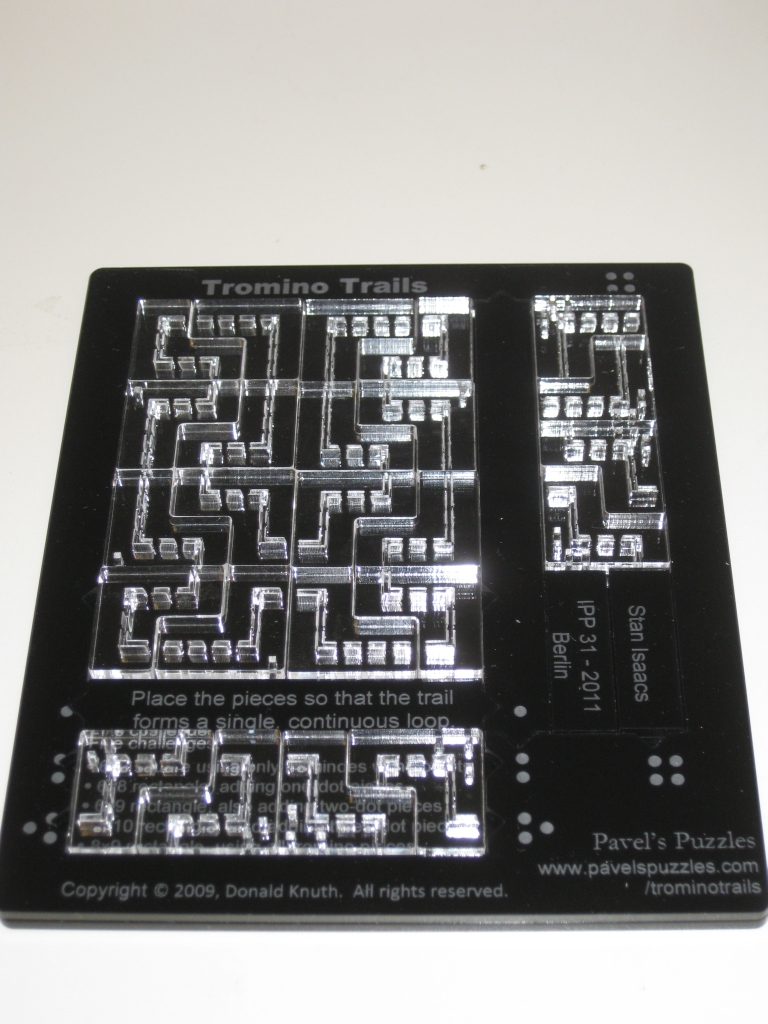
The first thing that struck me about this puzzle is the size. This is much larger than I was expecting from the photographs I’d seen. You’ll get a feel for just how big the pieces are from the video (just excuse my gammy thumb). The pieces are all beautifully made, and perfectly smooth. Each of the oiled beech pieces has a good weight to it, and are all fairly large, even in my hands. The whole puzzle with all eighteen blocks measures 8″ x 8″ and each piece has a diameter of around 1.33″. The puzzle comes in a heavy card box with the puzzle name on a sticker on the outside of the box. One of the challenges is even to fit all 18 pieces into the box in a continuous circuit (as opposed to just thrown in there as they normally are after playing with the puzzle).

The Sticker on the box has the subtext “a puzzle construction set”, and it does live up to that claim. It certainly reminds me of the building blocks I used to play with as a child when I was at my grandfathers house, although these are significantly less beat up than those blocks were!

The puzzle comes with a challenge card with 8 different challenges on it, the first four of which are really showing you how to use the blocks, so contain a picture of the solution on the card. My biggest issue therefor is that there’s only really 4 challenges provided with the puzzle to start off. For most people it’s not going to take that long to work through the challenges. Visiting the website, there are now a total of 29 challenges which should keep you puzzling for quite some time, and it seems that more challenges are being added on a fairly regular basis. The most recent challenge was added on the 27th October (at the time of writing). The challenges are not all just ‘build a circuit’ challenges either. Some really need you to think about what you’re doing by adding restrictions on the type of circuit. For example, the circuit must fit inside a 3×3 cube.

Note: New puzzle challenges are added every Thursday. Thanks to the designer for the update

Some simple solutions

Some simple solutions

As you can see from the image above, showing a few of the simpler challenges, it’s possible to construct several of the solutions at the same time, and all of them are stable once complete. One of the issues I had was that the order in which you construct the solution is very important to the stability during creation. While it’s true that all the solutions I have found so far are stable once complete, they’re not always easy to build due to the nature of the pieces to roll. As you’ll see in the video, removing one piece from the completed structure, and the whole assembly in many cases will fall down with a satisfying clunk as the pieces hit the table. While I love the fact that the solutions are all stable when built, I can’t quite get past the feeling that having either the tiniest flat spot on the edges would help the puzzle greatly as the building would be less frustrating. That said, Dr. Volker is very proud of the design, and that the pieces are stable with no other aids, and I think he’s right to be proud of it. Bottom line is that the way the puzzle is, there’s an added dexterity element to the puzzle, which certainly adds to the challenge.

Way shows gravity who's boss

Way shows gravity who's boss

Some of the more challenging puzzles really start to look like they’re defying gravity with pieces hanging outside the main mass of the puzzle creating some interesting overhangs!

Overall this is a really good puzzle, and if the challenges keep coming, then there’s going to be a good reason to keep going back to it for some time to come. You can get one directly from Dr. Volker via the Way Website.

Flemin’

This entry is part 2 of 6 in the series IPP 31

Flemin’ is an interesting puzzle from Shiro Tajima from the Karakuri Creation group. This fairly plain looking Cherry box with an inlay detail apparently conceals a hidden compartment in its centre, however it’s not easy to find!

Flemin'

Flemin'

As I mentioned the goal of the puzzle is to open the shell and find the secret compartment. Opening the shell isn’t too hard. The outer panels are attached to the inner cube using short dowels which run in grooves in the outside of the inner cube. The way the panels of the inner cube are glued together prevent the outer panels from being removed, and keep the solver going round in circles. Confused? The picture below should help.

Showing how the pegs interact with the inner cube

Showing how the pegs interact with the inner cube

Made from Cherry, Rengas and Mizuki, this take apart puzzle while fairly plain (compared to some boxes we’ve seen from Shiro Tajima) still has a striking appearance to its outer casing. Created back in June 2010, this box has been around for a while now, but the internal mechanism was slightly redesigned and entered in the IPP 31 design competition in Berlin.

I’ve spent quite a lot of time on this box, which was kindly loaned to me by Derek Bosch, and (like Derek) have singularly failed to find the internal compartment. I spoke with a couple of fellow puzzlers about this puzzle, and eventually, talking with Jim Strayer, he pointed me towards the correct technique to open the inner box. It was Jim who mentioned while I was talking to him that the mechanism had been redesigned, and that he can easily open his copy, but was only able to open the IPP copy once.

Our thoughts seem to come down to the mechanism on this copy being locked solid as a result of expansion of the wood. Sadly, it is a potential problem with wooden puzzles, and it seems that the mechanism on this box is rather sensitive to wood movement. Given that I have the puzzle on loan, I certainly didn’t want to force anything and possibly break a puzzle (and my thumb being slightly out of action doesn’t help). Jim did mention that to open the internal compartment the mechanism needs to move very precisely, and I was concerned about damaging what sounds like a delicate internal movement.

So for now, this one remains unsolved. I can say that having spent possibly an hour and a half working on this one (most of that before my accident), that nothing I had tried would have led me to opening it, so it is a challenging box even when you understand its mechanism.

Given the comments of other puzzlers who’ve struggled to open this one, and the possible problems with wood expansion, I’m not sure whether to recommend this box or not. I really like the concept behind the mechanism, and I’m sure if it works, it is both simple, unexpected and very clever. It is a challenging puzzle, so if you’re looking for a puzzle box that is a little unusual, and will not work the way you expect then it’s a great buy. On the other hand, if you get one where the mechanism is stuck, this will frustrate you no end.

Check Me Out

This entry is part 3 of 6 in the series IPP 31

Quite some time ago now, I mentioned in the post about the Post IPP California Puzzle Party that I’d purchased a copy of Dave Rosetti’s exchange puzzle from IPP31 and that I’d write a review soon. It seems that soon wasn’t very soon at all and it’s taken me months to get round to writing it! But here at last is the review of ‘Check Me Out’ designed by Stewart Coffin, and numbered 256 in his numbering system.

STC #256 - Check me out

STC #256 - Check me out

Check Me Out is another devious tray packing puzzle from Mr Coffin, where a mere four pieces have to be packed into the tray. To make things interesting, the tray isn’t square, it’s a nice parallelogram, and one piece is conveniently not placed in the tray. If that wasn’t hard enough, the card which comes with the puzzle kindly states


With puzzle art such fun to play
Chuck the four “checkers” in the tray
So that shape and color both will be
In perfect two-fold symmetry

Front of the info card

Front of the info card

Back of the info card

Back of the info card


The Puzzle itself is fairly plain. There’s no exotic woods used here (possibly Maple for the lighter wood), and the base of the tray is made from a veneered 3 ply plywood. That said, the grain in the veneer of the base of the tray is nice enough and gives a good contrasting colour to the pieces. Add to that the fact that the grain is offset to the angle of the walls of the tray really helps to mess with your head as you’re solving it. The bottom of the tray is marked in pencil “256 STC 2011”.

Bottom of the tray

Bottom of the tray

Each of the four pieces is very accurately cut and has had the corners rounded very slightly to take the sharp edges away. It’s a small detail, but as a fellow puzzle maker pointed out to me when I started making puzzles, it really does make the puzzle far nicer in the hands when you’re solving it.

Solving this one really took quite a while for me. I spent several hours trying to find a combination where all four pieces could fit in, ignoring the symmetry part of the problem. This is an excellent puzzle that will likely keep you busy for a long time. Who would have known that four pieces could provide such a problem to placing them in a tray?

I’m not going to post the solution here, as that would spoil the fun. If you’re really stuck, then drop me a note and I might help you out by letting you know where one or two of the pieces go!

Houdini’s Torture Cell

This entry is part 4 of 6 in the series IPP 31

Carrying on in the IPP series, today I’m looking at Mr Puzzle’s IPP31 exchange puzzle “Houdini’s Torture Cell”. I was lucky enough to be given this one as a gift from my fiancée for my birthday, after dropping a few hints. Mr Puzzle (Brian Young) is great at making sure that his exchange puzzles are relevant to the location of that year’s IPP, and this is no exception. The puzzle celebrates Harry Houdini’s first public performance of The Torture Cell at the Circus Busch in Berlin on 12th September 1912. A small copy of the original poster from that show is printed on the presentation card as you can see below.

Houdini's Torture Cell

Houdini's Torture Cell

As the info card states, the object of the puzzle is to free Houdini from the torture cell. For those not familiar, during this illusion, Harry Houdini was suspended by his feet, locked through the top of the box which was filled with water, and escaped without drowning. Now having performed this illusion myself many years ago while I was still doing magic, I can confirm that there was no steel ball in the bottom of the tank, however the puzzle does recreate nicely the shape of a suspended figure, with no apparent way to escape.

The puzzle is very well made, as with all of Brian’s puzzles. The puzzle makes use of the wood and perspex together to create a very sharp looking puzzle. On the bottom of the puzzle you’ll find the Mr Puzzle Logo branded into the wood. Despite the very visible screws, there’s no screw driver required to solve the puzzle, so you can stop thinking along those lines! At just under 4″ tall, and a little under 2″ square at the base, this is a good sized puzzle, and feels good in your hands when you’re working on it. Not too small that it’s fiddly.

If you’re a seasoned puzzler, you’ll be tempted to get the compass out for this puzzle, as Brian states that there’s lots of magnets, but no “tapping” required to solve the puzzle. You’ll find a very strong magnet in the base, and a couple of others elsewhere. The question is what to do with them.

On the Mr Puzzle website, Brian states that the idea for Houdini’s Torture Cell came from one of the locks in the incredibly complex “The Opening Bat” puzzle. Brian felt the idea was unique and very satisfying to solve so he revisited the idea and changed it to present in a way that would suit IPP; this way it’s available for lots more people to experience a great ‘Ah Ha’ moment.

Houdini safely out of the cell

Houdini safely out of the cell

And the Ah Ha moment in this puzzle is excellent. The beauty of the puzzle is that everything is on show for you, so really you can; after a quick investigation; think about how to solve the puzzle and then go ahead and solve it. Well, when I say everything, I mean almost everything is on show for you. There’s a little bit of discovery required, and you’ll need to find a tool or two hidden in the puzzle to help you solve it, but everything you need is right there in front of you. If you really get stuck there is a solution provided in a folded piece of paper, so if you don’t want hints, don’t unfold that paper.

Balancing the Ball on the base is easier than it looks

Balancing the Ball on the base is easier than it looks

The puzzle’s party piece as I think of it is that once you’ve figured out how to solve it, you can leave it sitting on the shelf with the metal ball balanced on the podium at the bottom of the puzzle. Trust me, there’s no way you’re going to be able to get it there with dexterity alone, and leaving it in this state not only makes it look great on display, but also makes people wonder how on earth you got it there.

I highly recommend this to any and all. It’s a brilliant little puzzle, and solving it is a lot of fun. I have to agree with Brian’s thoughts, that this is a very satisfying puzzle to solve, and I’m really glad he decided to make this version of the puzzle as it’s unlikely I’ll get the chance to play with an Opening Bat. With Christmas coming up, this would make a great gift for the puzzler in your life. To see what other people think of it, read Allard’s review and Oli’s review for another perspective.

Tromino Trails

This entry is part 5 of 6 in the series IPP 31

Carrying on with my review of IPP31 puzzles, here’s another of the puzzles that I picked up when I was at the recent Post IPP California Puzzle Party. Tromino Trails was Stan Isaacs exchange puzzle from IPP31, and given that Stan was the host of the Puzzle party, it would have been rude not to buy one of his puzzles.

Tromino Trails

Tromino Trails

Tromino trails is designed by Donald Knuth and made by Pavels Puzzles. You can read Pavel’s description about the puzzle by following the link, and also purchase a copy for yourself if you’d like one. And I highly recommend you do!

This puzzle goes back to 2009, and IPP29 in San Francisco. There Donald Knuth gave a talk about varying puzzles he was working on and passed out a sheet with some puzzle problems that people could play with later. One of those problems was the Tromino Trails problem. I’ll let you read about it on Pavel’s site, as he was there and will explain it far better than I.

However I digress.The Tromino Trails puzzle is a physical version of Don’s paper problem from IPP29. The puzzle consists of 24 L shaped trominoes with varying paths marked on them, a tray that can be configured to a number of different sizes and five challenges.

The first problem, a 6x6 loop

The first problem, a 6x6 loop

You start off with a 6×6 square, and 12 pieces, with the goal being to fit the pieces into the tray and form an unbroken loop with the trail marked on the pieces. There’s a single unique solution to the problem. Given that the tiles are transparent, the trail is visible on both sides, and therefor can be flipped over and rotated as desired.

The 6x8 challenge and pieces marked with one dot.

The 6x8 challenge and pieces marked with one dot.

You then move a few bars around and get a larger 6×8 tray, add four marked pieces, and have the same goal of an unbroken loop. Again this problem has a unique solution.

Reconfiguring the tray to the next size

Reconfiguring the tray to the next size

Moving the tray around is easy as the spacers all have tabs on their ends that fit into notches in the tray and have a number of dots based on the challenge you’re attempting. A great idea and really well thought out.

Next up a 6×9 tray created by moving more black frame pieces, and two new trominoes. Same goal, same unique solution … are you seeing a pattern yet?

All five challenges, add progressively more pieces, and a bigger tray until you’re using all 24 trominoes, all with unique solutions, and you have a beautiful, and elegant puzzle design. I think the nicest thing about this (given that we know I’m not good at tray packing puzzles) is that this one is really approachable. I’ve been able to solve all five problems, and none of them are too difficult. Yes they’re a challenge, but not such that you get frustrated and want to throw the puzzle across the room.

There’s no solutions provided, but if you are stuck, or just curious, then click the 6×6 solution link or the 6×8 solution link to see the solutions. After that you’re on your own. After all, what’s the point in my giving you the solution. This is actually a fun tray puzzle!

Three Piece What ‘sit

This entry is part 6 of 6 in the series IPP 31

At IPP 31 in Berlin George Bell exchanged his Three Piece What ‘sit made by Bernhard Schweitzer in the New Pelikan workshop. The goal, and the only hints you get are to “Assemble the 3 pieces to an allside symmetrical 3D shape”

The Three Piece Whatsit Pieces

The Three Piece Whatsit Pieces

This great looking puzzle is made from Maple and Robina and measures 2.75″ x 2.75″ x 2.75″. The three pieces are a good size in your hands and give little away about how they should be combined. Playing around you’ll quickly find several ways that two of the pieces can be joined, which leave no room for the third to fall into place.

I probably spent around 10 minutes before I found the correct orientation of the first two pieces to allow the third to drop into place correctly, leaving a very pleasing solution shape. Taking it apart and photographing it for the review, it then took me around another 10 minutes to get it back to its solved state again. Since then I’ve taken it apart and put it back together again several more times, and I can solve it fairly reliably now. I’m sure if I left the pieces separate for a while then came back to it, it would take a little time before I could solve it again, so the level of difficulty is reasonable on this one.

Interestingly, at the at same time as George designed this puzzle, Don Charnley also designed the same puzzle, and named it Donz Q’b. The interesting thing is that the puzzles pieces are mirror images of each other. So you may find this puzzle referred to by either name, but in the end it’s the same puzzle.

Solution shape of the What 'sit

Solution shape of the What 'sit

I’ve deliberately, not included the picture of the solved shape as part of the gallery since that’s part of the challenge, but since it’s readily available in a number of places on the web, if you want to see it, click on the image above to see the full shape. Overall, a fun puzzle, and highly recommended if you can get a copy.