Tag Archives: Dexterity

Ring & String, or perhaps “Something memorable from IPP”?

Hi all, it’s been a good few weeks since I sat down and wrote anything, but then after a fantastic three and a half weeks touring the UK, catching up with friends and family; a wonderful long weekend with the MPP crowd soaking up the fantastic hospitality of the amazingly humble and welcoming Walker household; a week of IPP and many puzzle friends old and new, all mixed in with my one year delayed Honeymoon, it’s good to be back, and probably about time I put a pen to paper, or finger to keyboard.

There’s a good few puzzle bloggers out there who are writing about IPP, and all the fabulous conversations and events that took place over the week, so I’m not going to give you my account of what happened. But I do suggest you go read Allard’s Assessment, Rox’s Ramblings, and Jerry’s Journey. They’re all well worth reading, and will give you a good feeling for what a fantastic time was had by all. I’ve said it before and I’ll no doubt say it again, the people in the puzzle community are an amazing group, and I’m proud and humbled to know each and every one of you, and to be able to call so many friends. Thank you.

I will give one special mention to Allard and his wife Gillian (as well as their two dogs, Ben and Jerry) for welcoming my wife and I into their home, putting us up for 4 days, feeding us, making us so welcome and at home, and not accepting a single penny in thanks. You truly are great friends, and I can’t wait to return the favour at some point. Fortunately no harm came of the dogs who decided to eat some of my green packing peanuts while we were all out. The only casualty with Allard’s lap when one of them decided to throw up on him. (Sorry!)

Anyway, I do want to mention one great experience from my IPP. While there Dr Colin Wright was wandering around talking to people and showing us some interesting little tricks. Colin is a Juggler, magician and specialises in Communication. I spent quite a bit of time talking to him, given that I juggle, have done my share of magic over the years, and with all this writing that I do, I have to accept that I have something to do with communication as well. (Ed: So hurry up and get to the point!)

Colin was wandering around with a length of chain around his neck, attached to it there was a steel ring. At one point as I was wandering around talking to the myriad of puzzlers Colin had a group around him, and he was doing something interesting with said ring and “string”.

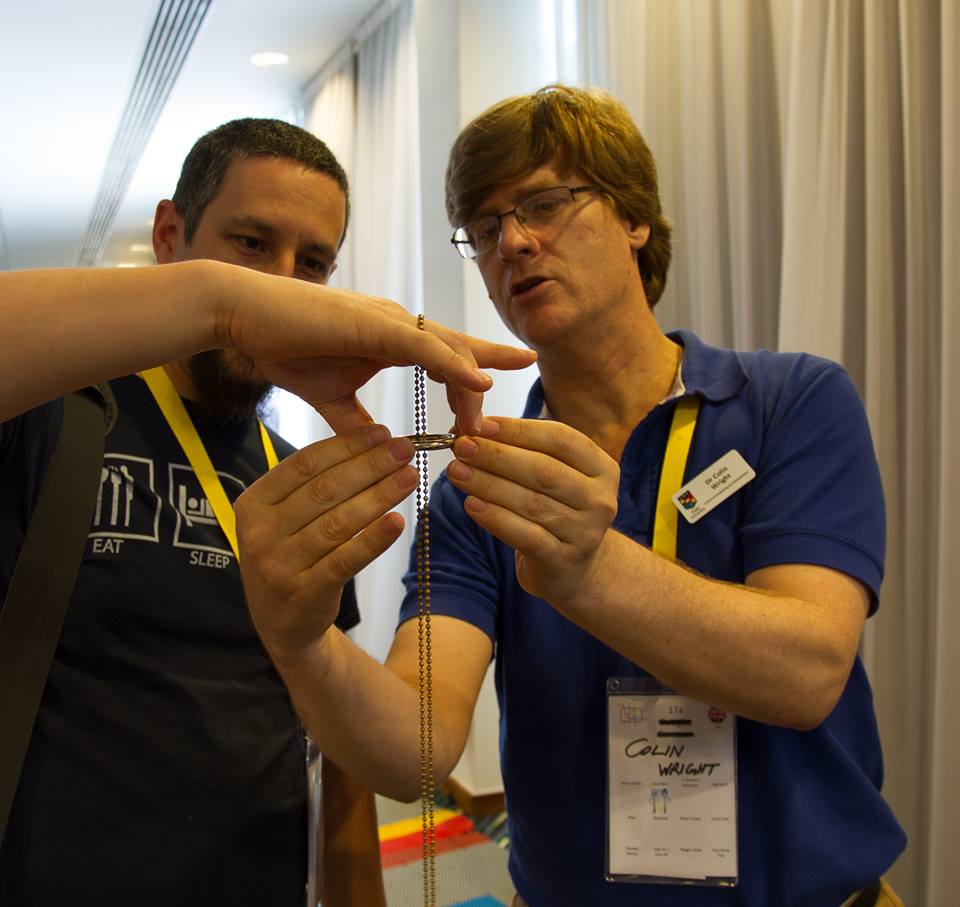
“Now, hold it like this ….”

As you can see, being the curious chap that I am, I wandered over and listened in to what he was saying. Before I knew it, he’s turned to me, and I have the apparatus around my hand, and with a huge grin have been shown how the magic happens, and have now done it for myself. Yes, I really did have a huge grin on my face, as Colin explained what was happening, and that he had analyzed the behaviour to work out exactly how things worked, and perfected the one-handed technique. A few other people commented that they’d seen it before, and even done this before but using other grips, two hands or even a table. (Ed: But what was it … get to the point already!)

Well when I got back from IPP, I went to the local hardware store, picked up a couple of rings, some chain and made my own copy, and one for my son. I knew he would like it, and for a couple of dollars, it’s a great toy to have. Anyway, the picture above surfaced on Facebook, and I was tagged. A few comments from confused readers later, and I find myself making a video showing what we were doing. (Ed: But you’ve still not told us what that was.)

Rather that try to explain, I’ll just leave you with the video below. I am fortunate enough to have a high-speed camera now, so I took some footage at high speed showing what happens, and put that in the video. I don’t show how to do this, but it’s fantastic to see what’s happening.

Now, I took this to work with me to show a couple of my colleagues as I knew they would appreciate it. What happened though was entirely unexpected. Rather than asking how to do it, I was relieved of the pieces, and the team started trying to work out how to do it themselves. (I’m and engineer, and this has become a problem to be solved). For me this was fantastic. I’ve now seen about 4 different ways that can reproduce the result, none as elegant as what Colin showed me, and none that are nearly as reliable.

So here’s a challenge. Go get yourself a solid ring, a length of chain and try this for yourself. I’d love to see how you get on in the comments!

Until next time, when I’ll be back to puzzles, enjoy the video.

One Four All & All Four One!

Not long after my wife and I moved to California, she got in touch with Mr Puzzle and ordered some puzzles for me for my upcoming birthday. Yes, I knew back then she was a keeper! One of the puzzles she decided on was One Four All & All Four One! designed by Arcady Dyskin & Pantazis Houlis. Themed around the Four Musketeers, I guess the look appealed to her, and I certainly wasn’t disappointed when I opened my presents!

One Four All & All Four One!

One Four All & All Four One!

This is a very simple four piece puzzle, with a frame, with the simple goal of “placing all four cubes into the rhombus frame, in such a way, that the entire structure (frame and cubes) are interlocked (i.e. there are no loose parts).” Yes, I used simple twice in that sentence. Do I even need to comment on what that means?

One Four All & All Four One! info sheet

One Four All & All Four One! info sheet


Each of the cubes is 3/4″ and the frame is 3 1/2″ x 3″ x 1 1/8″. The cubes appear to be Maple, Lacewood, and two others probably native to Australia if I know Mr Puzzle. Sadly I can’t find much more information about them, suffice to say they are contrasting woods. This particular copy was used by Pantazis as his exchange puzzle at IPP30. The puzzle was also entered into the design competition at IPP30, and received a top 10 place in the judging. As you can see from the info sheet, each of the cubes has been given the designation of one of the four Musketeers. It doesn’t change the puzzle any, but keeps a nice theme flowing.

As you’ve probably guessed, the reason I’ve not written about this before now is because the puzzle is so simple. It’s so simple in fact, that even with the solution printed on the other side of the card, it took me a very long time to solve. This is not just a logical challenge to understand how to interlock the pieces, but also a dexterity challenge to place all the pieces in the correct orientations within the frame. And trust me, juggling four pieces inside the frame at precise angles is anything but simple.


I don’t normally talk about puzzle solutions, or show them, but in this case I feel I’m justified. Amusingly, on the solution side of the puzzle card, it states “Beware: Even knowing the solution, it is not easy, and some musketeer skill is needed!” Forget musketeer skill, a bloomin’ Ninja would struggle with this one. I have no doubt that when Mr Puzzle made these, he tested the fit of each and every one of them. And I have to commend him for that as this is one infuriating puzzle. If there’s an easy way to get the cubes in place I’ve not found it. Yes, I did solve it, and I took a photo to prove it. If you want to see it, click the link here.

It looks great, and it’s one heck of a challenge. I doubt it will live on my shelves solved as it’s so challenging to put together, but it is a great puzzle, and really deserves some recognition. You may struggle to find a copy, but if you spy one for sale or see it in someone’s collection, don’t pass it up. It is worth a crack.

Revomaze R2 – Mercury

This entry is part 10 of 11 in the series Revomaze

If you’ve read my posts on the Revomaze puzzles, you’ll know the first generation of puzzles ended with the release and solving of the Gold Puzzle. There are a few special editions out there, but for me solving the Gold, was the end of the journey on the R1 puzzles. Chris Pitt, has come out with an entirely new design of puzzle, a second generation of Revomaze puzzles, the R2’s. The first in the series is Mercury.

Revomaze R2 - Mercury

Revomaze R2 – Mercury

This second series is based on the planets in the solar system, and the closest to the Sun, Mercury, is the first to be released. The series has had a difficult birth, with the company trying to raise funds to buy CNC machines to bring all the production in-house, and move away from the reliance on engineering companies to produce the limited run puzzles they wanted. To that end, “Voyager Status” was created. This was an up front payment to guarantee the price of each puzzle in the series (up to 10 puzzles) for early adopters. For that you’d receive a limited edition coin (stored inside the puzzle of course), your puzzle would be part of the initial limited edition run of 100 puzzles and would be engraved with a serial number to set it apart from other general release puzzles to be released later.

So back on the 12th March 2013, I sent Revomaze £50 of my hard-earned cash, and sealed myself a place on the voyage to the R2. At some point over the course of the next 8 months there were a few changes to what Voyager status meant, and a decision was made at Revo HQ to limit the R2 run to only the 100 puzzles from the Voyager sign-up. The result of this decision is that the puzzles would only be made to meet the Voyager demand (100 max) and no more would be produced or sold until the Voyager members have ALL of their puzzles from the entire series. So at this point, if you missed out on Voyager status, expect it to be 3 years before you get your hands on a Mercury, or any other puzzle in the series. Note that this assumes a release schedule of 3 puzzles per year.

Not long after the Voyager announcements, the option was given to the first 20 people who wanted to pay for the puzzle to receive the puzzle ahead of the main batch, and be part of a ‘Beta Trial’ to allow Chris to sort any issues, and make sure the puzzle worked perfectly. Since I’m always happy to help bringing a new puzzle to life, I agreed to be one of the first batch. On the 1st May 2013, I paid for my puzzle, and began the wait for the R2.

Mercury #24

Mercury #24

Background covered, I should probably start talking about the puzzle, as I’m sure that’s why you’re here. I received my puzzle on the 14th February 2014 and eagerly opened the package when I got home from work, to start playing with the new puzzle. My plan was to take it to the California Puzzle Party on the 15th, and let people play with it there. In fact Chris had express shipped the puzzle to me to ensure that I had it for the Puzzle Party. (Note: He’d done the same for a puzzler on the East coast, and also to some of the puzzlers in the Midlands) Before taking it to the party though I wanted to have some time to play and understand the puzzle. Foolishly, I’d hoped that I could open it before the party. I spent 2-3 hours with it on the 14th trying to understand what was going on, and start mapping out the paths inside the new maze. Most of that was just spent getting used to how different this puzzle is to the original series. It’s a completely different animal that needs a very different touch to be able to solve it. And yes, I did take my wife out for dinner that night… I’m a romantic at heart.

The raw maze before it's finished

The raw maze before it’s finished

The puzzle itself is made from a couple of solid blocks of aluminium and measures 4-1/8″ in diameter by 1″ tall. Including the knob for the draw bar the puzzle is 4-5/8″ and weighs in at 800g. Now I’ll be honest, despite being heavier than the original R1’s, the puzzle feels lighter. Perhaps just the weight being spread over a larger diameter helps.

Unlike the R1 where the pin was in the sleeve, and the maze on the central core (or draw bar if you like) requiring you to twist, push and pull the core to navigate the maze, the R2 is a little different. The pin is attached to the draw bar, and the maze is etched onto the titanium coloured disk which rotates inside the black outer case. To navigate the maze you need to both push and pull the draw bar while simultaneously rotating the disk. This requires a lot more coordination than the original maze, and is a very different experience. Any skills you may have learned from solving an R1, will be of little use to you here.

Despite my best efforts and a very crude map, I certainly didn’t solve Mercury before the Saturday puzzle party. One issue which did arise as I played with it was that the silky smooth rotation that the puzzle exhibited on the Friday night, wasn’t quite as smooth by the time I arrived at the puzzle party. I wish I’d realised before going as the puzzle was mostly unusable given the amount of friction between the maze plate and the case. We required two hands on the disk to turn it in any direction, and really any chance of playing with the puzzle or solving it were gone.

Talking with Chris, he suggested WD-40 would help. Skeptical as I was, I took the can of WD-40 to the puzzle, giving it a good coating, and spin it did. The friction issues were completely resolved, and it moved better than it had when it arrived. Over the course of the next week, I didn’t have a great deal of time to spend with the puzzle, but I dabbled on and off mapping as I could and trying to understand what I was ‘seeing’.

Mercury during solving

Mercury during solving

Mapping the R2 is a completely different challenge to an R1. With the R1, you can think of unrolling the maze to a flat plane (since effectively that’s what it is – wrapped onto a cylinder) but the R2 is already flat, and is circular. Some Polar graph paper may be useful here. Fortunately, the centre of the disk has 24 notches, and the dimples on the outer rim match to 15 degree increments. Handy for reference! I started out with regular graph paper making a very crude attempt with a compass. Let’s just say it wasn’t elegant, but it worked. A couple of people pointed me to that wonderful invention – the Internet – to download some polar paper, and I transferred things to there.

One thing you’ll find in Mercury is that it’s full of curves. Actually it’s full of circles! Chris claims that the design of the maze is meant to represent the cratered appearance of the planet itself, and I guess I can see that. As I mapped, I found that there was a chunk of the map which I couldn’t get to , just a little clockwise of the serial number, and part around 10pm. Now knowing that nothing would be wasted in here, I knew that’s where I had to get to, but finding how was proving challenging. The other very concerning aspect I discovered was a trail leading through ~25% of the maze, where everything I had was trap. This was starting to look a lot like a Green. And I hate Green.

After a good few hours trying to find how to get to these new areas, find it I did, and my fears were confirmed. The puzzle becomes a serious dexterity challenge, needing the lightest of touches, and an excellent map. To get there, is a challenging section that I am sure will cause a lot of frustration (it did for me), assuming you can find it. The entrance is very challenging to find, and needs some very careful exploration of the maze.

Given that I have one of the first copies, there’s a few issues in the puzzle which Chris is already solving, as quickly as they are identified.

  • The Spring is a little light, meaning that it’s possible (and even easy) to hug the walls a little tight, and as a result get to parts of the maze through a route which was not intended. That’s fixed with a stronger spring in the draw bar.
  • There is a slight amount of play in the draw bar, meaning that it can rotate a fraction while you’re solving. It’s not a problem that affects the maze, and it certainly won’t help you, but that will be tightened up in the later releases.
  • The last and biggest issue with the early release is that the pin has a fairly rounded profile as you’ll see in the photo below. That means that in some areas where there are ledges in the puzzle, the pin won’t stay on the ledge, without applying some pressure to the wall. That’s being fixed with a different profile for the pin head.

As a result of these issues, a number of people have managed to open the maze very quickly having taken a path which was not intended. I didn’t find these shorter paths, and completed the maze as intended. The benefit of having produced this short run is that Chris is learning how the puzzle is used by someone who doesn’t know what’s going on inside, and by the time these get into general production for the remaining 80 in the run, they will all be perfect. It was a very sensible decision by Chris, and one which I hope he is aware was the best way to launch a new design, and make sure it’s exactly the way he intended.

Mercury #24 - Open

Mercury #24 – Open

From start to finish it took me around 8.5 hours to open the Mercury, and I’ll be honest, it’s a challenging puzzle, not for the faint of heart. It’s difficult from start to finish, and darn right evil from 50% through to the end. I’d even go so far as to say that the very last few millimeters of the puzzle are Satan incarnate. This is perhaps one of the most challenging static puzzle that Chris has released to date, and to my mind is far too challenging for the first puzzle in the series. Yes, you can argue that it took me less than 10 hours to open it, so it can’t be that difficult, considering how long it took me to open Silver from the R1 series, however I go back and re-solve Bronze and Silver. I never go back to Green, and I’m unlikely to want to ever go back and re-solve Mercury.


As a small aside, when the puzzle was opened, I found some small flakes of metal sitting in the case of the puzzle. Presumably from the grinding as a result of the friction between the two large plates of aluminium. It doesn’t affect the puzzle, and I certainly don’t see any damage to the maze, but clearly there is some wear as a result of using the puzzle.

Metal shavings in the case

Metal shavings in the case

Propeller

If you’ve read some of my previous posts about visits to various Puzzle Parties, you’ll remember me talking about puzzles designed by Roger. There are lots of my fellow bloggers have written about some of his other puzzles, and even a few have written about the Propeller puzzle. Rogers puzzles are all highly sought after, as he no longer makes new puzzles, and there’s very few people out there know who he really is, but they all have one thing in common. They’re tough to figure out, and in most cases the mechanisms are all amazingly straight forward, if not entirely on show.

The Propeller by Roger in its startling locked position

The Propeller by Roger in its startling locked position

I’ve been trying to get my hands on one of Roger’s puzzles for my collection for a while now, but it seems that given their rarity, and the number of collectors looking to add them to their own collections, I’ve been outbid each time they’ve come up for auction. In a recent auction however I had a little spare puzzle money and decided it was time to not be outbid. Propeller is the first of the Roger puzzles I’ve added to my collection, and I think it’s a good puzzle to have been able to buy. I’ve played with a fair few Roger designs and enjoyed most of them. I think one of the reasons that this appeals to me is that it really looks like an aircraft propeller and engine, meaning that the goal is reasonably obvious to anyone picking it up.

Propeller is a great looking puzzle, made from aluminium with a textured surface finish and measuring 3.25″ across the propeller, 1.75″ high and 1.5″ deep it’s surprisingly light for its size. There’s no instructions provided, as with many of Roger’s puzzles, and the only hint is the double ended arrow positioned between Roger’s initials to let you know what the goal is.

The Propeller by Roger viewed from the side

The Propeller by Roger viewed from the side

In it’s starting state, the propeller is locked in the horizontal position. The goal unsurprisingly is to get the propeller to spin freely. When you pick the puzzle up, you’ll find that there’s a small amount of play to the propeller, and you’ll hear some rattling from somewhere inside the puzzle. Being a fairly deep puzzle, and having various hex screws protruding from the puzzle, the obvious investigation is to try to tilt and rotate the puzzle to try to find out what is blocking the propeller from rotating. There’s a lot of space in there and your mind will probably be your worst enemy as you try to figure out what’s happening.

As with other puzzlers, Allard and Oli included I too managed to release the mechanism a few times through random turning and shoogling, with no real understanding of what I’d done, and like others would have the mechanism lock up every bit as quickly as I’d released it, again with no idea why.

The Propeller in full spin

The Propeller by Roger in full spin

The real challenge here is being able to repeatedly release the locking mechanism, and allow the propeller to spin freely, and know how to re-lock it. It took quite a bit of time for me to figure out exactly what was happening to the point that I could repeatedly solve the puzzle, and the mechanism is so simple once you understand what’s happening that I really have to smile and tip the hat to Roger for a simple yet challenging puzzle.

This is a great example of a simply challenging puzzle that looks great, needs no explanation, and puts a smile on your face when you know how it works. I have no idea whether I’ll be able to add more of Rogers puzzles to my collection, but don’t pass up the chance to have an attempt at solving this one if you can.

Great Collision

I don’t own too many metal puzzles, however a while back I spotted a rather interesting looking puzzle in the shape of a spiral galaxy on Puzzle Master’s site. At the time it was out of stock, and it seemed that there were a few people looking for the puzzle. Puzzle Master now has it back in stock, so I picked up a copy of the “Great Collision

Great Collision in the starting position

Great Collision in the starting position

The goal is to separate the metal pieces of the puzzle and release the red ball in the centre. Sounds like a fairly simple task however on first inspection, the pieces seem to be pretty well locked together, and there doesn’t seem to be enough room to separate the pieces.

The puzzle looks great with the black anodised aluminium being well finished, and the red ball in the centre really standing out against the outer pieces. Measuring 4″ in diameter, it’s a good sized puzzle, and easy to manipulate the pieces. Given that it’s solid aluminium it has a good weight as well.

The four pieces of the puzzle

The four pieces of the puzzle

Much like the Yin & Yang puzzle I reviewed a long time ago, I think this is more of a good looking object, than a challenging puzzle. It can be a little tricky to get things into the correct position to allow them to separate, however there’s little challenge to solving the puzzle. Putting the pieces back together is also fairly simple although I found it slightly more tricky. It is possible to force the solution; however if you find yourself doing that then it’s time to think a little as there is no force required to solve this one, and the pieces will glide past each other if you’re on the right track. You shouldn’t need a solution, however if you do, you can download one here.

Overall, this is a simpler puzzle which would suit a new puzzler, or a younger puzzler to get them more interested in puzzling. That said, it will look good on the puzzle shelves given that great contrast, and the striking black spiral arms.

Revomaze Gold Extreme

This entry is part 6 of 11 in the series Revomaze

It’s been a while since I reviewed a Revomaze puzzle, and since the last time I talked about them, there’s been a couple of new puzzles released from Ashton Pitt. We’ve had a couple of special editions in the form of an Orange, and a Lime, and the final puzzle in the Series 1 set was released. That puzzle was the Gold, and was shipped almost exactly a year ago.

The Gold Revomaze

The Gold Revomaze Puzzle

I’ve already covered the basic puzzle in my first review of the blue, so for general information on the Revomaze puzzles, I’d suggest reading that post here.

The fifth and final puzzle from Revomaze in the Series 1 is the Gold. This puzzle, like the Bronze and Silver isn’t available as a plastic puzzle in the Obsession line, as it’s not possible to create some of the internals in plastic.

The Gold is rated by Revomaze as having a difficulty of 100/100 (extreme) and an estimated opening time of 250+ hours. The fastest opening so far is listed as 400 hours. It is described as a dynamic maze and is the hardest puzzle to be released to date from Revomaze. Only part of the puzzle is listed as being mechanical. There is also an algorithm, which needs to be solved in order to be able to open the mechanical puzzle. Each Gold is listed as being unique, and I’ll talk a little about that later.

If you’ve read the Silver review, you’ll remember me talking about the “not-a-canyon”, which was an area where the core was able to spin. Something we’d not seen in a Revomaze puzzle previously, and certainly had many of us scratching our heads as to how that could happen. Well Gold starts that way, and really doesn’t get much better.

Very early on in the puzzle, you’ll find yourself going in circles, with the occasional notch you can drop into. You may even find that from time to time that notch isn’t a notch, and becomes a path further into the puzzle. At first it doesn’t seem to make a lot of sense, and if you’re lucky, within a short time, you’ll find yourself with the core as far out as you’ve seen it with any of your other puzzles, but there’s no dot, so you know you’re not finished. And let’s be honest, if the puzzle is rated as the hardest to date, you’d be a little upset if it was that easy.

So you’ve now got the core as far out as you can, but it’s not done much for you, and really at this stage you have little idea what you did to get it here. So you decide to go back to the start, and spend some time trying to figure things out. Of course, getting back is almost as much of a journey as getting to where you are!

The challenge here is to figure out what’s going on and understand what allows you to move from one ‘ring’ to the next. Like any other Revomaze, this puzzle can be mapped although you probably think that’s not true initially. As with any other Revomaze puzzle, I had to sit and map things out, and although it seemed like I’d need to do something special for this maze, it does map out the same as any other and I resorted to my usual Excel based map.

Now as I mentioned previously, the mechanical puzzle is only one small part of the Gold, and that is where many people on the Forums have expressed disappointment, myself included. The reason is that in order to open the puzzle, you need to solve an algorithm, in the form of a set of cryptic clues to be able to get a code which can then be applied to the puzzle to let you open it.

Sound complicated? Well the clues are certainly cryptic, and will need you to think so far out of the box that as of writing this a year after the puzzle was released, no-one has solved the algorithm to the satisfaction of Chris Pitt. That alone tells you all you need to know as far as I’m concerned.

For me, I found the algorithm to be very off-putting. I have loved the Revomaze puzzles from the first one I played with as they are challenging mechanical puzzles. Sadly the Gold is not a mechanical puzzle. It’s a combination lock. You get a code, enter it, and the puzzle opens. That may be over simplifying things, but at the bottom line, it’s exactly what we have.

Chris tried to create a puzzle which could not be opened by cheating, and wanted to have a puzzle were each and every copy was unique. The algorithm allowed him to do that, and with a minimum number of internal parts, each puzzle in the 250 puzzle run could be made unique. Sadly for me, and I know I’m not alone, that also took the Gold away from the original spirit of the puzzle.

When you receive the puzzle, and get the algorithm clues, you’ll also get a three letter code with the puzzle. When you register your puzzle with Revo HQ, you’ll need to send this code as part of the email. From there, you’ll receive another three letter code in return. These are the starting point for solving the algorithm and getting the solution code you’ll need to open the puzzle. Of course without understanding what’s going on in the puzzle, and how you’d apply the code to the puzzle you’re not going to get very far.

You’ll also get a warning that excessive use may damage the puzzle. Given that this was expected to be the most challenging puzzle, with over 250 hours of puzzling expected, what exactly is excessive use. It turns out that the warning was issued because there was some discussion about brute forcing the puzzle by trying every possible combination (in theory 25^3 or 15,625 combinations). I don’t think you’re going to damage the puzzle by trying to solve it, but perhaps trying 15k+ combinations is excessive!

There are clues and useful markers inside the puzzle for the observant puzzler, and there is a lot to learn in the puzzle. I lost track of how long it took me to open the Gold, however I finally opened my copy in August 2012, after playing on and off (mostly off) for eight months. I was number 7 to open the puzzle and there have been only 15 puzzles opened in total so far. Strangely enough the puzzles being opened are a little like busses. There are none opened for ages, and then four come along at once.

Revomaze Gold Open

Revomaze Gold Open

Having opened it, I think it’s fair to say that it is a challenging puzzle, and may well be the most difficult Revomaze released to date. There are certainly fewer people have opened Gold than any other Revo. I don’t think it’s my favourite in the series, and for me Bronze still holds that spot.

Oh, and there is no dot on the shaft if you were looking for one.

The review wouldn’t be complete without me mentioning a few of the issues that have been discovered since the puzzle was released. There have been a few puzzles which had to be returned to HQ for repair, and it is possible to get the puzzle in a state where it is jammed, and you can’t navigate through the puzzle. In most cases, this can be easily fixed without having to return the puzzle, but as with anything that may not always be the case. As with any of the Revo puzzles, excessive force is not required, and could damage some of the parts inside the maze.

I’ve spoken with many other people who have been working on the Gold puzzle, and many people have expressed opinions about their experiences. This puzzle is not for the faint of heart, and will test you far beyond any other puzzle in the series. Just be sure that you’re willing to spend a lot of time thinking and working on the algorithm before you take the plunge and get one. My personal feeling is that the Gold was a let down, and not the pinnacle of an excellent series of puzzles as it should have been. Chris I know has learned a lot from this, and will go on to bigger and better things I’m sure.

If you’re still working on the puzzle, and don’t want to know more, then I’d stop reading now. The remainder of the review is rather candid, and may reveal a few things about the puzzle that you might not want to know. Continue reading