I have been a fan of Jean Claude Constantin’s work for a while. Many of his designs are laser cut pieces which press together making for some very characteristic ‘Constantin’ looking designs and almost all of his puzzles have some unique and interesting mechanic that makes them worth owning. Radbox is another design which is a classic laser cut puzzle box design with some striking features which makes it really stand out. I got my copy from Puzzle Master.
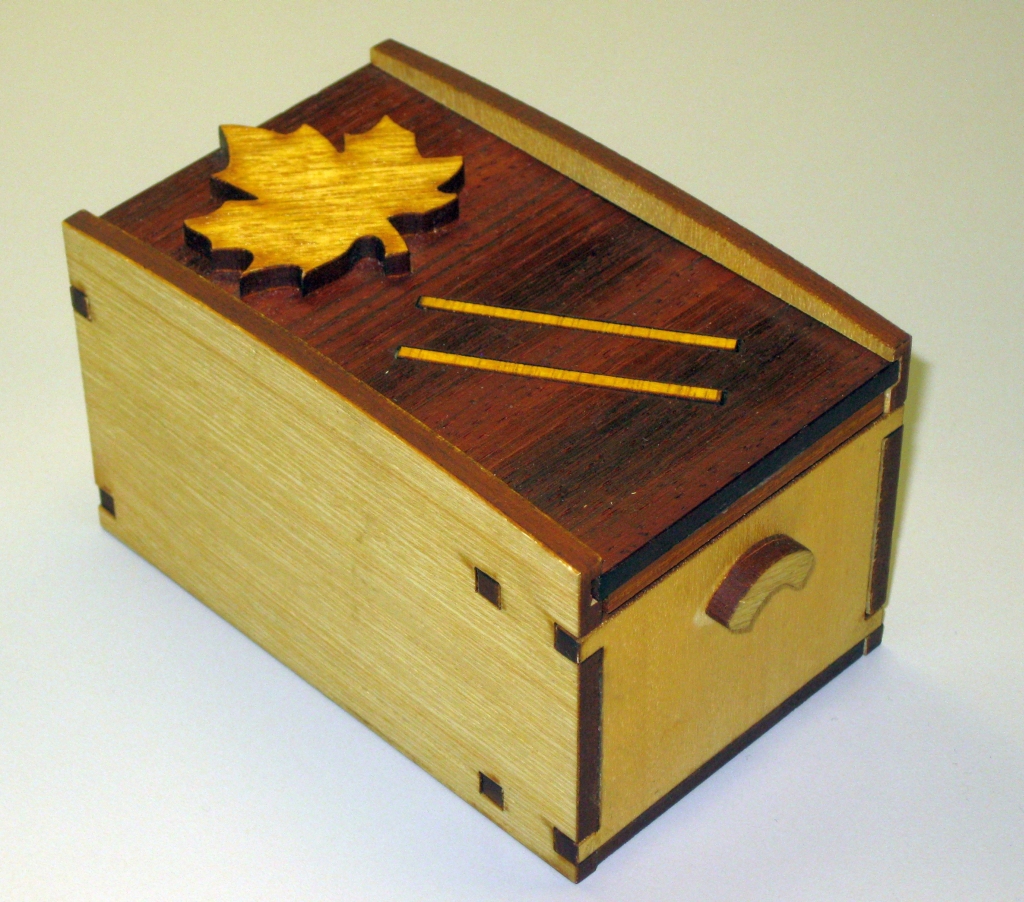
Radbox by Jean Claude Constantin
As you can see from the image above, the design is quite striking. The Maple panels, Paduak top with Maple leaf and banded Maple insets really looks good. If you have any misconceptions that laser cut puzzles are ‘cheap’ or somehow ‘low quality’ then this box is a good example to prove that as a false statement. There are a lot of really nice design choices such as the gentle curve on the top of the side panels and the curved handles on the sides which don’t change the mechanism of the puzzle, but really help to finish the puzzle. At 4.5″ x 2.75″ x 2.5″, the box is a good size, and has very little reduction in inner dimensions so you’ll be able to store something around the size of two packs of playing cards inside.
Examining the box you’ll quickly see that at one end there is a peg attached to the sliding lid, and at the other you can see something curved at the other end, which all together stops the lid moving more than a new millimeters. Shaking the box, there’s a slight rattling, and spinning or blowing on it doesn’t seem to do much to move the lid any further. Some careful examination will lead to some discoveries about how the locking mechanism works, before making you realise that you may not have fully understood what’s going on as the box remains resolutely shut.
The Radbox opened.
The mechanism is simple yet clever and once you understand how it works, you can open the box repeatedly and fairly quickly. Although it is similar to mechanisms I’ve seen in other boxes, it does take the idea one step further making it worth a look. Overall a fun box, and great value if you can get your hands on one.
The Brass Treasure Chest is a Rocky Chiaro design, produced by Puzzle Master. As the name suggests, this is a small Brass puzzle which is made to look like a treasure chest, and like many of Rocky’s designs contains a devilish locking mechanism that will keep you puzzling for quite some time.
Brass Treasure Chest by Rocky Chiaro
Having met Rocky Chiaro when I was at IPP, and being able to spend time talking to him at his puzzle table on the day of the Puzzle Party, it was great to see the passion he has for his puzzles, and to see just how happy he was to demonstrate his puzzles, and talk about them in general. Getting insight into why he made a puzzle the way he did, or having him show me a much better way to solve a couple of his bolt puzzles after I bungled my way through the solutions myself was superb. Currently the only one of Rocky’s puzzle design’s I own is the Brass Treasure Chest, and having played with a number of his puzzles now, I will have to remedy that!
The Puzzle itself is quite small, measuring 2 1/8″ x 1″ x 1 1/4″, and has a good weight to it given that it’s made from a big lump of brass. The front of the puzzle has Rocky’s signature scribed into it, and if you’re familiar with trick opening boxes, that can’t just be coincidence, and will surely be useful when you try to solve it. The box is reasonably well made, although there are a few edges on my copy which don’t line up perfectly, and there’s a couple of small gaps in the seams between sections of the puzzle. You’re going to have to look closely to see it, and it doesn’t affect the puzzle at all, so it’s not something that should put you off. And no, it’s not going to help you to solve the puzzle either.
When you first start solving this puzzle, there’s a couple of things you’ll find fairly quickly as the first couple of steps are fairly easy to find and allow the top of the chest to rotate a small amount. After that, you hit a dead end, and that’s where the really tricky part starts. Moving the puzzle around (or shaking it) will let you hear that there’s a couple of loose parts in there rattling around, and figuring out how they move is key to opening the box fully. This is fairly typical of Rocky’s designs so will give you a good idea of whether you’re going to like his style of puzzle boxes.
Brass Treasure Chest by Rocky Chiaro opened.
After a lot of what felt like blind stumbling I finally managed to get the box open. I really didn’t understand exactly what I’d done to solve the hidden mechanism, and it took quite a bit of fiddling around with the lid open to understand what I did to allow the lid to swing open freely. It’s a challenging little box, but once you understand the mechanism, it can be opened quickly and repeatedly. The first time took me around 45 minutes over a couple of nights of playing and thinking in-between. No solution is provided with the puzzle, but if you need one, you can find it here.
There’s a small space inside as you can see from the picture which could be used to store a very small item. That said, I’m not sure if anyone would actually store anything inside their puzzle vessels. (I know I don’t)
As an introduction to Rocky’s puzzles the Brass Treasure chest is a very affordable first puzzle, and although the fit and finish isn’t as good as the puzzles that Rocky hand makes, it is a great puzzle for the price. As I mentioned, the mechanism is a classic design so it will give you a good idea of whether you’d enjoy his style of puzzle, before spending a lot more money on a handmade original. Having been fortunate enough to see all of Rocky’s puzzles in person, I can’t praise his work highly enough. Anyone who still makes all his puzzle by hand in brass, with no CNC or computer aids and is able to turn out such high quality puzzles is truly a master craftsman.
During the recent Baxterweb auctions I was fortunate enough to win a couple of puzzles. Hinged Box by Eric Fuller was one of those purchases.
Hinged Box – Eric Fuller
This beautiful looking puzzle is made from figured Teak, and really stands out as a great looking box. Measuring 6″ x 4.25″ x 4.25″ it’s not a small box either, so it stands out on the puzzle shelves, despite being a fairly plain ‘box’. The copy I have was listed as having a long scratch on it, but it took me quite some time to find it, and given that it’s underneath the finish, I’m pretty sure it’s been there since the box was made. Not that I’m complaining, it certainly doesn’t take away from the beauty of the box at all. Eric made this box in several woods. Have a look in the Cubic Dissection Gallery to see all the combinations which were available originally.
So why is it called the “Hinged Box”? Well this photo of the back of the box should clear things up.
Hinged Box hinges – Eric Fuller
The back of the box shows two small brass hinges, and hint at the way the box will open. Of course, I’ve had puzzles before which have visible hinges at the back, and they were entirely red herrings, designed to throw you off. In this case however the hinges are real, and when you finally solve the puzzle, the lid swings open the way you’d expect.
I had this puzzle for several weeks before I solved it. My work schedule has been hectic (hence the lack of posts here) and as such I’d pick the puzzle up and play for a few minutes at night when I got home from work, but realise I was far too tired to apply logical thought to the box. As it turns out I found most of the solution fairly quickly. Some simple investigation will reveal a number of sliding panels, and a few panels which look like they should slide but don’t. More poking and prodding will get the panels which didn’t move freed up, and at that point I hit a dead end. I couldn’t see any more forward progress, and as such went backward and forwards with the moves I had found for several days.
One evening a few weeks ago, I was having a fairly good night puzzle wise, and I can only attribute that to having had a Sunday off for the first time in weeks as I’d solved several puzzles that had been sitting on my unsolved table. I picked the Hinged Box back up and within a minute had found the move which was eluding me and had the box open.
Hinged Box opened – Eric Fuller
I’ve been careful not to give anything away as to how the box opens in the photo above, but as you can see it opens the way you expect it to given the hinges. Overall, this is a really nice puzzle, and the final move is very well hidden, and in my opinion rather unexpected. Great puzzle Eric, and I’m glad to have one in my collection.
Secret Base 2 was Hiroshi Iwahara’s 2011 Christmas Present from the Karakuri Club. I didn’t have him as one of my designers last year, but I was fortunate enough to be able to borrow this box to play with.
Secret Base 2
The Secret Base 2 as you might have guessed is based on the original Secret Base puzzle which I’ve not played with myself, but am aware of how the mechanism works. In this case, I think that partial knowledge may have made my solving of this box more challenging!
Made from Oak, Walnut, Birch and Bubinga this puzzle measures 3.5″ x 3.5″ x 3″ and is beautifully finished as any Karakuri box is. The mechanism is wonderfully smooth, and the first movement seems almost magical as the pieces slide past each other. It’s actually a very difficult puzzle to describe without giving much away.
With my knowledge of the original Secret Base, I found the first move fairly quickly, and even the next step didn’t take me long to identify. After that however I was a little stumped. The final movement is rather unexpected and quite nicely hidden.
Secret Base 2 - Partially Open
I’ve taken the photo above very carefully to give nothing away about how this opens, but it does at least let you see the movement of the pieces. Once open, there’s a reasonable sized space inside and unlike the original Secret Box, there’s only one compartment to be found in this puzzle.
Overall a nice box with an interesting twist. Well worth picking up a copy.
Allard, Brian, Jeff and Michael have all written about it, so head over to their pages to find out what they thought.
As I mentioned in my review of the Karakuri Work Kit – Kakukaku Box, here’s the second in the series of builds for the Karakuri DIY boxes. This time I’m looking at the Newton Box, which is a little more complicated that the first box in the series, and in my opinion a much better kit and puzzle! Read on to find out what I think of it, and see the video builds and review.
The Video below is a short highlight reel for the build. I skip a lot of detail here, but it will give you the idea of how the build goes, and I have put my thoughts at the end of the video. If you want the detailed 50 minute video showing all the steps in detail, then jump to the Build Instructions section below.
As promised in the video, you’ll find the instructions below, with my guide to building the box. Be aware that this is in no way a translation of the instructions!
General Kit Comments
The Karakuri group offer a reasonable number of DIY puzzle boxes which they refer to as “Work Kits”. Each of the kits consist of a number of pre-cut plywood pieces, some decorative pieces (like the beautifully made acorn on the Acorn Box), and any hardware needed for the mechanism, if it’s not just a straight forward sliding panel or suchlike. The kits are all perfectly cut, and of the kits I own there have been no issues with the fit or finish on any of the pieces.
Something which is worth noting about the kits is the price. They all come in at around the $25 USD mark, so in terms of affordability, these are really affordable boxes. The quality of the cuts on the pieces is excellent and the fit is as good as you will find with anything from the Karakuri group, so I’d say from that side of things, they’re great value.
One thing to note is that the build instructions for the kits are in Japanese language only. Don’t be put off by that however as with a little thought, and some careful study of the diagrams, you’ll build the kits just fine. Failing that, have a look at my Build Instructions section below, where I have detailed the steps (in English) to build the kit.
On this particular kit, there were a number of the pieces which had small burrs or rough edges that I needed to clean up before starting the build. It’s really not a big issue, and there were no pieces which were poorly made or had any sort of problem that would have meant that the kit did not go together easily. After all these are wooden kits, and each piece is unique. A little patience when starting to tidy things up and you should have no issues.
Kakukaku Kit Review
This is the second of the boxes that I bought from the Karakuri Creation group, and as well as looking good, I was very interested to be able to see the mechanism, which you’d otherwise be unable to see.
Newton Box Kit completed
As you can see from the picture above, the box itself is fairly simple. The ply is visible on the top of the box, but personally I don’t think that’s an issue. If you don’t like having the ply exposed, you could glue some veneer onto the top panel just to make it neater. The decorative handle is made from walnut and maple, and rather than giving you a pre-made piece, you have to put it together yourself, so it truly is a box you built. No pre-made fancy parts here!
Building the kit was fairly simple. There is slightly more to this kit than the Kakukaku box, but the instructions make it easy to follow. The diagrams on the build instructions are very clear, and there’s nothing complicated to this kit, so I didn’t have any issues building it. The build of this box took around 30-40 minutes to put together, and would probably be quicker if you’re not recording a video and talking through everything you’re doing!
I have to confess I really like this kit. The puzzle box is much better than the Kakukaku Box and works perfectly every time. It’s a clever mechanism, but remarkably simple which I like. The box look great, and I think the cube on top really sets it off. The box is slightly deeper than the Kakukaku box, and a little shorter. In total it measures 3.25″ x 3.25″ x 2″ and is a good size in your hands.
As a kit I certainly enjoyed building it, and you will understand the mechanism once you’ve built the box, so it certainly meets the expectations that the Karakuri group set out to achieve. I highly recommend this kit if you’re thinking of buying one (or more!)
Comparison of Kakukaku and Newton Boxes
The image above will give you an idea of the relative sizes of the two kits so far.
Build Instructions
In this section I will try to give my guide to building this kit. Please note that this is in no way a translation of the Karakuri Group’s instructions, but my own instructions based on having built the kit. If you have issues following my instructions, feel free to get in touch and I’ll help you if I can, and update things below to clear up any confusion.
The video below is a full 50 minute uncut build of the box. I show detailed instructions on how to build it, along with tips from my own build experience. If you’re new to this and want some really detailed help, this is the video for you.
Click on the image below for a full size version of the instructions.
Build instructions - Click image for full size
The instructions below match to the numbers on the diagram above.
Tools Needed
Before starting, you’ll need a couple of tools.
Wood Glue / Elmers hobby Glue
Pencil
Ruler (or some measuring device)
Tape – I recommend blue painters tape
Screwdriver (Philips head)
Glue Brush (optional)
Engineers Square (optional)
Step 1 – The Pendulum
First up, sort the parts from the kit into the same order as shown in the top diagram. If you feel like you need to then you can mark the piece numbers in pencil on the inside of each piece. The way the pieces are laid out in the diagram shows the inside, with the exception of piece ‘B’, which will be inside the box and unlikely to be seen so even if you don’t remove the pencil mark, probably not an issue. In my opinion, the pieces are pretty clear so you should need to label them.
Take piece F and mark a centre line in the middle of the piece.
Take piece G and mark a centre line down the length of the piece.
Glue piece F onto piece G, using the centre lines as a guide. As the diagram shows, place piece F towards the bottom of piece G, making sure that the pre-drilled hole is at the top of the assembly, and is not obstructed by piece F.
Leave the top for around 10 minutes for the glue to dry (note if the glue you are using takes longer to dry, then follow the manufacturers recommendations).
Step 2 – Inner Box
Taking the pieces labelled ‘A’ in the diagram, glue the four walls which will make up the sides of the inner box together, making sure that the groove which is cut in two of the pieces is at the top, and the thinner of the two pieces is glued to the bottom such that the groove will allow the piece labelled ‘B’ to slide in and out freely.
Glue the four walls to the base labelled ‘A’ ensuring that the small pre-drilled cube which is glued to the centre of this piece is underneath (not inside the walls you are gluing to it).
Make sure that the edges are square to one another and that they are lined up with the base section.
Using tape, secure the corners of the box, and tape the walls to the base as shown int he diagram. Set this aside to dry.
Step 3 – The Lid
Make sure that piece ‘B’ slides freely into the groove in the inner box that you built in step 2.
Step 4 – Handle / Top decoration
Using the four decorative pieces labelled ‘C’, glue them together into a square, then glue them to the centre of the piece labelled ‘B’.
Set this aside to dry.
Step 5 – The Outer Box
Using the pieces labelled ‘D’ arrange the pieces as shown in the diagram.
Apply glue to the pre-cut notches on two of the pieces, then insert the flat plate with the pre-cut hole into the narrow groove in the bottom of the pieces.
Bring all four corners together ensuring that the flat plate sits in the groove, and tape the corners.
Put this aside to dry.
Step 6 – Putting the pieces together.
Put the inner box from step 2 into the outer box from step 5. Note that the location of the cutout on the outer box will determine the orientation required to open the box. You can put this in any orientation that you want.
Step 7 – Adding the locking mechanism
Turn the assembly from step 6 over, and using the supplied screw and a Phillips head screwdriver, screw the pendulum assembly from step one into the pre-drilled hole. You do not want the screw too tight here. The pendulum should turn freely around the screw to ensure correct operation of the mechanism.
Step 8 – Finishing the box
Glue the large flat square labelled ‘E’ to the base of the box, hiding the locking mechanism. Using some tape, tape the base to the sides until dry.
Some time back I reviewed Wil Strijbos’ Aluminium Cylinder puzzle after being able to get a copy when he made a second run of them. I’d heard so many good things about it, I really couldn’t pass up the opportunity to own one. So when he got in touch to say that the Washer Cylinder was available, a new puzzle along the same lines, I jumped at the chance to add one to my collection. What I’m going to say may be controversial, but I don’t like it. Before you start shouting obscenities at me, read on to find out why.
Wil's Washer Cylinder
The Washer Cylinder is slightly larger than the original Aluminium Cylinder, and unlike the first doesn’t have a sprung top. There’s a hole in the bottom as before, this time much larger than the original, but this time rather than being able to see into the puzzle, there’s a small rod and a washer spinning freely around it. Not all versions have this rod, as the original prototypes had a coin in there instead. It doesn’t affect the puzzle in any way, so really doesn’t matter which version you have. (I’ll come back to that later!) The lid spins freely, VERY freely, but other than that there’s not much else to see here.
The Bottom of the Washer Cylinder
As before, the number on the ‘lid’ of the puzzle is the version number of the puzzle in the run Wil made, but this time, there’s no accompanying mark on the main body of the puzzle. That’s the first clue that this is a different beast altogether. Much like the first puzzle you can hear something rolling around in there, and you’ll probably guess that it’s ball bearings. Pretty much everyone I’ve talked to has some theory about how many BB’s are in there … and we were all wrong.
If you’ve played with the Aluminium Cylinder then I truly think you’re at a disadvantage. You know how that works, and whether you like it or not, you’re going to try the same things in the vain hope that it will help. It won’t but even after reading this, and the many other reviews, you’ll still try!
So why do I not like this puzzle? Well the answer is pretty simple. There is absolutely no feedback while working on the puzzle that you’re doing anything right at all. The tolerances on the puzzle are so fine that you have to perform the solution exactly for it to work, otherwise, nothing will happen. Given that, I really don’t find it a satisfying puzzle. The first gave you feedback, confused you as the BB’s appeared and disappeared in the hole in the bottom, and delighted you when you solved it and the top popped open with a satisfying sound. For me, this puzzle has none of that.
Allard recently wrote a post about what makes a good mechanical puzzle. For me personally, getting some feedback from the puzzle that you’re making some progress (even if it turns out to be negative progress) is very high on my list. If you’ve not read it, then I’d suggest having a look at Allard’s thoughts as it was a good read!
Now I know the opinion above is not the opinion shared by the others who’ve reviewed it, it is my feeling, and I’ve always been honest in my reviews. Have a look at what Allard, Jerry, Kevin, and Oli have to say.
Now having told you why I don’t like it, I do think it’s a very clever puzzle. The mechanism is simple, yet deceptive and it does work flawlessly every time. Despite the instructions from Wil, I’d disagree that no force is required. There’s no force required initially, but the final step may require a little force to start the opening process. It’s not excessive, but having said ‘no force’ may lead some people not to make that final step towards opening it.
It took me a couple of days to get this open, probably 6-8 hours in total so it certainly had me stumped for a good while. When I was trying to find something to help, I managed to unscrew the rod in the base of the puzzle. On doing that I emailed Wil to check that it wasn’t part of the solution and that I hadn’t broken anything. Wil confirmed on both counts that I was on the wrong track and that it wasn’t going to affect anything. Knowing that it wasn’t an issue, I left the rod out as I hoped it would let me hear what was going on in the puzzle a bit better. It may not have helped at all, but it made me feel better! Once I had the puzzle open I decided to replace the washer with a coin as I prefer the look. (Sorry Wil!)
The washer and peg replaced by a 1 cent coin
When you’re putting the puzzle back to the start position, it’s possible to get things stuck if you turn the puzzle over and the washer drops off the rod. Not a big problem, but something to keep in mind!
Being one of the first 20 people to be sent a copy of the puzzle from Wil, he kept in touch and I was aware of a lot of discussion around the puzzle. Wil was great at keeping in touch, and sending out updates as to when various puzzlers had solved it. As such, I was aware of a number of reports of issues being found. Sadly, given the tight tolerances, and the nature of metal on metal there were some cases where the puzzle got jammed, and as a result it was possible to open the puzzle without going through the intended solution. Wil was actively looking for input and thoughts on the puzzle, and I think he’s looking at improving the design, so fingers crossed this will get better in future copies.
Despite what I’ve said, I do think it’s a nice puzzle, and I am happy to have one in my collection. It’s beautifully made, and the work that went into it is clearly the high quality Wil always makes. Would I recommend it to someone else? No, I really don’t think I would. I’d say get the original, as I personally think it’s a far better puzzle.