Tag Archives: Saw

Unhappy Childhood

No, this isn’t a post about how I had a hard life growing up, or anything of that nature. I had a pretty happy childhood as it happens. Most of you will know already, that this is one of Stewart Coffin’s puzzle designs, #41 in his numbering system, consisting of 10 pieces, made from 5 cubes each, which come together to form a 5x5x2 rectangle with a checkerboard pattern.

Unhappy Childhood, boxed in the unique checkerboard solution.

Unhappy Childhood, boxed in the unique checkerboard solution.

This particular copy was made by me and is made from Rosewood and Maple, with a Myrtle Burl box. It measures 3.7″ x 3.7″ x 1.5″ for the pieces, and 4.25″ x 4.25″ x 1.7″ in the box.

This is a pretty tough puzzle to solve, as there is only one solution where you end up with the checkerboard pattern on both bottom and top as you can see in the picture above. There are however 2,408 possible solutions if you ignore the checkerboard. So no shortage of ways to get a 5x5x2 solution! (Stewart Coffin reports that “a computer analysis by Beeler, these pieces pack into a 5 x 5 x 2 box 19,264 different ways”, however Burr Tools shows just 2,408)

The following is a look at the creation of this puzzle. Hope you enjoy!

This is one of the puzzle designs that I had been looking at making for a while, since it seems no-one has made any in some time, and I don’t have one in my collection. Really that’s where this all started, looking to add a new puzzle to my collection, and having spent (far) too much on puzzle already this year, what better way than to make it myself.

It all starts with cubes

It all starts with cubes

So the puzzles that I’m making currently are all cube based, and that’s where it all starts. 50 wooden cubes, 25 Rosewood, and 25 Maple is the starting point for the UC. The darker tops on some of the Maple cubes at the bottom of the picture is actually the natural wood. Since I love the look of wood, I’m not selectively removing pieces which don’t look perfect. After all each puzzle is unique given the grain and natural colour of the wood, which is something I love. When I put the pieces together, I’ll orient the pieces so that very little of this is visible, because I’m really aiming for the contrast between the two woods in this puzzle. If the couple I’ve made, only one has this distinctive colouring on some of the pieces.

50 Cubes to be Bevelled

50 Cubes to be Bevelled

One row done, 9 more still to do!

One row done, 9 more still to do!

Half way there!

Half way there!

Some time later, and I'm done!

Some time later, and I'm done!

This is one of the most time consuming parts of the process (currently). I have to take all 50 cubes, and put a very small bevel onto each edge of the cube. All in all it takes between 1.5-2 hours with my current method. There’s been a fair old discussion in one of the puzzling forums about beveling cubes, so I’m sure I can cut this down significantly, but that’s going to need a new jig, and some more tools in the shop so for now I’m stuck with what I have.

If you’re interested, the checkerboard piece of wood in the pictures isn’t some sort of template, it’s actually what will become the base of the box that the puzzle sits in. I just happened to be working on it at the same time, hence it ended up in the pictures.

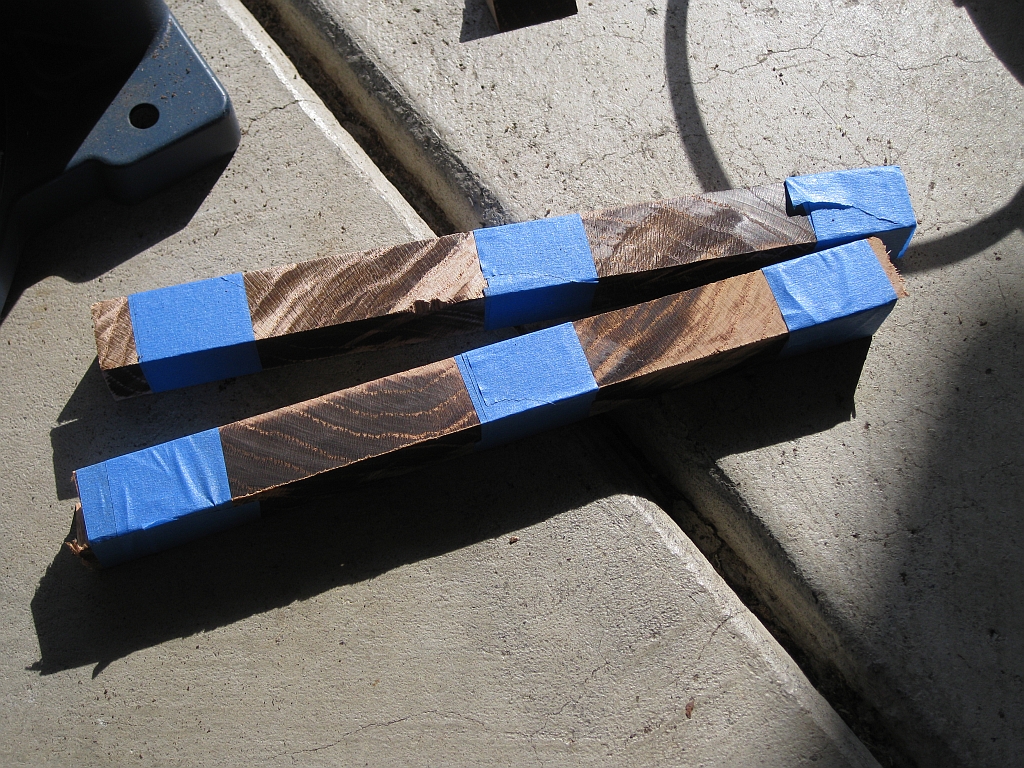
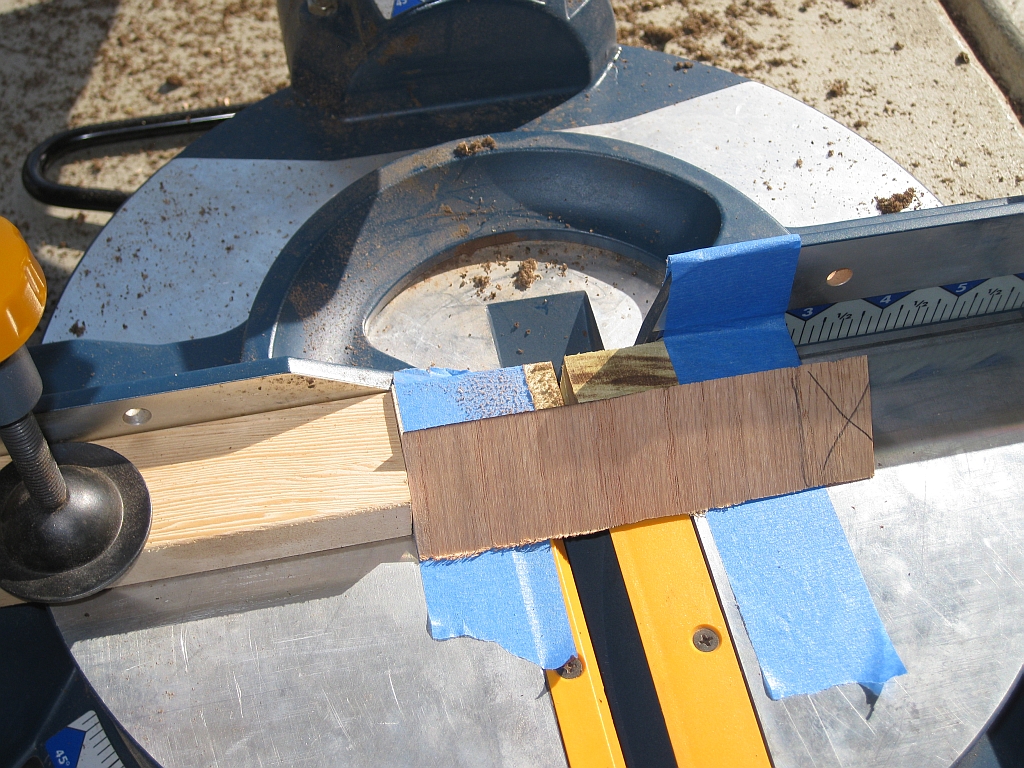
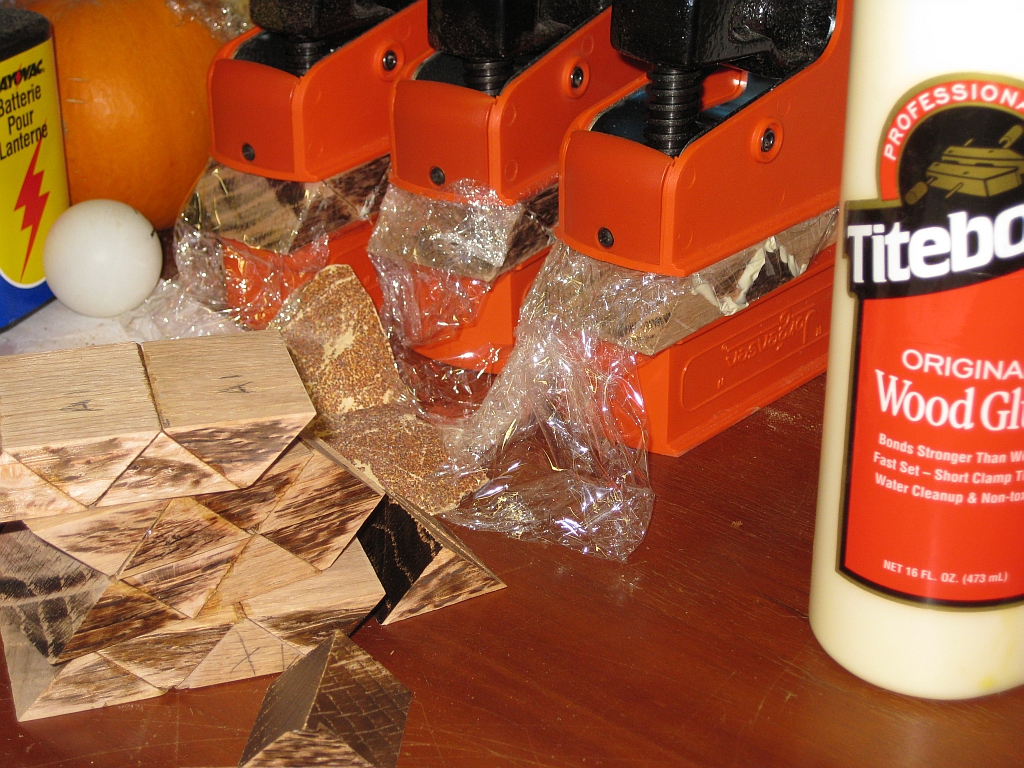
Next up I made the 10 pieces of the puzzle from those 50 cubies, and as it happens I don’t have any pics of the process. I’ll need to take a few from the next one I make and update this at a later point. Anyway with that done, I turned my attention to the box. I now had dimensions for the box, based on the final size of the pieces, so I took the burl I was using to the saw, and cut it to the right lengths for the box, and created a dado in the edges of two sides, to allow me to get a stronger joint for the corners.

The outside edges of the box

The outside edges of the box

Despite the very small contact area, wood glues are remarkably strong, and will hold the frame together with no issues. In fact, to take it apart would probably break the wood, before the glue would let go. Using blue tape, I tape the corners, (no clamping required) and that will hold the box well enough for the glue to set. I do a quick check to make sure that the corners are square, and leave it to dry, while I turn my attention to the base.

The unfinished base, with the sides sitting on top

The unfinished base, with the sides sitting on top

As you can see, the base is unfinished. The pencil marks were to allow me to line up each of the strips for gluing everything together. As you can see I still have some sanding to do, since there’s glue and all sorts on the base. Thanks to the random oscillating hand sander I got for my birthday, it will make short work of that!

A quick dry fit before gluing the box together.

A quick dry fit before gluing the box together.

With the sanding done, I have a quick dry fit with the pieces in place to make sure everything fits as expected before gluing the base in place. Note at this point, Ive sanded the inside of the box to its final point, as it will be pretty touch to get into the corners once it’s all glued together, so best do that before the final glueup.

Box glueup from the top

Box glueup from the top


Box glueup from the bottom

Box glueup from the bottom

It’s probably worth pointing out at this stage, that I’ve spent around 3-4 hours making this box. Given that I decided I wanted a checkered base, that meant cutting thin, equally sized strips, gluing them together, then cutting them into strips once dry, flipping the strips to create the checkerboard, and re-gluing, then sanding, etc etc. All in all probably the most labor intensive part of the puzzle build, but hopefully worth it!

Finishing.  First coat of thinned lacquer applied

Finishing. First coat of thinned lacquer applied

With all the individual pieces ready, it’s time to look at finishing the puzzle. The box was all sanded on the outside, and it’s looking pretty good. I start off by applying a coat of thinned lacquer to all the pieces. It’s 1 part lacquer, 2 parts thinner that I’m using. It gives a very thin coat, but does the job or really making the grain pop. If you compare this to the pictures of the dry fir you’ll see what I mean.

First Coat of Watco Satin Wax.

First Coat of Watco Satin Wax.

Second Coat of Watco Satin Wax.

Second Coat of Watco Satin Wax.

Once that’s dry, the puzzle gets two coats of wax. I’m using a liquid wax, Watco Satin Wax to do the job. I leave the wax for around 5-10 minutes, then wipe off any excess with a rag. This is building up a nice finish on the pieces, but there’s still one more step to complete the process. That’s a final buffing with some Renaissance Wax.

The pieces, next to the finished box

The pieces, next to the finished box

A final view from the side, showing the effect of the checkered base.  The myrtle burl box almost looks like its floating.

A final view from the side, showing the effect of the checkered base. The myrtle burl box almost looks like its floating.

The final puzzle ready to be played with!

So there you have it. I hope you enjoyed the build as much as I enjoyed making it.

From Square Sticks to Cubes

I recently wrote about the first of my puzzle making jigs to create square sticks as the first stage in creating the building blocks of many puzzles. With that jig successfully completed, and working pretty well, I had to move to the next stage and create some cubes. I said in the Square stick post that I’d tell you about it soon. Well, soon is now, and it’s time to make a crosscut sled!

The starting point for a crosscut sled

The starting point for a crosscut sled

For this jig, I needed a larger platform than the square stick jig, and as such I was going to be using both miter slots on the table saw. I cut myself a slab of MDF and marked it up for adding runners. I don’t have enough of the fancy metal miter bar that I used for the last jig, so I made my own. Starting with a strip of wood rough cut to the correct size for my miter slot, I sneaked up on the correct width by taking thousands of an inch off at a time until I had a snug fit. It didn’t take as long as I thought it might, and I think I now have an even better runner than the metal versions I used on the first jig.

My intention was to drill and counter sink holes in the top of the sled and screw straight into the runners below. Sadly that didn’t quite work out as planned as I didn’t have screws which would fit. What I had was either too short or too long so I had to go to Plan B. I decided to screw through from the runner side into the base. As it turns out, it wasn’t too much of a change and in the end achieved the same end result.

Runners mounted and a slot cut

Runners mounted and a slot cut

With the runners mounted, I flipped the jig over and tested the fit in the miter slots with the blade below the table. I had a couple of spots which were binding slightly, so I lightly sanded the offending areas until I had a tight but smooth fit with no wobble in the jig. For anyone wondering, the way I found out where the runners were binding was to run a sharpie along the length of the runner sides, then move the jig in the slots. When you take the jig back out, where the sharpie has been rubbed away is where you need to remove a small amount of material. Simple yet effective!

With the sled moving smoothly, I raised the blade up, and cut myself a slot part way through the sled. That slot will help aligning the crosscut fence as I need it to be perfectly square to the blade. Without having the blade through the sled that would be almost impossible.

Some reinforcement across the back of the sled.

Some reinforcement across the back of the sled.

Given the slot I’ve just created, I now have a potential weak point in the sled where it could flex, and degrade the cut. Despite how it may look in the photograph, I wasn’t trying to create a wing to add down-force to the sled.

Each of the three spacers on either side is screwed to the piece below with three screws, and gives enough clearance that with the blade raised to the point that the blade stiffeners are just below the base of the jig, it doesn’t cut into the cross bar. The cross bar keeps either side of the sled stable and prevents any twisting or warping of the sled. Yet again simple but effective. (I’m liking the fact that I can keep things simple. Less chance of things going wrong!)

A beautiful Dragonfly that stopped to see what I was doing

A beautiful Dragonfly that stopped to see what I was doing

Given that it was getting on for around 5 hours that I’d been working on the saw and building the jigs by this point, I took a break, stretched out my legs and back and relaxed for ten minutes. While I was doing that, I spotted a dragonfly floating around the garden. Standing watching him for a few minutes, he landed on the radio antenna for our car. Given that I still had the camera in my pocket from taking pictures of what I was doing, I grabbed it, as he posed for me! Looking at the pictures later, there really came out well, so I thought I’d share…

Anyway, back to the jig …

Adding the fence and a stop

Adding the fence and a stop

With the back reinforced, I had to add the fence to the sled. The important thing here is that it is at exactly 90 degrees to the saw blade. If it’s off, then the cut will not be square, which isn’t going to make for a good cube. Using the best square I have, I sat one edge against the blade, and the other against the fence board I’d cut. Keeping both edges in firm contact, I drilled one screw hole, counter sank and then screwed the fence to the sled at one corner. With one corner in place, I double and triple checked the fence was square, on both sides of the blade (using two squares). That may be a little overkill, since the blade shouldn’t be different on either side, but I figured it couldn’t hurt!

Everything checked, I pre-drilled and screwed the other side of the fence to the sled, and checked again for squareness. With everything looking good, it was time to add the stop. Now this was something that I’d been puzzling over for a good few days at this point, and hadn’t really figured out how I was going to perfectly measure the offset so that I ended up with good low tolerance cubes. As is ever the case, the answer came to me when I least expected it, in the shower in the morning before heading to work.

The answer. Make sure that the stop is far enough from the blade to make the biggest cut you’ll need, plus a bit. The reason … Well if you properly size a piece you want to cut (and I’ll get to that) then you can use that piece against the stop, then cut a ‘spacer’ by placing it against the fence, and the piece you want to cut, then cut that piece. You get a perfect spacer, and no complicated measuring required. (Other than the piece you want to end up with). Yes, I know that’s all very confusing, but I’ll annotate the pics below and it will make more sense!

Clamp removed now that the stop is screwed in place

Clamp removed now that the stop is screwed in place

Having screwed the stop in place I could remove the clamp. The stop is placed 6″ from the blade. I’m unlikely to ever cut a stick that needs to be 6″, unless perhaps I’m making 18 piece burrs, so this is lots of space to create whatever sized stick I need.


Creating the spacer for a single cube

Creating the spacer for a single cube

If you click on the image on the left, you’ll see I’ve annotated it to make my previous explanation simpler to understand. The single cube in walnut was created by shaving a few thousands at a time from the edge of the block and measuring after each pass until it matched the dimension of the square stick. In some regards, that is probably the most time consuming part of the process, as if you take off too much, then it’s a case of starting again.

With the first cube created by hand, it can be placed against the stop, then a long stick placed against it to create the spacer. In the diagram, you’ll see I created mine from some of the redwood sticks I’d cut when I was testing the square stick jig.

Batching out some cubes

Batching out some cubes

Now it’s a simple task of swapping the order of the pieces so that the spacer is against the stop, and batching out some cubes. I’ve used a clamp to keep the spacer in place, both against the fence, and hard up against the stop to make sure that it doesn’t move between cuts. It’s also important after each cut to clear out any dust that gets between the block and the fence as this will affect the accuracy of the cut. It is possible to adjust the spacer by adding feeler gauges between the stop and the spacer and before each run of cubes, I’ll need to check the sizes to make sure everything is within an acceptable tolerance.

Running through a few cubes, each cube came out almost perfectly. The worst cube had a tolerance of 0.001″ from the size of the square sticks. I can’t really complain when the cuts are that close. It’s going to be pretty good for any initial puzzles I make.

Making double size cubes

Making double size cubes

Now with a few cubes cut, I measured them, and selecting two that were exactly cubic, I placed them together and verified that the length was exactly double that of a single cube. Repeating the process I had used for the first cube, I cut a ‘two cube spacer’. This spacer will let me make double sized cubes, perfect for making any of Stewart Coffin’s Convolution/Involution/Involute puzzles.

Let the fun commence!

Cutting Square Sticks

The start to many a good puzzle is a square stick. But not just any square stick. One which is accurately sized along its length and each side square to its neighbor. Not an easy task.

A while back, Scott Peterson sent me a tutorial for building a table saw jig to create square sticks. Over the Labor Day weekend which is a holiday for us in the US, I set about making the jig (mostly) following Scott’s tutorial so that I’m firmly on the road to making my own puzzles. Scott kindly game me permission to make the tutorial available to anyone that wants it, so feel free to download a copy.

The following is my attempt at creating square sticks …

Starting off with a sheet of 3/4″ MDF I cut myself a strip that was wide enough to go between the miter slot and just past the blade of the saw. I left a good sized area on the other side of the miter slot so I had room to attach a handle to help push the jig through the cut, and back after the cut. I marked the position for the miter bar and after pre-drilling the holes, screwed it in place.

Preparing to attach the miter bar.

Preparing to attach the miter bar.

Miter bar attached to the base of the jig

Miter bar attached to the base of the jig

The miter bar that I bought has plastic screws that protrude from one side to ensure that the bar is a perfect for for the slot. Taking some time I adjusted each of the screws to make sure that there was no wobble in the slot, as this would compromise the cut.

Taking Scott’s advice, I also added a UHMW plastic base to the cut side of the jig to back up the cut and help prevent tearout. Using blue tape I secured the plastic to the base, and marked out the positions for the screws, predrilled, countersunk then screwed the plate down. The Blue tape came in really handy as it’s almost impossible to mark the UHMW plastic with a pencil.

UHMW plastic set in place ready for drilling and screwing

UHMW plastic set in place ready for drilling and screwing

The UHMW screwed down.  Note the screws are all below the surface of the plastic

The UHMW screwed down. Note the screws are all below the surface of the plastic

With that done, It was time to make the first cut, and trim the extra material that I had left off the edge of the jig, ensuring that the blade ran along the edge of the jig which is needed for an accurate cut. Making sure that the blade was at 90 degrees to the table top, I made the first cut. And immediately noticed that there was a gap at the front of the jig which wasn’t there at the back. It was pretty small, but enough that I could see light between the blade and the jig, so I knew the jig wasn’t good enough. It seems that I didn’t do a good enough job of adjusting the miter bar, so I readjusted, and remade the cut. Fortunately, I’d left enough space between the edge of the jig and the screws holding the UHMW plastic down to be able to do this. This time things were much better and I got the accurate cut I was looking for.

Ready to screw the fence to the jig

Ready to screw the fence to the jig

The magnets to hold the steel bar in place

The magnets to hold the steel bar in place

Fence screwed gown and ready to go.

Fence screwed gown and ready to go.

Next up I need to install the fence on the sled which the stick will be clamped against when making the square sticks. As Scott notes in the tutorial, I have a steel bar as a spacer, and use some brass feeler gauges to get an accurate cut. I also embedded some Neodymium magnets in the fence to hold the steel spacer firmly against the fence. The fence is clamped securely against the saw’s rip fence, then predrilled and screwed down.

Those eagle eyed readers out there may notice a couple of extra drilled holes in the fence. Well yet again, I managed to get things a bit wrong, and screwed the fence in a little squint. Now that’s not a lot of use when you’re trying to get accurate cuts, so I re-drilled and re-attached the fence. So there’s a couple of extra holes there now. It won’t affect the jig, but a squint fence would have!


Adding some toggle clamps to the fence and I have something where my fingers are well out of the way, and the sticks will be firmly held against the fence.

Cutting a stick square

Cutting a stick square

Ten minutes later; five identical sticks

Ten minutes later; five identical sticks

With everything set, It was time to put some sticks in there and see if I could make some square sticks and whether they would be accurate or not. At this point I was looking to test the jig, so I used some redwood I had to spare, and ripped it into roughly sized sticks. Now you’ll notice the knots in the wood so even I knew things weren’t going to be perfect. Still it was good enough for a test.

Measuring the sticks using my digital calipers, I am getting sticks with a 0.005″ tolerance between either end of the 12″ sticks. That’s not too shabby. Given the knots in the wood, which will most likely make it twist as the knot is cut, I’m fairly happy with the results. At this stage in my puzzle making career, it should be more than accurate enough for making cube based puzzles, and burrs.

But that’s not the end of the story ….

I came back to the jig in the morning, used some walnut that I had bought a few weeks back for making puzzles, and used that to get some square sticks. The walnut is much nicer wood, no knots, and a beautiful grain to it …. The results. I cut four 9″ long sticks with a tolerence of 0.002″ across all four sticks. Now that’s a result I’m proud of!

Next up, I need to create a crosscut sled so that I can cut these sticks into accurate cubes for use in making puzzles. That post is coming soon, so stay tuned.

Building a Matrioshka (Part 1)

This entry is part 1 of 3 in the series Building a MaTRIOshka

I’ve had a bit of a break from working on my own puzzles, as work and life in general have been rather hectic meaning I’ve just not had the time. However over the Easter weekend, I had three whole days that I could do something puzzle related. I’ve still not been able to pick up some wood to get back to working on my burr cube, however I did have a lump of oak left over from the box project my oldest son wanted to make as a birthday present.

After reading Kevin’s review of the Matrioshka here. I noticed that the puzzle is entirely made of triangles. Now I just happened to have a number of leftover ‘scrap’ that would fit the bill perfectly from the box. So I sat down with a pencil and paper to figure out how Vinco created his box, and see if I could replicate it.

Note: This project is purely for my own learning, and experience in working with wood to build puzzles, at the scale I need to be working at to create my own puzzles. This is not for sale. If you like Vinco’s puzzles, please buy them, they really are great puzzles, and the craftsmanship is superb. I own several of Vinco’s puzzles, and highly recommend them.

With all that said, on to the build …

To break down how the puzzle is built, we need some good photos. Kevin happened to upload some excellent pictures, and I’ll not repost them here. Go read his review and have a look if you’re interested. The bottom line is that the outer shell is made of 54 idential pieces. They are equilateral triangles on the edge, with a piece length that is twice the length of the side. So, I set about creating 54 identical pieces.

The first thing was to cut the wedge shaped strips of wood which I would eventually cut to the correct length. I took out my mitre saw, and set about making the cuts. One small issue I had was that the amount of the blade in contact with the wood generated a lot of heat, which warped the strips I was cutting. As a result, I had to tape two together as they cooled to make sure the wood was going to end up straight again when I was ready to cut it to length.


With all the strips cut, I had to cut them down to the correct size for each piece. I measured one piece, cut it and checked that it was exactly right. With that done, all I had to do was clamp down a stop, put a sacrificial fence in place and start cutting. As you’ll see from the photo, I used a scrap piece of wood as a zero tolerance fence to avoid chipout on the pieces I was cutting. It just saves some time later.


After about half an hour, I had a reasonable pile of pieces next to me, and it was time to do a little rough sanding before gluing up the pieces.


With the rough edges sanded down so that things were a bit neater, and all the pieces labelled to make the glue-up easier, it was time to get the clamps out. The shape of the pieces I was gluing up made things a little more challenging, but with a few of the scraps from cutting the pieces out, life was made simpler again.


It’s worth noting at this point, that all these pieces are oversized. This gives me a little bit of material to work with so that I can sand and fine tune all the pieces. For this to look good, it has to have a tight(ish) fit, and the only way to do that is to make sure the pieces are all the same. Despite using the fence, and stops on the saw, not all my pieces came out to be the same size. After all, I’m still learning, and you could say that this is an ambitious project. That said, how do we learn if we don’t push ourselves?

In the next post, I’ll continue with building the Matrioshka and think about putting each of the six pieces together that will form the final puzzle.

Wood is sharp

This is not directly related to puzzles, but I felt it worth posting regardless as it does tie in to my progress from puzzle solver to puzzle designer.

Last night I was asked by my oldest son to help him to make a box for my youngest son who’s 13 today. So given that I plan to look at building puzzle boxes, that’s my tenuous link for posting this. (Run with it … there’s good info in here!)

So he wanted to make a box to hold his brothers Bakugan toys. A nice gesture, and who doesn’t want more storage, especially when it’s made from wood? We picked up some Red Oak to use as the sides and some Yellow Poplar as a base. The different coloured woods should give a nice enough contrast, and given that this was last minute, it had to be something we could put together in one night. Nothing like a last minute challenge!

Given that this was to be a simple box, I went with a straight forward 45 degree cut at each corner to create the outside of the box, which would be glued together creating the walls. After the first piece was cut, I picked it up to move it to the side, and in doing so, sliced my finger open at the side of the nail. But it’s only wood, surely it can’t be that sharp?

The problem is that the Red Oak has a hardness of 1290, and is a reasonably dense wood. While it’s not the most dense, or hard, it’s substantial. What that meant was that when we’d cut the 45 degree angle, the thinnest point was really thin, and it kept its edge. IT effectively created a knife on edge of the cut.

So if you’re looking at building puzzles, and you’re going to put angles in there, remember, wood is sharp.

For all those experienced wood workers out there who are currently thinking “Well duh, of course it is”, I apologise. I am neither an experienced woodworker, or puzzle crafter. I learned something very useful last night, and hopefully others will take something from my experience.

More real puzzle stuff coming soon.

Tools for the Job

So now that I’m starting to transfer the design I have from Lego into wood, it probably makes sense to talk about tools.

I’ll freely admit that I’m not a professional woodworker. Far from it. I just enjoy playing around, and I’m still very much at the bottom of the learning curve. That said, I’ve had a few successful projects and I’m slowly working from the simpler to the more complex creations that I want.

So first up, I have a host of hand tools, including various saws, block planes and chisels. I may not be an expert in using all of them, however I manage to do what I need with the limited experience I have. I also have a small hand held Dremel with some router attachments and various cutting/sanding/etching bits that I can play with. The two larger machines I have to play with are my 9″ Band Saw and a Drill Press.

When it comes to getting clean repeatable cuts the band saw is indispensable. It also allows me to create fairly complex cuts and curves so I can do some interesting and fairly intricate work if I need to. Best of all, if I cam trying to cut down some of the larger pieces of wood to the size needed for whatever puzzle I’m working on, the band saw makes it quick and easy to do.