Recently I wrote about my first attempt at building a puzzle in wood, from scratch. You can read about that here.
At the end of that post, I had a working puzzle, that I was very proud of, but it still wasn’t finished. By that I mean that it was finished to the point it worked as a puzzle, but there was no finish on the wood. So I set about resolving that and with advice from a few fellow puzzle makers, here’s the result of that process.
Involute - Lacquered and unfinished side by side
First up was to sand the outside of the puzzle, so it is ready for the eventual finish, and to break all the edges of the puzzle. Working my way through the grits, I sanded at 120, 150, 180 and 220 grit. Straight off the saw, the edges are all very sharp, and it’s not the nicest thing to hold. By passing the edges over some 220 grit sand paper, it takes that sharp edge off, and makes the puzzle much more appealing in your hands.
Next thing to do was to apply a coat of lacquer to the puzzle pieces. This does a couple of things. It brings out the grain in the wood and gives some sort of protection to the wood from our greasy fingers. Going with some recommendations, I used 1 part satin lacquer, 2 parts lacquer thinner to apply a very thin coat. Leaving the pieces for 10 minutes after applying then rubbing off any excess with a soft clean rag.
The results are pretty obvious when you look at the two puzzles side by side. Given how much time I spent getting the tolerances right, you’ll be pleased to know that the lacquer really doesn’t add any thickness to the pieces given how thinly the lacquer mix is applied. It’s pretty much flush with the surface, so no real issues that I can tell, and my puzzle making friends seem to concur.
After that it’s time to apply a couple of coats of wax to the pieces. This helps to make sure that things slide nicely. I had a liquid wax recommended to me, as it’s much easier to brush a liquid into a corner than it is to use a wax paste and a rag. If you’re interested, I’m using Watco Satin Finishing Wax.
Finished involute, the Ren wax just adds that extra polish
Finally I use some Renaissance Wax to buff and polish the outside faces. It’s not cheap stuff, but it is effective. You really don’t need much which is probably just as well. This really brings out the wood, and gives a good protective layer to the outside of the puzzle. If it’s good enough for the British Museum, its got to be good enough for my puzzles!
If you’re wondering, the first fully completed puzzle is now in the collection of a good friend. I’m waiting for him to open the puzzle to let me know what he thinks of it!
Some of you who read my blog may already know that I had purchased a new table saw to add to my arsenal of woodworking tools, and that I’d had a few issues in getting it to me. I purchased this saw from Home Depot, they shipped it to me the next day, and it traveled from the east coast US, to San Jose in the West coast, over the weekend. It then sat in San Jose for a full week before it made it to my house. It was somewhere within 30 miles of me, but not at my house. This was frustrating to say the least, however Home Depot, also frustrated by the length of time to deliver refunded the delivery charges (which were not insignificant!). So thanks to Home Depot for that. Just change your carrier please!
Anyway, now that I have the saw I spent most of my Sunday building the saw, and setting it up. So for those who are interested, here’s my thoughts on setting up the saw, and the saw itself.
Opening the Box
Opening the box and removing the top sheet of cardboard, you’re treated to an array of well separated parts. The fence, mitre, magnetic push stick instructions and screws all have their own spot. My only note here is that the spaces in the pre-formed polystyrene are a little large for a few items, which could lead to things sliding around more than necessary.
Opening the Box, revealing the saw itself
Having removed the top layer, the orange body of the saw is exposed along with all the legs and side panels that it will eventually sit on, and the rails for the fence. Again the packaging here isn’t perfect, as that front rail for the fence is rather free to bounce back and forth. Fortunately nothing was damaged. As you can see, the motor on the R4512 is now inside the case, unlike previous models where it was external.
At this point, the instructions tell you to lift the saw out of the box onto two thick planks of wood. Lift …. seriously! I took down a 2×6 board of redwood I had, and ripped it in half to put the saw on as the instructions recommend, then slit the cardboard box open, and with some help, half slid, half lifted the saw onto the boards.
Taking the saw out of the box
The boards that the saw is resting on are supposed to make assembly easier. It certainly helps for attaching the table top extensions. Here’s my first gripe. The extensions are steel, and not particularly thick steel at that. While the main table top is cast iron, clearly Ridgid have decided to save money and not supply cast iron extensions as they did on previous models. This may work to my advantage as I’m waiting on the Benchdog Router table extension to arrive, which will replace one wing, and allow be to attach the wing I remove to the other side. Given that the steel will be lighter, it should require less support.
Using the cardboard from the top of the box, I assembled the base. The instructions at this point however are pretty poor. Initially, I thought all the panels were the same size. WRONG. I realised this when I was putting the last panel in place and found I had a trapezoid, and not a square (or rectangle) as expected. After a quick adjustment, I was back on track. The instructions state that a particular panel is the front, so that’s fine. What they don’t tell you is that the two sides with the Ridgid name indented in them are different, and it matters (slightly) which one is where. Anyway, I didn’t realise this, and in the end it doesn’t matter, but it would have been nice if it was clearer.
The saw with its legs and lift system assembled
Legs assembled, and dust chute in place, the legs get placed onto the bottom of the saw, and screwed in place. Next up is the lift system to allow you to move the saw around. This is going to make things much easier for me, as I don’t have the space to keep the saw in a single location permanently (yet).
Again, the instructions completely fail here. When putting things together for the lift, the diagram shows the orientation of the pieces, but neglects to mention how the bar has to be rotated before putting the wheels on. As a result, I had all four wheels attached, then had to remove them and start again once it became clear that things weren’t going to work. Not a big problem, but the instructions could have been clearer here.
Getting the saw Upright
Now it’s time to get the saw upright. Knowing how heavy it is, I draft in some help in the form of my 16 year old son, and my fiancée. Very gently, and carefully the saw is first lowered onto its side, where my fiancée complains that she’s now covered in oil from the coating on the table top. (Perhaps laughing that this point wasn’t my best idea). Then we lift it up onto it’s feet. At this point, I realise just how high the saw is. It’s taller than I had expected, but actually sits at a really good height so you’re not bent over the saw when you’re working. Something that’s going to be important if I’m making lots of repetitive cuts for puzzle pieces.
Nearly there, and looking like a saw now
The next few hours saw me assembling the rails for the fence, the blade, where I shed a little blood to the project, but not in the way you’d expect, and leveling up the extensions to give myself a flat surface across the entire table. Add to that cleaning the oil from the cast iron, and polishing the surface up, and we have a nearly ready saw. So how did I shed blood? Well when installing the blade (I’m still waiting for my new Freud blades to arrive) you have to release the lock for the splitter at the back of the saw. I did so, and unfortunately, caught the skin of my thumb on that splitter as it’s a really tight mechanism. Cursing (more because I was now bleeding on the saw than anything else) I stuck a plaster over it to prevent any further blood getting on the saw and continued assembly.
This is where I found out about the panels on the base needing to be in the opposite orientation. You might see in the picture above the holes either side of the Ridgid name. These are for two brackets which presumably hold the power cable when not plugged in. Needless to say I didn’t bother adding these.
You’ll also notice that the saw has a built in Blade and spanner storage right on the side of the saw. I doubt I’ll put my spare blades there, but the tools will certainly be kept where I’ll not lose them. The miter also slides into some convenient storage on the side of the case as well, keeping it handy, but out of the way.
Ready to cut
The last thing to do was to install the power switch which hangs from the front rail and turn the saw on. There is a nice touch on the power switch in that it is protected by a larger flap which means turning the saw on requires you to lift the top flap to get to the main power switch (which comes with the usual cutoff key), but turning the saw off you just need to press the larger outer flap. A nice safety feature, and a simple but useful touch.
Included are a kickback prevention attachment, and a blade guard. I haven’t put either of these on the saw since most of my work will be using jigs, so these are just going to be in the way.
So everything together it was time to plug the saw in and turn it on. That’s exactly what I did. The video below is the first time the saw was turned on. The blade isn’t wobbling, it’s just that grey band round the saw isn’t uniform all round the blade, so the optical illusion is that it’s off centre. Honestly, it’s not!
As you know from my blog, I’ve been learning about woodworking, and taking something of a journey from puzzle solver to puzzle creator. Over the weekend, I had the great pleasure to be able to visit Scott Peterson at his home to talk about how he creates puzzles, and his journey from 2003 to now in the world of woodworking and puzzle creation.
Scott and I have been talking back and forth via email for a while now and it was great to be able to meet him in person and spend some time with his family who made Jen and I so welcome. Not to mention the great lunch they made too!. I had a great time picking Scott’s brain for hints and tips on how to go about creating my ow puzzles. I really can’t thank Scott enough for all the help he’s given me so far. Let’s hope it all pays off, and I can start creating some puzzles worthy of showing off!
When I mentioned on the Renegade forums that I was going to visit Scott, a few people asked if it would be possible to get a shop tour. Well Scott and I may have gone one better. We recorded around 40 minutes of video, and after some editing, the results are here.
I hope you enjoy the shop tour, and seeing what Scott uses to make his puzzles. We also recorded an in-depth video about the jig Scott built to cut blocks for the Stewart Coffin puzzles that so many of us are familiar with, and finally we recorded a section showing an actual cut and glue-up. (Scott is pretty sure the glue-up is going to be controversial, but if you’ve seen the results, I don’t think you can argue! (Also as a side note, I’ve seen pictures of the way Stewart Coffin himself (or his kids) glued up puzzles. Enough said!)
It’s worth noting that in the Jig video, the stick used to show the tool marks is African Blackwood. The photo is taken using a macro lens so this is hugely magnified to show the tool marks. The tooling marks on the African Blackwood stick show up much more than one would notice on a Maple or Cherry stick. The very dense woods make the tool marks show up much more clearly than the softer woods. This isn’t an attempt to make Scott look bad! (Trust me, having seen his sticks up close, I can’t believe that they are unfinished. The quality is just stunning!)
At the end of the first post on my Matrioshka build, I’d finished gluing up the ‘ends’ as I think of them for each of the puzzle pieces. I still hadn’t cut out the centre sections (or as I’m referring to them, the bridges) that join the two ends of each puzzle piece together, and I still had a lot of sanding to do so that the pieces were all the same size. In this second part, I go through that process, and get closer to the finished puzzle.
On a side note, I originally referred to this project as a MaTRIOshka, however what I’m actually building is a single layer of Vin&Co’s puzzle. Stewart Coffin originally referred to this assembly in “The Puzzling World of Polyhedral Dissections”, which I have been reading recently as the Expanding Box puzzle. There Mr. Coffin refers to this as a curiosity more than a puzzle, but I’m going to continue on none the less with this build. It is helping me learn about puzzle creation and improve my skills, although I dare say that as with most puzzle creators early works, this will be less than impressive. The bottom line is that it is still a nice co-ordinate motion puzzle.
With 12 ‘ends’ all glued together, I had quite a task to remove all the excess glue from the pieces, and sand them all down to a nice smooth finish. I had deliberately left the pieces slightly larger than they would be for the final glue-up, so that I had some room for cutting errors and the like. This is fairly standard, as it’s easier to correct for problems with your saw being slightly off, or gluing issues when you have a little extra material to work with.
Puzzle Pieces before sanding - not pretty!
As you can see from one of the pieces, things weren’t exactly pretty at this stage. Yes I could probably have allowed the glue to set for about 30 minutes, and then scraped off the excess, but I let things sit overnight without touching them, so I may have created more work for myself here that I needed to. You’ll also note that there are apparent gaps between the individual pieces. As I mentioned, this is a learning experience, and I expected that I would have a problem like this! (Oh, and the large lump of tearout on one of the pieces is pretty obvious too.)
If you’re wondering about the interesting pattern in the dry glue, this is because I’m using plastic wrap to prevent glue getting onto my clamps. It’s effective at keeping the glue where it needs to be, but until I build some gluing jigs, I’m left with this sort of mess.
After a lot of sanding, and some time measuring each piece against a ‘perfect’ reference piece, I was left with 12 identical pieces. The puzzle has six sides, which are all identical, so this would be the basis of the finished pieces. (ok, so I only photographed 10 pieces. The other two were on my workbench.)
Sanded End Pieces
As yet I still hadn’t cut any wood for the join between each end of the piece. I’ll be honest here, I still hadn’t entirely figured out how these should be cut, the angles required on the cut etc.
Some stock laminated together to give the thickness I needed
All I could tell from the pictures I was working from was the length of the piece, and that the base touched one side of the end and the top of the triangle touched the other side. Note: I had not started reading Stewart Coffin’s book at this point which told you exactly how to make this! (Thanks Stewart) With that information on hand, I decided the best thing to do was to just go for it. I cut six rectangular blocks which were a match for the dimensions of the end of my end piece, marked the mid point on the end, and took to the band saw. (These rough cut pieces are what you see in the image above. Note that they were only true on one side, as I was cutting to a point on the other so I didn’t care!)
The rectangular stock marked up for cutting to make the bridge
As I have learned, I cut close to my lines, but didn’t go over, to allow me to sand the pieces to the perfect size. You may notice from the image, that my lines are not in pencil Given the accuracy of the cuts I wanted, I used a hobby knife to make the lines. This gives a much more accurate line than pencil, since the edge is much thinner, and also helps to prevent tearout by severing the ends of the fibres if you’re working across the grain. Yes, these marks are in end grain so it’s not helping me here, but I though it worth mentioning.
Note: If you’ve not figured it out already, all the images I upload are at least twice the size you see here. Click the image to see the full size version, and to browse all images for this blog entry.
The result was six identical pieces which would form the bridge between each end of each puzzle piece. So far, so good. Now the interesting thing I found out taking this approach, and working purely from pictures, is that the piece required for the bridge is a standard triangular cross-section, the same as the rest of the pieces in the puzzle. The only difference is that the bridge is slightly taller than the end pieces. Going back to Coffin’s book, this is exactly what he shows, so this was confirmation that I had this right.
The Bridge pieces ready for assembly
In the next part, I’ll look at tackling the problem of gluing up the final pieces and seeing if this thing actually works. On a side note, I have my copy of Vinco’s Matrioshka now, and the puzzle I’m building is large enough that the Matrioshka will fit inside it. So does this mean I’m actually building a Quadrioshka?
I’ve had a bit of a break from working on my own puzzles, as work and life in general have been rather hectic meaning I’ve just not had the time. However over the Easter weekend, I had three whole days that I could do something puzzle related. I’ve still not been able to pick up some wood to get back to working on my burr cube, however I did have a lump of oak left over from the box project my oldest son wanted to make as a birthday present.
After reading Kevin’s review of the Matrioshka here. I noticed that the puzzle is entirely made of triangles. Now I just happened to have a number of leftover ‘scrap’ that would fit the bill perfectly from the box. So I sat down with a pencil and paper to figure out how Vinco created his box, and see if I could replicate it.
Note: This project is purely for my own learning, and experience in working with wood to build puzzles, at the scale I need to be working at to create my own puzzles. This is not for sale. If you like Vinco’s puzzles, please buy them, they really are great puzzles, and the craftsmanship is superb. I own several of Vinco’s puzzles, and highly recommend them.
With all that said, on to the build …
To break down how the puzzle is built, we need some good photos. Kevin happened to upload some excellent pictures, and I’ll not repost them here. Go read his review and have a look if you’re interested. The bottom line is that the outer shell is made of 54 idential pieces. They are equilateral triangles on the edge, with a piece length that is twice the length of the side. So, I set about creating 54 identical pieces.
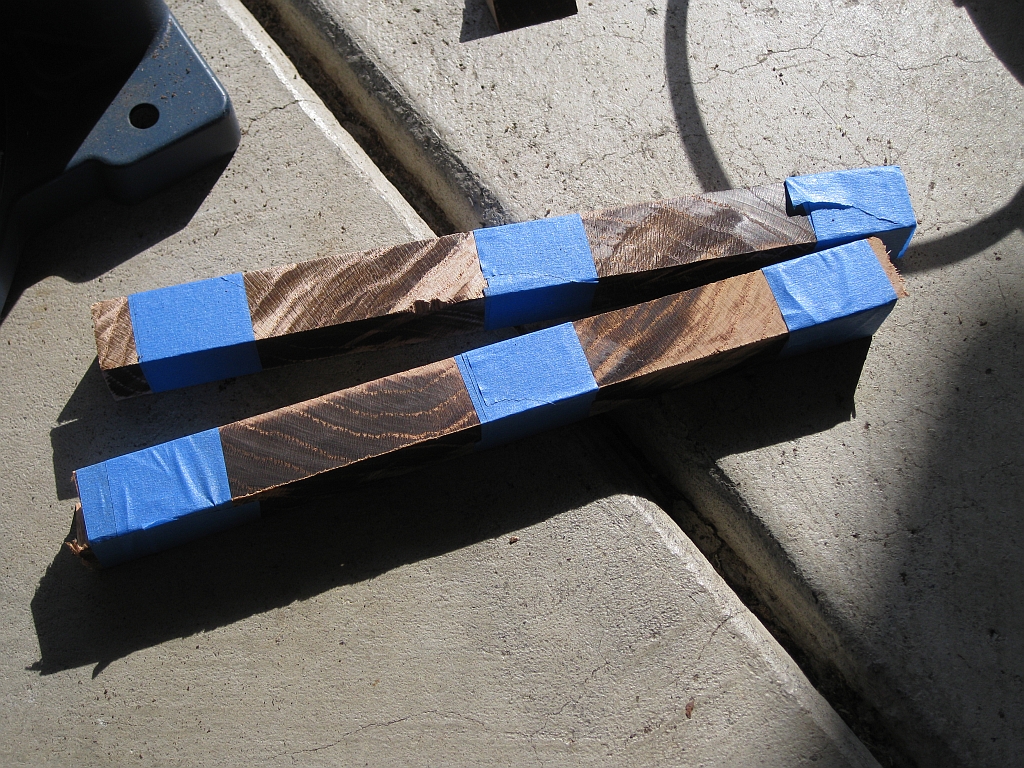
The first thing was to cut the wedge shaped strips of wood which I would eventually cut to the correct length. I took out my mitre saw, and set about making the cuts. One small issue I had was that the amount of the blade in contact with the wood generated a lot of heat, which warped the strips I was cutting. As a result, I had to tape two together as they cooled to make sure the wood was going to end up straight again when I was ready to cut it to length.
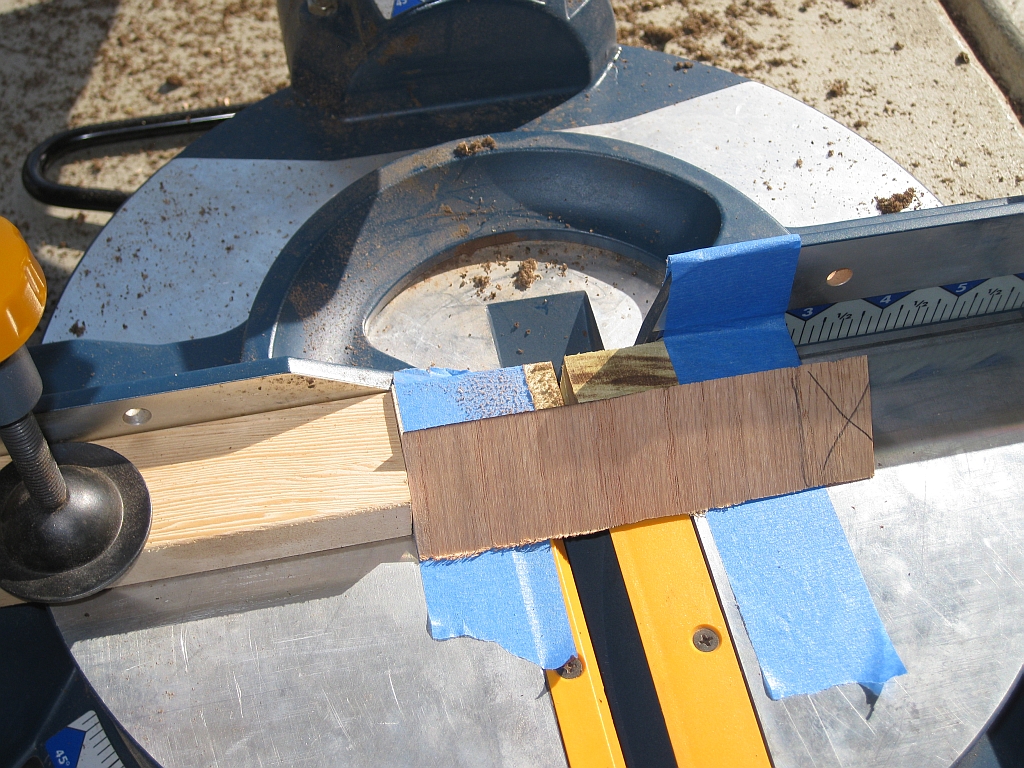
With all the strips cut, I had to cut them down to the correct size for each piece. I measured one piece, cut it and checked that it was exactly right. With that done, all I had to do was clamp down a stop, put a sacrificial fence in place and start cutting. As you’ll see from the photo, I used a scrap piece of wood as a zero tolerance fence to avoid chipout on the pieces I was cutting. It just saves some time later.
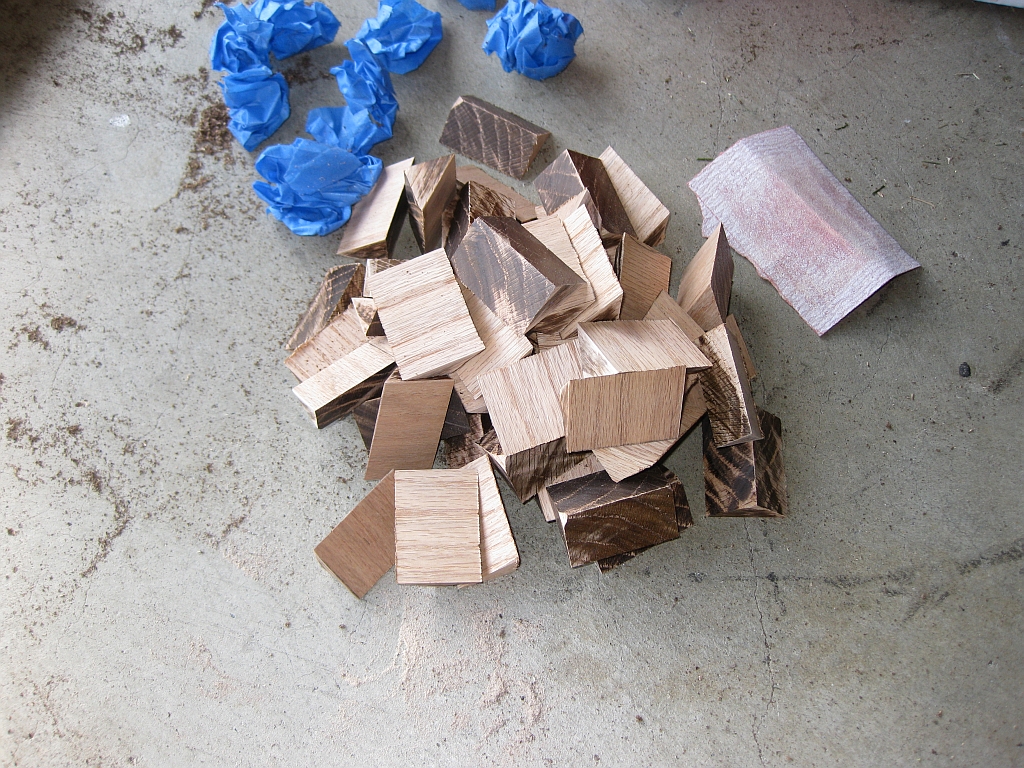
After about half an hour, I had a reasonable pile of pieces next to me, and it was time to do a little rough sanding before gluing up the pieces.
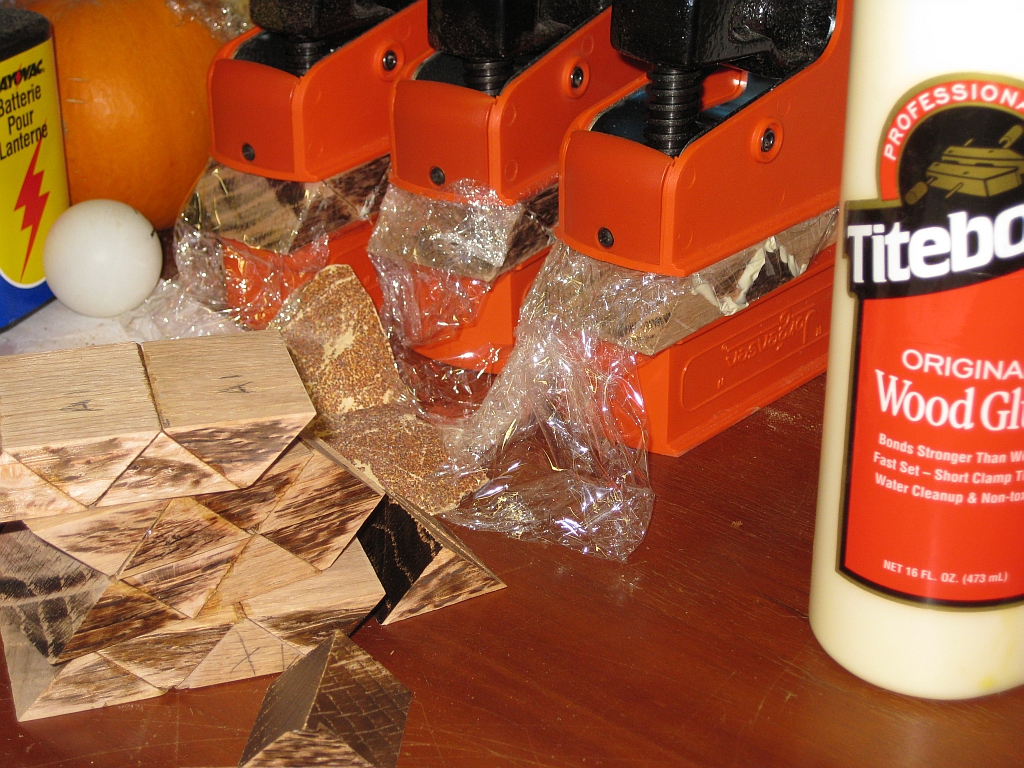
With the rough edges sanded down so that things were a bit neater, and all the pieces labelled to make the glue-up easier, it was time to get the clamps out. The shape of the pieces I was gluing up made things a little more challenging, but with a few of the scraps from cutting the pieces out, life was made simpler again.
It’s worth noting at this point, that all these pieces are oversized. This gives me a little bit of material to work with so that I can sand and fine tune all the pieces. For this to look good, it has to have a tight(ish) fit, and the only way to do that is to make sure the pieces are all the same. Despite using the fence, and stops on the saw, not all my pieces came out to be the same size. After all, I’m still learning, and you could say that this is an ambitious project. That said, how do we learn if we don’t push ourselves?
In the next post, I’ll continue with building the Matrioshka and think about putting each of the six pieces together that will form the final puzzle.
This is not directly related to puzzles, but I felt it worth posting regardless as it does tie in to my progress from puzzle solver to puzzle designer.
Last night I was asked by my oldest son to help him to make a box for my youngest son who’s 13 today. So given that I plan to look at building puzzle boxes, that’s my tenuous link for posting this. (Run with it … there’s good info in here!)
So he wanted to make a box to hold his brothers Bakugan toys. A nice gesture, and who doesn’t want more storage, especially when it’s made from wood? We picked up some Red Oak to use as the sides and some Yellow Poplar as a base. The different coloured woods should give a nice enough contrast, and given that this was last minute, it had to be something we could put together in one night. Nothing like a last minute challenge!
Given that this was to be a simple box, I went with a straight forward 45 degree cut at each corner to create the outside of the box, which would be glued together creating the walls. After the first piece was cut, I picked it up to move it to the side, and in doing so, sliced my finger open at the side of the nail. But it’s only wood, surely it can’t be that sharp?
The problem is that the Red Oak has a hardness of 1290, and is a reasonably dense wood. While it’s not the most dense, or hard, it’s substantial. What that meant was that when we’d cut the 45 degree angle, the thinnest point was really thin, and it kept its edge. IT effectively created a knife on edge of the cut.
So if you’re looking at building puzzles, and you’re going to put angles in there, remember, wood is sharp.
For all those experienced wood workers out there who are currently thinking “Well duh, of course it is”, I apologise. I am neither an experienced woodworker, or puzzle crafter. I learned something very useful last night, and hopefully others will take something from my experience.