The final puzzle I received from this year’s Karakuri Christmas presents is the one I was most looking forward to. Shiro Tajima’s present. Some of you may know that Tajima’s boxes for the last few years have been themed around the Chinese Zodiac, with last year seeing a Dragon themed puzzle, and a rabbit the year before. The thinking was that it would be likely we’d see a snake of some form for this year following his previous entries.
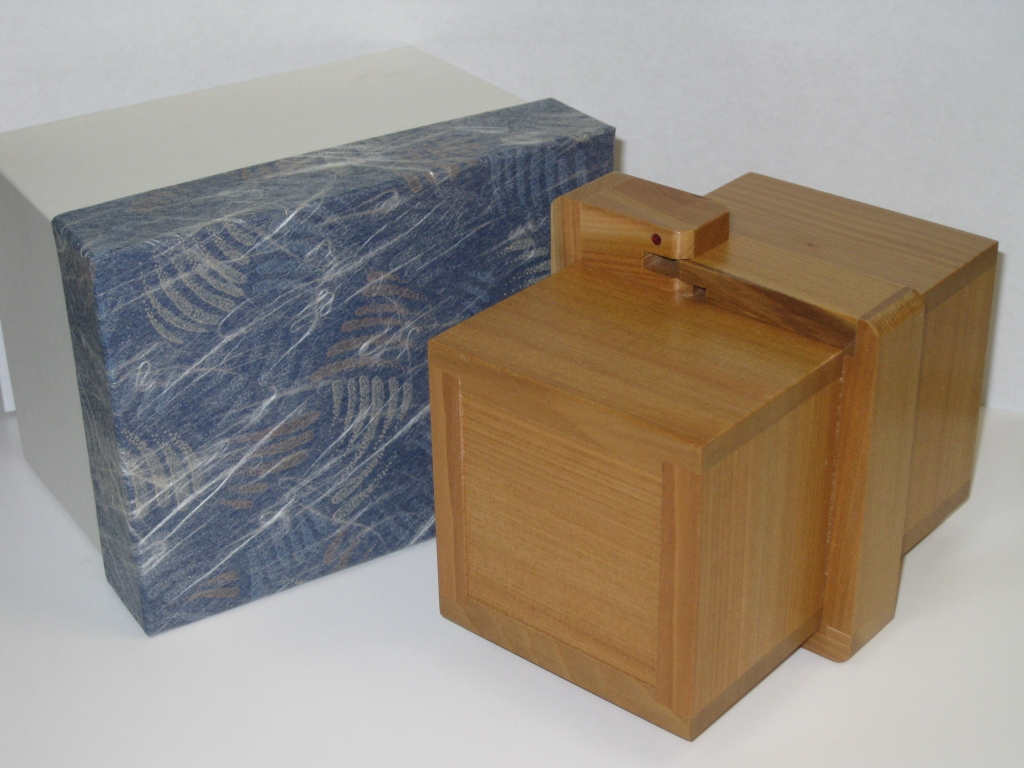
Uroboros by Shiro Tajima
As you can see we weren’t disappointed. “Uroboros is an ancient symbol of a serpent or dragon who eats his own tail, symbolizing self reflexivity. Although he must feel pain by doing so, he is in a constant state of recreating himself, thus the circular shape”, we are told on the Karakuri information page. The puzzle box is perhaps the box with the most plain wood choice of all those I’ve reviewed so far, being made from Katsura. It is also the largest of the boxes measuring a whopping 5.5″ x 4″ x 2.45″
The snake wrapping around the box and eating his own tail is central to the puzzle mechanism and is well executed. There are two compartments to be found in the puzzle, and finding the first is relatively easy. There’s a lot of space in there once you get the hidden compartment open, and the size of the puzzle is directly proportional to the space inside.
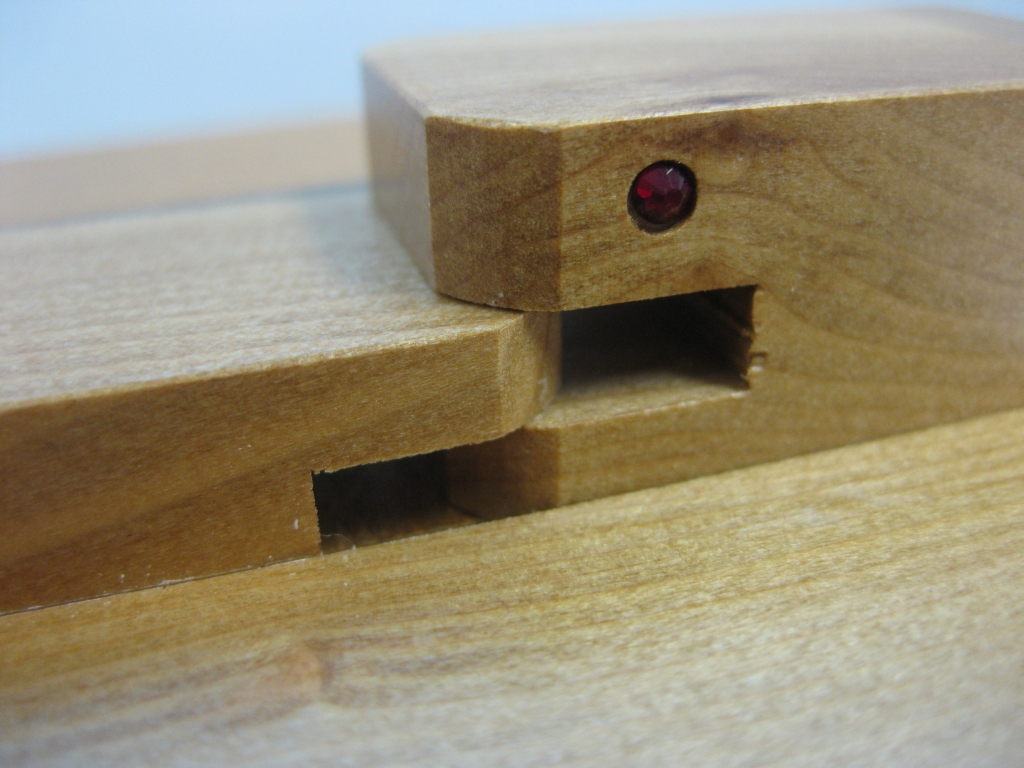
A closeup of the serpent’s head with his jeweled eye
The second is far more challenging to find and took me a lot longer to be able to open. I do like the box despite a fairly simple exterior appearance, it has a solid mechanism, and keeps with the theme we have come to expect. Overall a really good puzzle, and I’m very glad to have it in my collection. I’ve already made sure that Tajima is on my craftsman list for 2013.
It’s about time I got round to reviewing the 2012 Karakuri Christmas presents. I think I’ve left it long enough that people will have been able to play with them all and not have me spoil anything. One of the really interesting things about the membership is the Christmas present(s) and not knowing what you’ll get, gut in general knowing that the boxes will be unique, and made to a very high standard.
Sunflower – Tatsuo Miyamoto
First up for this years reviews is strangely, the last box I acquired. This one popped up on one of the puzzle forums with someone selling it and despite knowing it was a very simple box, I liked the look of it and decided to grab it, especially since the person selling it was asking for the same price as he’d paid for it direct from Karakuri!
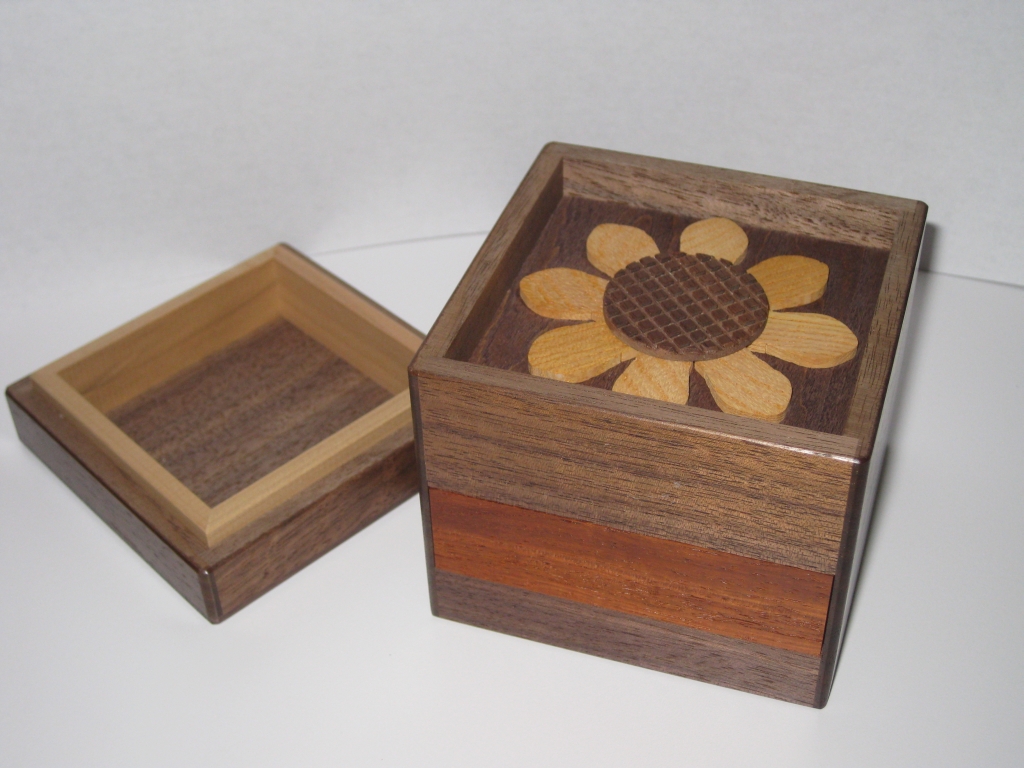
Sunflower by Tatsuo Miyamoto
Sunflower, designed and made by Tatsuo Miyamoto initially appears to be a fairly plain box, with a stripe of red wood across one face. The puzzle measures 7″ x 7″ x 7.5″, made from Walnut, Keyaki, and Karin. With some initial investigation you’ll find that the panel on the front will depress slightly, and the base seems to also depress. It won’t take much to realise that there’s a lid on the box, and removing that you see the reason the box is named Sunflower.
The Sunflower under the lid
I don’t want to give away any details about how the box works, other than saying that this is a simple two step box, which despite it’s simplicity did put a smile on my face when I opened it for this first time, given the way the mechanism works. My only small issue with the box is that the mechanism is really loose for me. This may have been to ensure that there was enough room for wood expansion, but in my climate it’s so lose that it will move on it’s own. A little bit of finishing wax added at the right place has easily resolved the issue, so not a big problem, and may be easy to fix up any issues you have on your copy.
Twin 2 – Hideaki Kawashima
The second box from this year’s Christmas presents and one of those I ordered myself is the Twin 2 from Hideaki Kawashima.
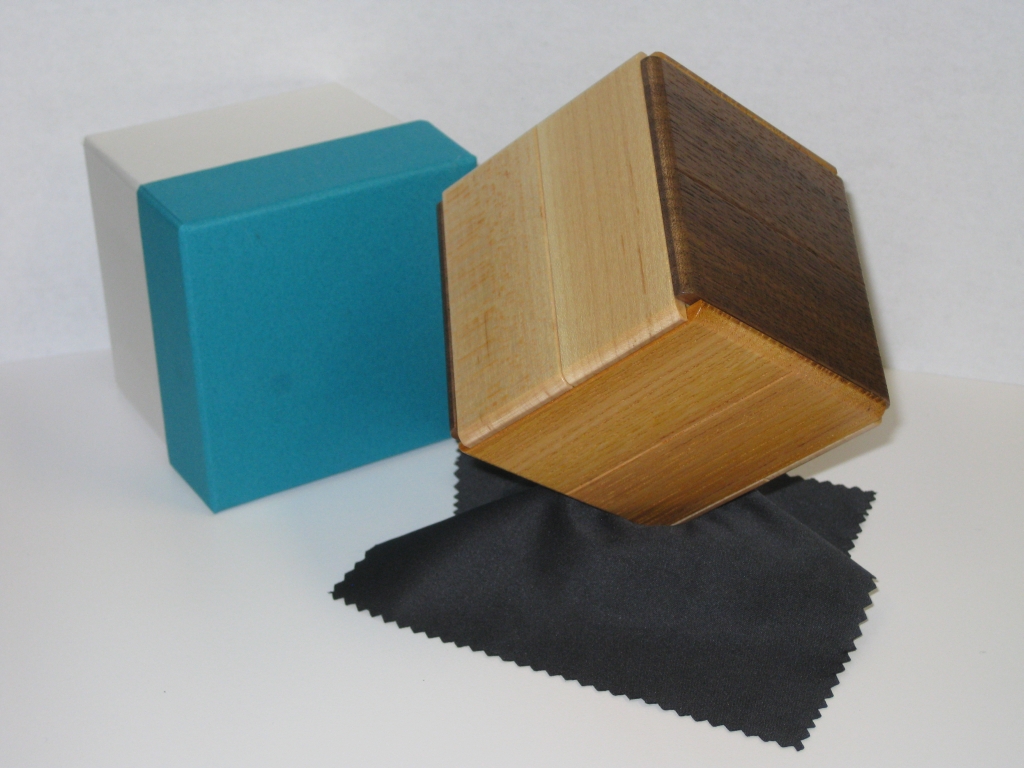
Twin 2 by Hideaki Kawashima
I have been very impressed with the style of Kawashima’s boxes over the last few years, and really like the simple style of his boxes. Measuring 3″ x 3″ x 3″ and made from three contrasting woods it’s a good looking puzzle, and very similar to some of the previous works he’s made. The woods used are Cherry, Maple and Katsura, which gives the puzzle striking contrast between the faces.
I’m not going to show any pictures of the puzzle open, as I feel it gives too much away, however this is a really fun puzzle to play with. As you start to investigate the movement in the panels, you’ll find a what seems like a spring loaded panel which surely must me useful, and will eventually lead to a discovery on the path to solving the puzzle.
With two hidden compartments both of a reasonable size, given the outer dimensions, it’s a good box, that really makes the most of the space available. Again, like the Sunflower it’s not a challenging box, requiring just 6 steps to open both compartments, however it is a beautifully made box, and great to hand to new puzzle box enthusiasts as it’s not too hard and will stand up to some harsh handling.
Summary
As an overall summary which I think applies to all of this year’s Christmas presents, none of the boxes are challenging from a puzzle perspective, and as such many people have commented that they are disappointing from that regard. I have to agree to some extent, as there have certainly been more challenging puzzles to come from the Karakuri group, however these are not the most expensive boxes made, and are as close to ‘mass produced’ as you really get where the quality of craftsmanship is still so high.
You may also be wondering why I’m including the boxes that each of the puzzles came in in my photographs. I’m not just trying to be artistic, but actually each designer has their own box style, so even before opening the puzzle box, you know who the puzzle came from. If you’re a member and not familiar with the designers boxes, then maybe this will help serve as a guide for you.
Secret Base 2 was Hiroshi Iwahara’s 2011 Christmas Present from the Karakuri Club. I didn’t have him as one of my designers last year, but I was fortunate enough to be able to borrow this box to play with.
Secret Base 2
The Secret Base 2 as you might have guessed is based on the original Secret Base puzzle which I’ve not played with myself, but am aware of how the mechanism works. In this case, I think that partial knowledge may have made my solving of this box more challenging!
Made from Oak, Walnut, Birch and Bubinga this puzzle measures 3.5″ x 3.5″ x 3″ and is beautifully finished as any Karakuri box is. The mechanism is wonderfully smooth, and the first movement seems almost magical as the pieces slide past each other. It’s actually a very difficult puzzle to describe without giving much away.
With my knowledge of the original Secret Base, I found the first move fairly quickly, and even the next step didn’t take me long to identify. After that however I was a little stumped. The final movement is rather unexpected and quite nicely hidden.
Secret Base 2 - Partially Open
I’ve taken the photo above very carefully to give nothing away about how this opens, but it does at least let you see the movement of the pieces. Once open, there’s a reasonable sized space inside and unlike the original Secret Box, there’s only one compartment to be found in this puzzle.
Overall a nice box with an interesting twist. Well worth picking up a copy.
Allard, Brian, Jeff and Michael have all written about it, so head over to their pages to find out what they thought.
As a member of the Karakuri Group, when I renewed my membership at the start of the year I decided to pick up a few of the DIY kits that they offer. After my experience with Bruce Vinney’s designs I was interested to see what Karakuri Group had created, and also to better understand the mechanisms used, which is one of the goals Karakuri set when making the kits.
When I mentioned that I had the kits on one of the puzzle forums, there were requests to show how to build them, so much like I did with the previous kits I built, I decided to show the build process in full. Watch the video below to see the build, and watch the kit come to life. In the video I’ll cover all the tools I use and this isn’t time lapse so you can see everything in real time. I’ll be doing videos for all the kits shown in the video, so check back for more soon.
As promised in the video, you’ll find the instructions below, with my guide to building the box. Be aware that this is in no way a translation of the instructions!
General Kit Comments
The Karakuri group offer a reasonable number of DIY puzzle boxes which they refer to as “Work Kits”. Each of the kits consist of a number of pre-cut plywood pieces, some decorative pieces (like the beautifully made acorn on the Acorn Box), and any hardware needed for the mechanism, if it’s not just a straight forward sliding panel or suchlike. The kits are all perfectly cut, and of the kits I own there have been no issues with the fit or finish on any of the pieces.
Something which is worth noting about the kits is the price. They all come in at around the $25 USD mark, so in terms of affordability, these are really affordable boxes. The quality of the cuts on the pieces is excellent and the fit is as good as you will find with anything from the Karakuri group, so I’d say from that side of things, they’re great value.
One thing to note is that the build instructions for the kits are in Japanese language only. Don’t be put off by that however as with a little thought, and some careful study of the diagrams, you’ll build the kits just fine. Failing that, have a look at my Build Instructions section below, where I have detailed the steps (in English) to build the kit.
Kakukaku Kit Review
The first of the kits I built was (as you already know from the title of this post) the Kakukaku Box. I picked this one for no other reason than liking the look of the box. Interestingly it was the last of the four that I picked, and really the only reason was that I had set a budget and this fit within that budget after having picked the three others I wanted.
The completed top and bottom of the box
As you can see from the picture above, the box itself is fairly simple. The ply is visible on the top of the box, but personally I don’t think that’s an issue. If you don’t like having the ply exposed, you could glue some veneer onto the top panel just to make it neater. The laser cut tree certainly adds to the look of the box, and is also a clue as to the solution.
Building the kit was fairly simple. The diagrams on the build instructions are very clear, and there’s nothing complicated to this kit, so I didn’t have any issues building it. The video is real time, so it took about 15 minutes to put together, and would probably be quicker if you’re not recording a video and talking through everything you’re doing!
As far as the puzzle box itself is concerned, I’ll be honest that I was a little disappointed with the box. I have two reasons for this, and at first they seem contradictory, but bear with me.
The locking mechanism is both too difficult to open, and too easy to open at the same time. If you attempt to open the box using the ‘solution’ provided, it can be very difficult to move the two parts of the box in the right way to get them to open. The fit is pretty good, and as such the movements need to be made very precisely to get the box open. Sadly, there is a much simpler way to open the box. If you hold the top of the box, and shake it, the bottom falls out on its own, making it far too easy!
As a kit I certainly enjoyed building it, and you will understand the mechanism once you’ve built the box, so it certainly meets the expectations that the Karakuri group set out to achieve. If you’re thinking of buying one (or more) of these kits, I’d say that there are better boxes in terms of the end puzzle that you could get, but if you just want to add them all, then go get it!
Build Instructions
In this section I will try to give my guide to building this kit. Please note that this is in no way a translation of the Karakuri Group’s instructions, but my own instructions based on having built the kit. If you have issues following my instructions, feel free to get in touch and I’ll help you if I can, and update things below to clear up any confusion.
Build instructions - Click image for full size
The instructions below match to the numbers on the diagram above.
Tools Needed
Before starting, you’ll need a couple of tools.
Wood Glue / Elmers hobby Glue
Pencil
Ruler (or some measuring device)
Tape – I recommend blue painters tape
Glue Brush (optional)
Engineers Square (optional)
Step 1 – The Locking mechanism
First up, sort the parts from the kit into the same order as shown in the top diagram. If you feel like you need to then you can mark the piece numbers in pencil on the inside of each piece. The way the pieces are laid out in the diagram shows the inside, with the exception of piece ‘B’, which will be inside the box and unlikely to be seen so even if you don’t remove the pencil mark, probably not an issue. In my opinion, the pieces are pretty clear so you should need to label them.
Take Piece ‘A’ and lay it as shown in the diagram. The sides with the notches cut out should be at the top and right of the piece as you look at it.
Take Piece ‘B’ and glue it into the centre of piece ‘A’. The piece fits snugly between the wooden blocks that surround the piece, so no adjustment or fine placement is required. Make sure that the lip on piece ‘B’ is on the left and top as you look at the piece. This can be confirmed by the angled corners as seen in the diagram.
Leave the top for around 10 minutes for the glue to dry (note if the glue you are using takes longer to dry, then follow the manufacturers recommendations).
Step 2 – Top Decoration
Once the top of the box is dry from step 1, flip the piece over so that the cut away sections are now on the top and left of the piece as you look at it.
Using a ruler, mark the centre of the piece, making note of the cutout which will not be seen once the box is complete.
With the centre identified, glue the tree piece to the centre as seen in the diagram.
Step 3 – Inner Box
Take the parts labelled ‘E’ in the diagram. The flat square is the base of the inner box. There are two sides with notches cut in each end, and two with no notches cut.
Place the base in the centre and then around that the two pieces with notches in the ends above and below it, then the two without notches at either side as seen in the diagram on the right.
You will notice that there is a grove running through the with of all of these pieces. The base will go into one of these slots, and the other is part of the locking mechanism.
Put glue into the notches on either end of the top and bottom pieces and using a brush, spread the glue evenly into these notches. Bring all four sides together around the base as seen in the lower left diagram.
Once all four pieces have been brought snugly together, tape the corners and check that the corners are square using an engineers square. Note: This check is not really needed as the pieces are designed to give a good square corner.
Note: You can put tape on the corners before adding the glue. This can make the job of taping the corners easier rather than trying to get tape around the corners after they are in place.
Leave the inner box to dry.
Step 4 – Outer Box
Take the top which was completed in step 2, and place it as seen in the diagram, where the cut-out sections are at the top and right of the piece as you look at it.
Taking pieces Labelled C-1, C-2, D-1, D-2, place these around the top as seen in the diagram.
Pieces D-2 and C-2 have a piece of wood inside the groove which ensures the pieces are correctly located in relation to the locking mechanism, and the centre of the box.
Pieces C-1 and D-1 have no insert in the groove, and will slide freely along the length of the top.
Apply glue into the notches on either end of pieces D-1 and D-2 and using a brush, spread the glue evenly into these notches.
Bring all four pieces together around the top as seen in the diagram on the right, starting with pieces D-2 and C-2 which will ensure that the pieces are correctly centred.
Once all four pieces are in place, tape the corners together and allow the top to dry. You can check the top for squareness before it is dry however as with the inner box, the pieces are designed to give a good square corner even without this check.
Note: As before putting tape on the piece before gluing can make this easier
Step 5 – Opening and Closing the box
To Close the Box, place the outer box onto the Inner box and move the top Right and Up as per the green arrow in the diagram. The box is now locked.
Top Open the box, move the outer box Down and Left as per the blue arrow in the diagram, then lift the top of the bottom. The box is now open.
“When we tie up a belt or paper tape well, a knot that is called “Chiyo-Musubi” is completed. In Japan, it is said to be a lucky knot.”
Chiyo Musubi
This fine looking box from Hiroshi Iwahara of the Karakuri Creation group is a sliding puzzle box with two hidden compartments requiring 19 moves to open both. The interesting point about this puzzle box is that the slides which conceal both hidden spaces cross one another, so the resulting mechanism is much harder to produce than a standard box. Iwahara notes that the shape of this particular knot is a Pentagon, but it is also possible to produce a Heptagon. He’s not planning to make a Heptagon version as a puzzle box though.
Created back in April this year, and measuring 9.5″ x 5″ x 2.75″ approximately, this is a big puzzle box, and it feels really solid when you’re solving it. I don’t exactly have small hands, and this box feels big to me when I’m working on it. I didn’t do too well on my wood identification in the video, as the only thing I got right was the Walnut! So to correct that, the box is made from Walnut, Oak and Angsana, giving it the striking appearance. To look at it, you really can get the feeling that someone has taken a plank of wood and knotted it like a belt.
I borrowed this puzzle box from Derek Bosch (yes he has a good collection and has been very kind to lend me chunks of it at a time), so I’m not sure if it’s just his copy or not, but the panels are fairly loose, to the point that when solving it, some of the panels would slide back to where I’d moved them from as I turned the box over in my hands. While it doesn’t take away from the box, it can make it a challenge to open, as you have to be careful that panels don’t slide around on their own as you move the box. Not realising that a panel slid back after you moved it preventing further progress can be a pain.
This is a really nice puzzle, and I have to admire the design, especially the ability to have pieces passing over and under each other to make a very slick puzzle. If I’m honest, it’s not my favorite puzzle from Iwahara, but it’s by no means a bad puzzle! It took around 10 minutes to open the box and find both hidden compartments the first time. Having gone back to it later, I can see that this could take much longer as the order you open the compartments does seem to come into play, so I may have been lucky the first time and opened them in the correct order.
Overall, a very nice puzzle and one which would certainly stand out next to other puzzle boxes, both for its size and striking contrast of woods.
This Japanese puzzle box by an unknown maker takes me back in my puzzling history. This was the first puzzle box I ever bought, and was on a trip to San Francisco with my family when I was finishing University around 14 years ago. This is where my fascination with puzzle boxes stems from, and it’s still a box that I enjoy opening even today.
Japanese Puzzle Box
As you can see it’s a standard Japanese box, with Yosegi patterns on all six sides. This box is fairly large for a Japanese puzzle box and comes in at a 5 Sun box.
So if woodworking wasn’t confusing enough given that everything is measured in inches for cuts (yes I’m Scottish, and we use the metric system for everything except speed and distance – don’t ask me why), and board feet for buying lumber (It’s simple enough when you understand, but way to confuse someone new to woodworking), the Japanese have another system called Suns. What it actually equates to is the following:
Sun Size
Size in Inches
1 Sun
1.22″ (Mame)
1.5 Sun
1.83″ (Mame)
2 Sun
2.44″
2.5 Sun
3.05″
3 Sun
3.66″
4 Sun
4.88″
5 Sun
6.10″
6 Sun
7.32″
7 Sun
8.54″
This particular box is a 36 move box. It’s by no means the most complicated box to open as the sequence is (mostly) the same from start to finish. Once you find the sliding panels, the box follows the same sequence until the top panel slides off. Well that’s mostly true. There is one sneaky move towards the end of the 36 moves where one slider actually moves back to a previous position to allow the next move to take place. This certainly caught me out the first time I tried to open it (as I threw the opening instructions away), and it catches most people I have given this box to as well.
The image below shows a closeup of the internal mechanism for this box, which I find fascinating. If you click on the picture, you’ll see the full box, so if you don’t want to see the full box, don’t click the link. It doesn’t give anything away really, but now you’ve been warned.
Japanese Puzzle Box open
The amount of work which went into this box is just stunning, especially when you consider that I paid less than $30 for it. This may be a mass manufactured box, but the quality of the fit and finish is excellent. Even the slides are well hidden with no visible gaps between the pieces.
As my first box, this holds a special place in my collection, and as a fairly large box it even has useful storage space inside if you want to keep a small object away securely hidden away. Just don’t use “The Big Bang Theory” method of opening it.