Wil Strijbos is a well-known name in the puzzle world, with his metal puzzles being beautifully made, and highly sought after. Not only does he design and sell his own puzzles, but he seems to be able to find rare puzzles which other people, myself included, seem near impossible to find. I have no idea how he comes across some of the items, but all you need to do is to ask. When Wil announced his latest sequential discovery puzzle “The Angel Box” with a fairly long story about its creation, it sounded pretty interesting, and given enough time, one found its way to me.
The Angel Box from Wil Strijbos
If you’ve ordered a puzzle from Wil in the past, you’ll know immediately when it arrives, as the package is always completely covered in a layer of brown packing tape. After that, there’s various quantities of bubble wrap and newspaper to keep the puzzle safe. The Angel Box takes the packing one step further, and you’ll find the puzzle itself wrapped in the very attractive birthday gift style box, complete with bow and gift tag.
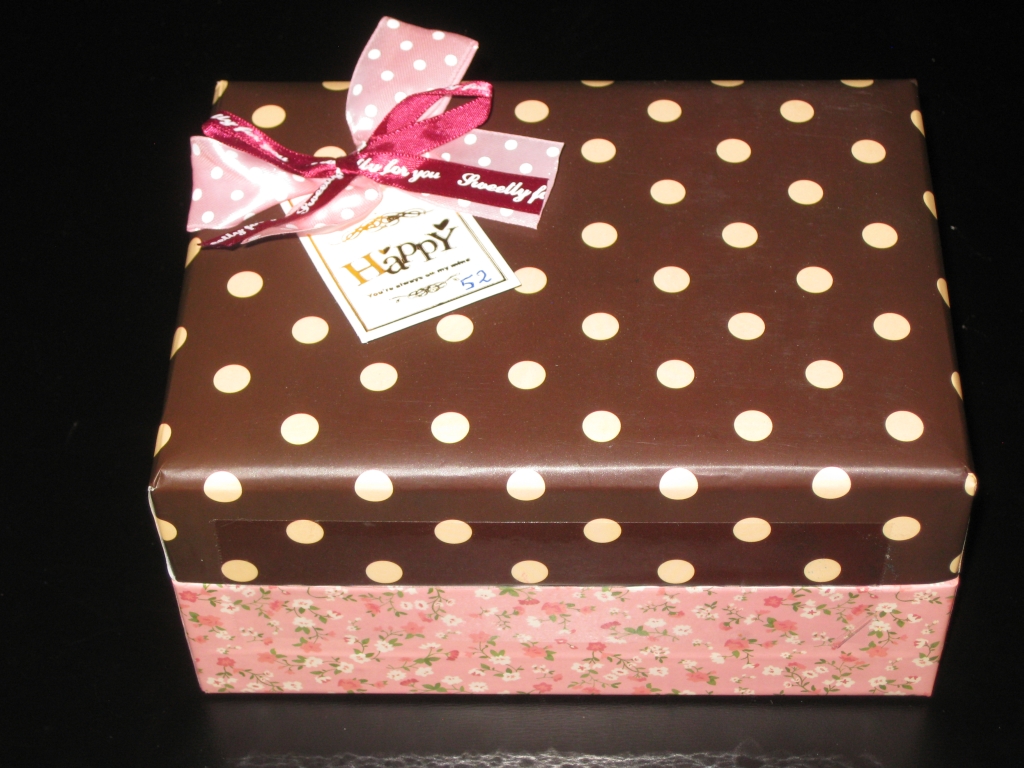
An early birthday present

Look what’s inside
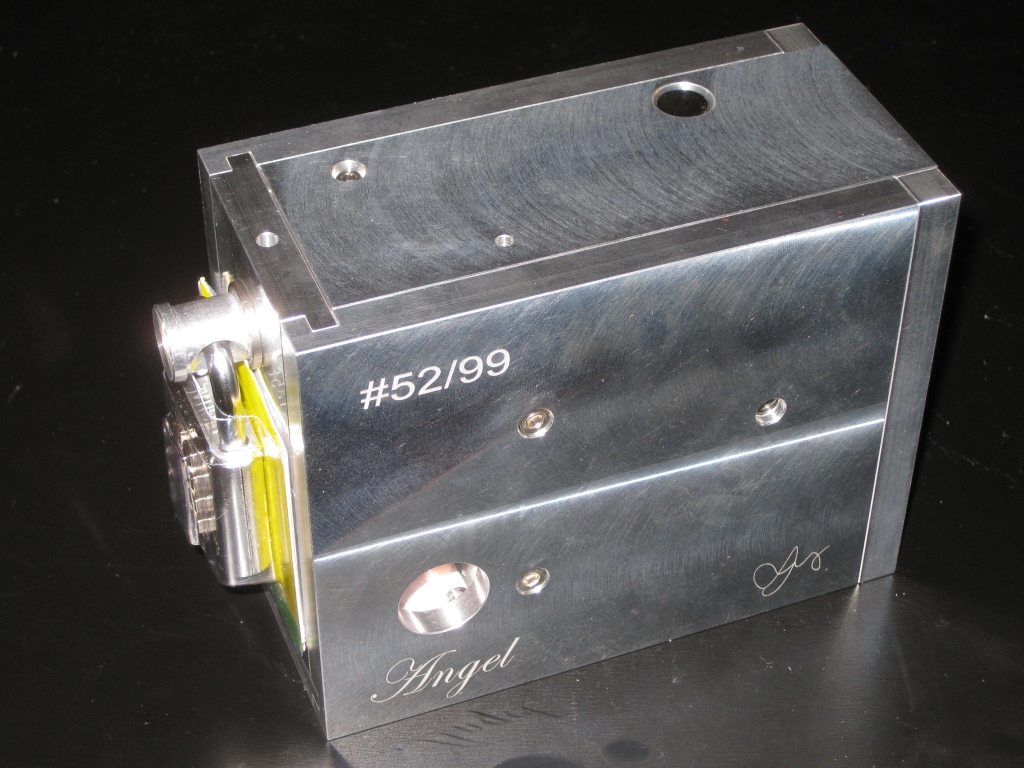
As you’ve probably realised already, this is a big puzzle. At 6.25″ x 4.33″ x 2.75″ and weighing in at a whopping 1.9Kg it’s fair to call this heavy metal. Made from some pretty serious aluminium, while the puzzle isn’t a solid block, it is solid. I certainly recommend puzzling with this one at the table. Not just due to the potential damage you could do from dropping the puzzle, but also due to the tools that you’ll start accumulating as you work through the puzzle. The small peep-hole in the side gives a hint of the goal, to remove the Angel from the box.
Your first challenge is the padlock on the front of the box, and as you’d expect from a puzzle, the small metal tag held in the shackle doesn’t contain the code you need to open the lock. That would be far too simple, and if you’ve read any of my other reviews of Wil’s puzzles, you’ll know that opening a puzzle for the first time tends not to be simple! At least the plate gives you the clue that the code is 4 digits which should make life a little easier for you.
Before too long, you should have the padlock removed, and be able to make some progress, although it may not seem helpful at first. At this stage, there’s not a lot of options to progress, and as with any good sequential discovery puzzle, you’ll quickly find a few tools, which in theory should be useful. Finding out what to do with the tools you’ve found is all part of the fun, and take heed from Wil’s own guidelines, that the padlock is not needed to solve the puzzle. Don’t be tempted to use parts of it in the solution. He gets very upset if you use the padlock as a tool!
Looking around the puzzle, you’ll find a number of small holes scattered about, and figuring out how to use the tools you have, and the correct sequence to use what you’ll find as you explore is the key to progress. There’s a great sense of achievement as you discover how the mechanism interacts, and finally make the next step toward progress in solving the puzzle. That’s lock #2 down.
That done, another tool will almost magically appear, and allow some fairly obvious progress toward opening the box. Lock #3 passed. Then things get interesting, and this is where I lost one of my tools. There’s a little flaw in the design of the puzzle, which allows you to lose the tool you need, and potentially prevent part of the mechanism from working correctly. To my mind, it would be a fairly simple issue to fix, but for now, a little care is needed not to lose a key tool. With this part of the puzzle carefully navigated, you’ll have lock #4 solved, and the goal should be in sight.
The Angel in the centre of the box is within grasp, but there’s a final lock, a cage, keeping her locked away. It shouldn’t take you long to get past this final lock and release the Angel. Lock #5 solved.
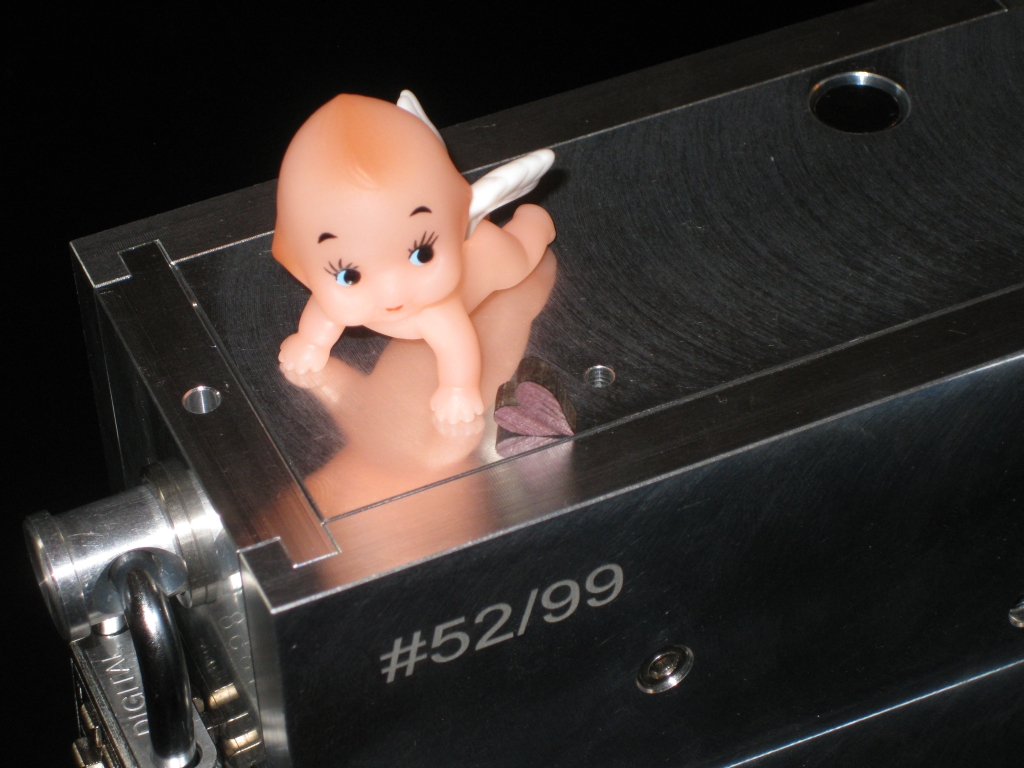
The Angel and her heart
With the Angel free, you’re not quite done. Freeing her heart is the last piece of the puzzle. A small note located with her will leave you with a final set of instructions… but I’ll leave it for you to decide whether to call the number or not. Perhaps Google it first!
Overall The Angel Box is a nice puzzle. Far simpler than I had thought it was going to be, and it took me far less time to solve than I had perhaps hoped for a puzzle at this price. Start to finish I had the puzzle open in 10 minutes so it’s certainly not a puzzle which will have you stuck for weeks. That said, my solve time may not be representative of the mileage others have had. Now my challenge is whether to display her inside her birthday box, or as the attractive aluminium puzzle that she is outside the box.


