While I’ve not had any time to get back to my workshop in the garage and spend time finishing off my current puzzle build, the Matrioshka (read part 1 and part 2) I have been busy. I’ve had a number of puzzle designs floating around in my head, and in the odd spare minute here and there I’ve been sketching things down and trying to make some progress. You’d be amazed how many ideas float through your head at 2am when you’re wide awake.
Since a good friend poked me in the direction of creating my own puzzles, I have had a myriad of ideas floating around in my head, each one probably more crazy than the last. The problem is that having an idea in my head doesn’t really do anyone any good. It was time to try to get a few things down on paper and see if there was some merit to any of them.
As you know from early posts here, my first puzzle design was cube based, and it created a nice puzzle in my opinion. (More info on that coming soon!) But I wanted something a little more interesting. I have been reading a lot about puzzle design, and Stewart Coffin’s work is an excellent learning resource. He challenges you to take what he has done, and learn from it. He doesn’t give the solutions to the puzzles he’s designed, far from it, he challenges the reader to find them himself. Having picked up a copy of one of his books from Amazon, and it was clear that in the world of polyhedral dissections, there is a lot more scope if you move beyond the cube.

Rough Sketches of a new puzzle design
I don’t want to make a copy of any of STC’s designs but I did want to see whether I could create a novel dissection. My starting point was a star, as in the sketches above. My idea was to create an extruded six pointed star with an interesting interlocking set of pieces. I played for a while with this idea, but realised that the dissection would lead to some very interesting cuts to create the pieces needed, and I abandoned that for a simpler 8 pointed star, where all the angles are 45 degrees. Ok, so simpler may be relative, however I did find it easier to work with!
The sketch in the middle is a rough of the dissection, where the puzzle is 6 units wide by two units high. With those base dimensions, I had enough freedom to create an interesting assembly, without it being too complex to create. Remember I am doing this by hand, not using a computer to help!
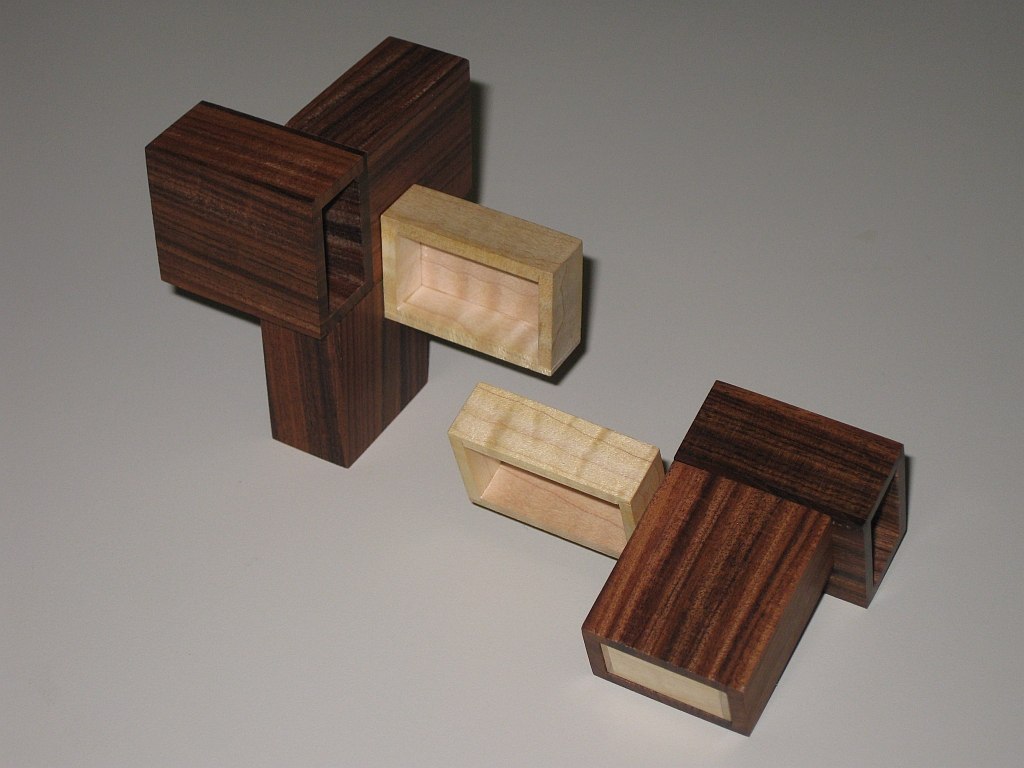
My first challenge was to visualise how you could dissect the shape. The nice part about working with the 8 pointed star is that each of the points is a cube, and cubic dissections are fairly straight forward. Using this as a starting point, I looked at creating 4 pieces which I could create some sort of locking structure around.
The first version was fairly simple, and went part way to what I wanted. I had created a two pieces which would join together such that movement in two of three dimensions was restricted. Creating a set of two such pieces created the first version of the puzzle.

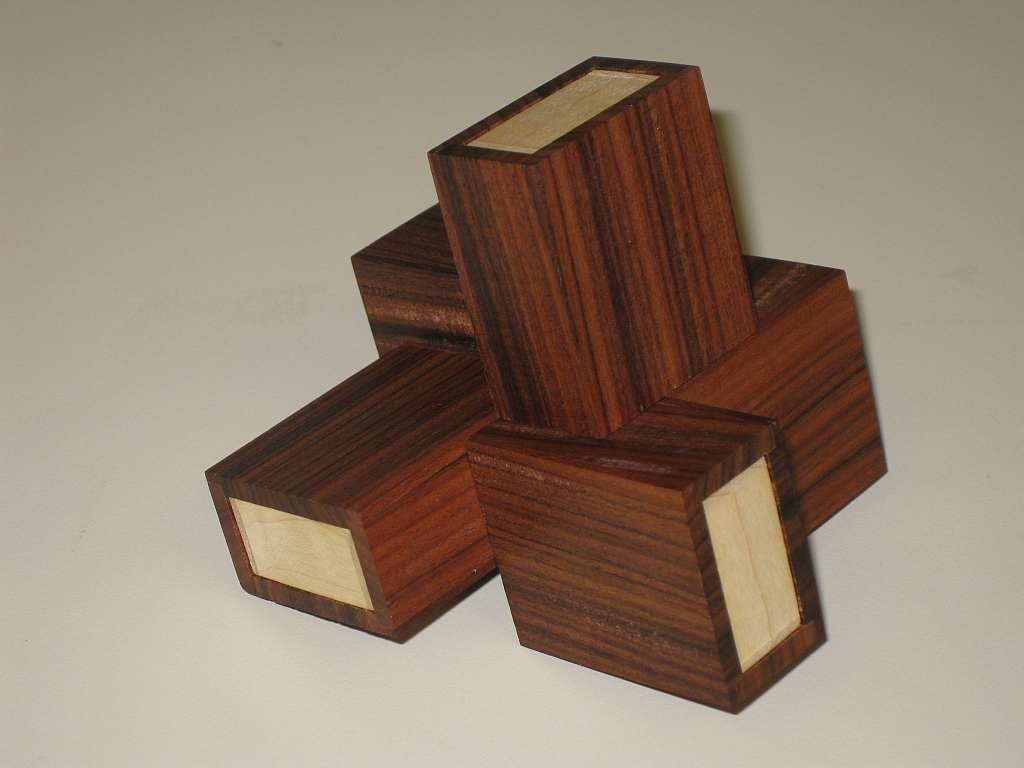
Basic Star Puzzle Solved

Two joined pieces of the puzzle
You should be able to see from the image on the right, that there is nothing to stop the two halves from sliding apart, so really this isn’t a great puzzle. The reason I show it, is that it may give you an idea of the stages I went through in creating the puzzle, and if you’re thinking about creating your own puzzles, then hopefully it will be of use to you too.
The next stage of evolution of the puzzle is to create a version where once assembled, the four pieces don’t just slide apart on their own. Some sort of manipulation is required by the solver. The added benefit to this is that it’s now more challenging to solve. To do that I started to look at ways to create a joint between the two halves I’d created. I was looking for something like a dovetail joint, and if you look at the sketches at the top of this post, my version of that is in red pen on the top of the left hand sheet.
Creating the two halves of this joint, I created a way for the two sub assemblies to be slid together to create the final shape.

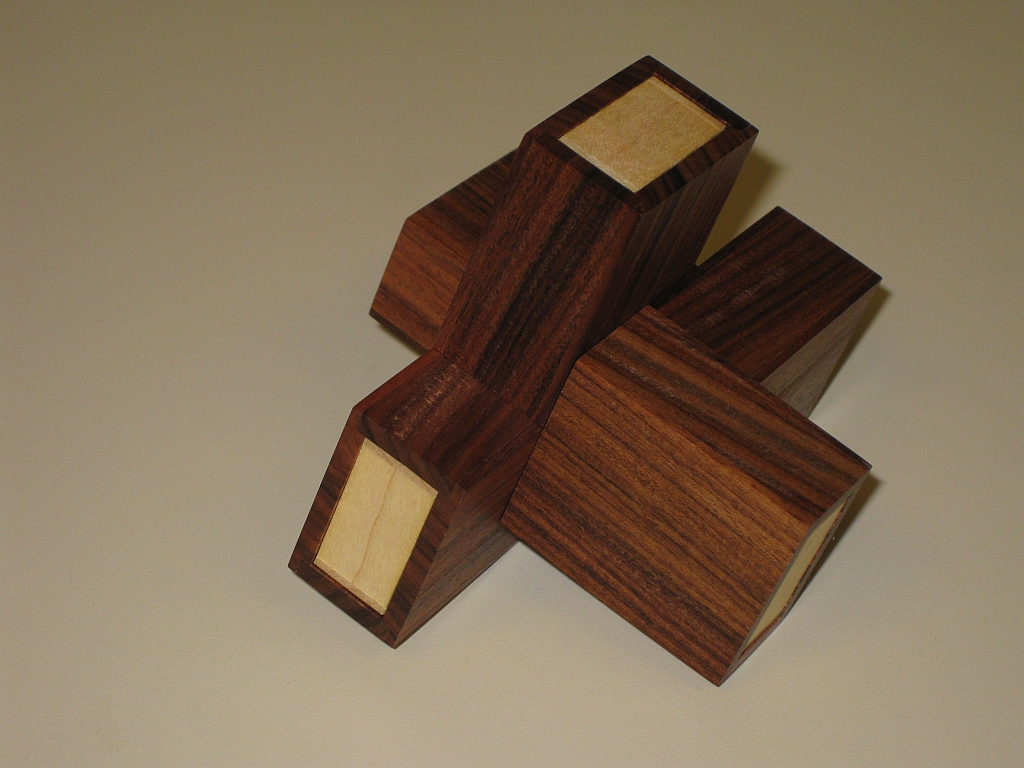
Sliding Star V2
So you may be asking why I’ve labelled this “Sliding Star V2”. The answer is quite simple. It’s the second version of the puzzle. Once I had created the basic pieces on paper, I turned to Burr Tools to model them on the computer, for two reasons which I’ll get to …
Many people turn to Burr Tools to find how to put their puzzle back together, or to create new puzzle pieces. The program has many many uses, and I’m no expert, but I am learning and getting much better the more I use it. I didn’t need to use the tool to find out how to assemble the puzzle, as I already had worked out on paper that it did. What I really wanted was to verify the assembly, and check how many assemblies existed with my pieces, and also because I wanted a model file that I could export for 3D printing!
Coming back to the reason for V2, when I originally designed the dovetail ends, I envisioned the puzzle as being two halves that slid together along the yellow blue axis in my rendering. What Burr Tools showed was that one of the pieces could slide diagonally out of the assembly, and in fact didn’t lock the puzzle together as I had drawn.
Here the power of the tool allowed me to see something I hadn’t seen on paper, and allowed me to rework the pieces to prevent the unintended movement. Burr tools also confirmed only one solution for the V1. For the V2, when I had redrawn things, and re-entered them into the tool, I was surprised to find 2 assemblies! So my small change allows two pieces to be swapped, and still assemble the puzzle. All very interesting, and very unexpected.
With the puzzle pieces confirmed as being possible within the constraints of Burr Tools, I set about exporting the pieces, so that I could have them 3D printed. This is a very quick way to prototype puzzles, which is far more powerful that pen and paper, or even computer modelling. Seeing a puzzle in real life, and playing with the pieces can give you much more feedback that looking at it in two dimensions.
Now I’ll be honest here, Burr Tools isn’t the most intuitive for exporting files, but with a lot of patience, and some guidance from Derek Bosch, I was able to export the pieces in a format which would work for sending to Shapeways. (Which I have done, and I’m waiting for the results!)
Now here’s the really interesting thing about the export from Burr Tools. If you export from the Solution tab, the stl files are created with location information. Which means that when you export them, they are in the position and orientation of the solved puzzle. So it means importing them into you 3D package of choice, you can render the solved puzzle, without painstakingly moving the pieces by hand. As a bonus side effect, it also shows you the tolerances between pieces, which is ideal for knowing how well things will fit when printed by Shapeways! If you’re wondering, yes this is how I created the images of the puzzle above in PovRay.
Once I receive the printed parts from Shapeways, I’ll update as to how things turned out.
With version two created, I turned my attention to the original goal of the project which was a co-ordinate motion version of the puzzle, using the same shape, but modified pieces to make a far more challenging puzzle to assemble. I’ll give more info on that in the next post about my puzzle making progress.
Finally, I mentioned a few posts back that I had a big project I was working on. Well I’m still working on it, but no more details yet. It is still at the pen and paper stage, and there’s a lot of work to tweak the designs before I take that further… Watch this space!


