Category Archives: Puzzle Reviews

Oskar’s Matchboxes

Oskar’s Matchboxes is another puzzle designed by Oskar Van Deventer. This seems like a simple enough puzzle, where five matchboxes have their sleeves and drawers attached at interesting angles to create five unique pieces. The goal is to close all five matchboxes. Have a look here for Brian’s review.

Oskar's Matchboxes Puzzle by Eric Fuller

Oskar's Matchboxes Puzzle by Eric Fuller

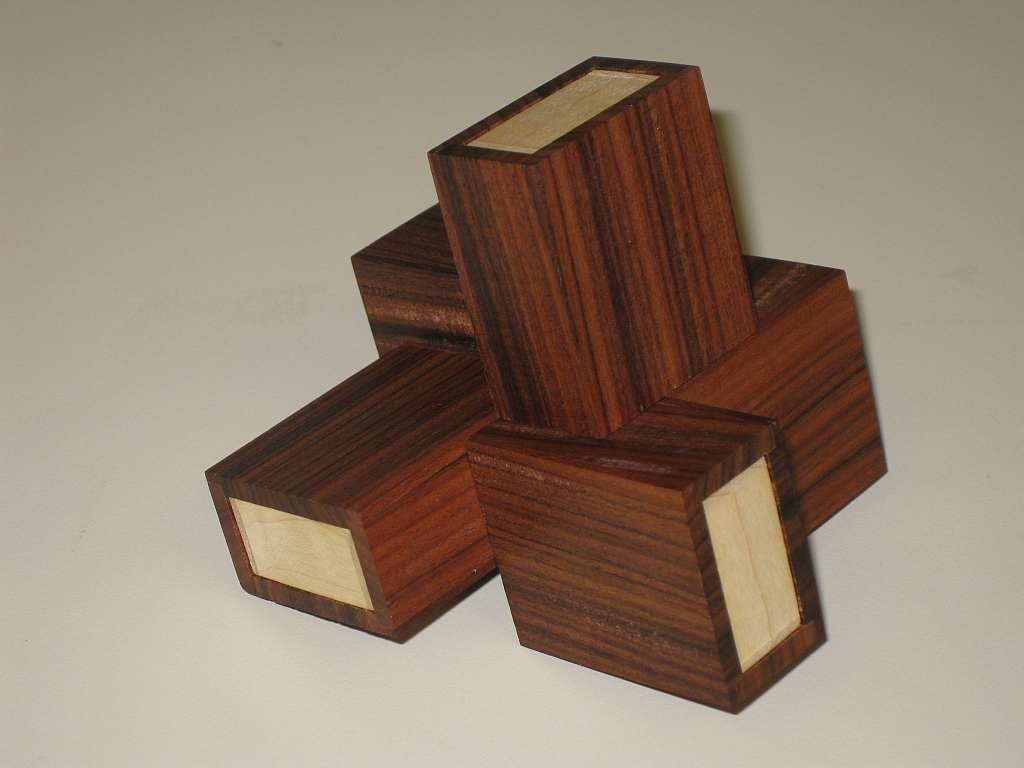
I recently won a copy of Oskar’s Matchboxes, made by Eric Fuller in 2010, on the recent Cubic Dissection Marketplace auction. This is a beautifully made version using (as best I can tell) Mahogany and Maple. Overall, the puzzle is approximately 3.5″ in size, making for a very compact version.

Matchbox Diagram

Diagram of each of the pieces

The diagram on the right shows how each of the matchboxes should be attached. The dimensions of the boxes are fairly important, they need to be on a 3:2:1 scale in order for the puzzle to work correctly. There have been a number of versions of the puzzle made, including short runs by Trevor Wood, Tom Lensch and Eric Fuller. Each of those has a different appearance as the creator can make the boxes in whatever style they desire, as long as it remains inside the dimensions listed. Recently Philos Games has started creating a mass manufactured version of the puzzle which you can buy directly or at Puzzle Master or Amazon.

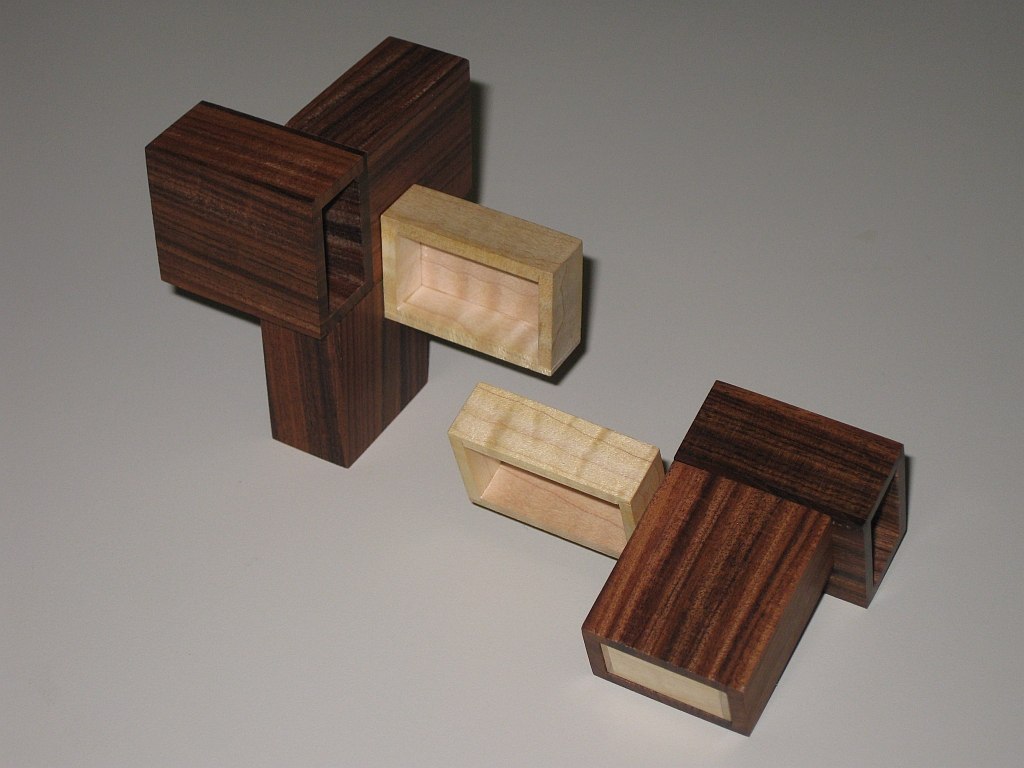
When I received this puzzle, Eric’s description states that there are two solutions, however I was aware that Trevor Wood claims there are three solutions. I set myself a challenge to find all three solutions or prove that there were only two. When I received the puzzle, it was already in the solved state, so I took it apart, shuffled the pieces and starting trying to put it back together. After about an hour I had the five boxes back together. This is a tough puzzle, and is very easy to get lost trying to solve it. A systematic approach will serve you best when trying to solve this, as randomly lifting pieces is unlikely to be successful.

With one solution found, I started looking for the others. After another 15 minutes, I found a way to change the location of only one piece and still solve the puzzle. Having done this, I had to take photographs of the two solutions to prove to myself that they were indeed different. The two solutions are mirror images of each other, so easy to miss that they are different. (You can click this link to see all solutions)

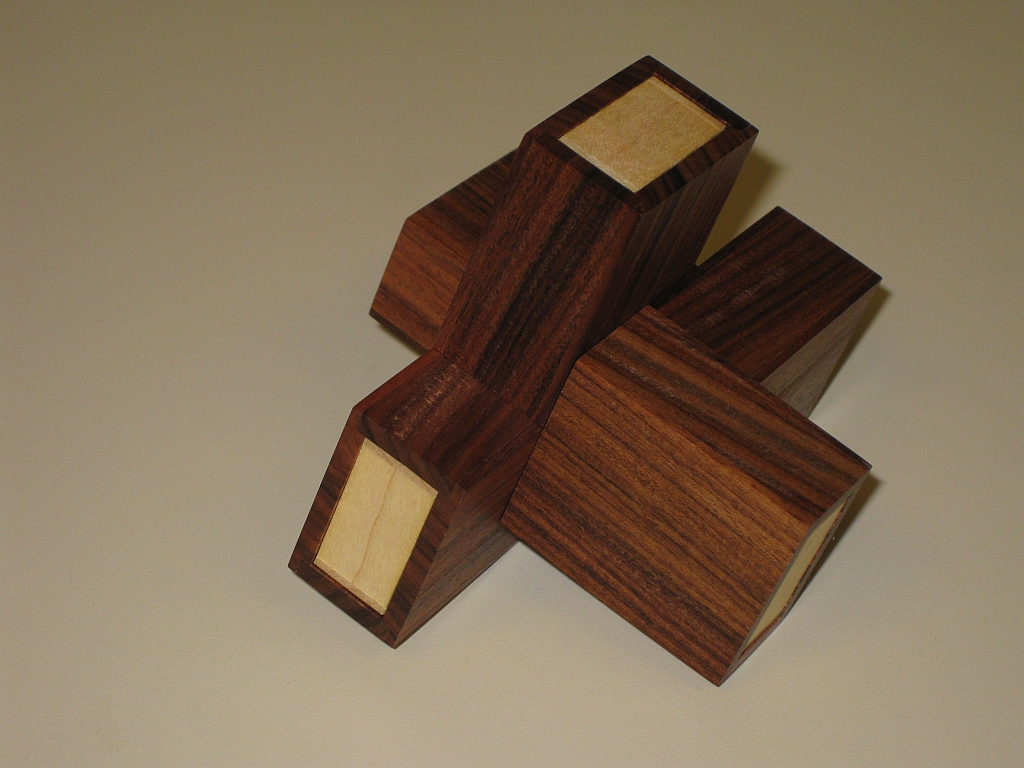
So two down. Could I find the third? As it happens, I had come across the third solution while trying to solve the puzzle for the first time, however it is not possible to create this third solution with Eric’s version of the puzzle. At this point, you might think I’d give up and accept that it wasn’t possible to create the third solution. Well, I’m not the sort of person that gives up. I wanted to create a version where all three solutions were possible. As Trevor Wood points out, the dimensions of the puzzle, and exact placement of the drawers is required to be able to create all three solutions.

One thing that made me want to create my own version was this image of the Philos Puzzle in the solved state (thanks to Brian Pletcher for the image). If you look at the image on the Puzzle Master site, you’ll see that it is solved in the same way as I have it solved, but here is a completely different solution, this one much flatter than the two possible using Eric’s version!

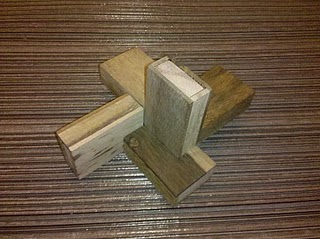
Off to the store I went to buy some matchboxes. (As a side note, you have no idea how difficult it seems to be to buy a standard matchbox in San Jose!) With a pack of 10 matchboxes in my hand I took out my tape, and started joining the sleeves and drawers together to match the diagram above, while creating an ever increasing pile of matches on my workbench.

Homemade version of Oskar's Matchboxes

Homemade version of Oskar's Matchboxes

The result speaks for itself (see the link below as I have not included the solutions by default so you can discover them for yourself!). The third solution which was not possible with the very high quality version from Eric Fuller.

If you want to see all three solutions, click here, and browse the images. Note, these won’t appear if you click any of the other images so if you don’t want to compare the solutions, you’re not going to be exposed to them accidentally.

As an additional challenge, try putting the matches back into the boxes when you solve the puzzle. After all, they are matchboxes, and should still be able to store the matches. I went ahead and did just that, and realised that the puzzle becomes harder. Given the interesting orientation of the drawers, the order in which you close them now becomes even more important, as it;s not possible to put them together in all orders since the matches will fall out (unless you have 4 hands!)

This is a fun project, and fairly simple as long as you get matchboxes with the correct scale. Have a go, and let me know how you get on. Alternatively, pick up a copy of the Philos version and have a go at finding all three solutions yourself.

The Svetnashki Optical Puzzle

While browsing the Puzzle Master store, I came across this interesting puzzle by Russian inventor Vladimir Krasnoukhov. The Puzzle is a variation of the classic fifteen sliding tile puzzle however instead of trying to create an image or sequence of numbers, you play with light. Thanks to Puzzle Master for sending me this puzzle to review.

Svetnashki Optical Puzzle

Svetnashki Optical Puzzle in the bag it arrives in.

The idea behind the puzzle is quite simple. Using perspex which has been polarised either up/down or left/right, an invisible grid is formed. The back of the puzzle is a 2×2 grid where each alternate quarter is polarised differently, and then the fifteen 1×1 sliding tiles are polarised in alternate orientations. As the pieces slide across the back grid, their colour will change from transparent to opaque.

The challenge is made somewhat more difficult due to the top sheet of perspex which holds the pieces in place but also restricts your ability to touch any of the corner pieces and the four centre pieces. As a result you have to tilt and rotate the puzzle to move the pieces around instead of just pushing any individual piece where you want it to go. It’s a nice idea, and the pieces move around freely enough that you don’t feel frustrated.

One possible solved state

One possible solved state with all tiles clear

One possible solved state

One possible solved state with all tiles black


Given the nature of the puzzle, there is more than one ‘solved’ state possible. You can make the puzzle entirely clear or entirely opaque, there really is no right or wrong answer, and as such it gives it far more flexibility and replay value than a standard sliding tile puzzle with a fixed picture printed on the surface.

Creating patterns in the Puzzle

Creating patterns in the Puzzle

A Checkerboard pattern

A Checkerboard pattern


Add to that, the ability to create as many patterns using the light and dark as you care to imagine, and the possibilities, while not endless are certainly large. Creating the checker board pattern on the right is just one example, but there are many more just waiting to be discovered.

Puzzle Master rates the puzzle as a Level 7 – Challenging (out of 10), however I don’t really see it being quite as difficult. Perhaps the amount of fun you can have with this puzzle makes it seem less difficult. I was able to move between each of the solved states in a few minutes, and was able to create a number of simple patterns quite quickly as well. To my mind this is a case where fun outweighs difficulty and is less important.

Puzzle Master sells a number of colours including both the larger and smaller versions of the 4×4 puzzle and the double layered version, you can order different sizes and custom colours from the manufacturer directly. Svetnashki Optical Puzzle On their website, they have 4×6 and 6×6 versions available if you’re looking for an added challenge, or to be able to create more patterns.

Overall, this is an excellent little puzzle/toy and I highly recommend it for all ages and skill levels. I’ve had a lot of fun just randomly spinning it and seeing which patterns are created. While I’m not normally a fan of sliding tile puzzles, this one really has caught my attention, and I have to say I really enjoy playing with it.

Aluminium Cross by Wil Strijbos

As I mentioned previously, I was lucky enough to be able to pick up a copy of this re-run of Wil Strijbos’ first ever puzzle design, the Aluminium Cross. John Devost over at Puzzle Paradise had been in touch with Wil to get a few for the US collectors, and I bought mine through John. Wil Strijbos is a fairly well known puzzle designer, creator and collector from the Netherlands. He has a huge collection of puzzles, and has been designing puzzles himself for quite some time.

Wil has a number of glass bottle puzzles (which Oli has reviewed here and Allard over here) and nut/bolt puzzles he designs and makes, but perhaps his most notable works are his aluminium puzzles. Just by looking at these puzzles, it’s easy to see why, they really do look good, they’re well finished and are just a little different to many other puzzles on the market today. You can read Allard’s review of Wil’s Aluminium puzzles over on his blog and Kevin’s over on PuzzleMad. Since Wil makes these by hand, there’s never a huge number of puzzles available, however he does take requests, and has a catalogue of other puzzles for you to buy while waiting on one of his puzzles.

Aluminium Cross by Wil Strijbos

Aluminium Cross by Wil Strijbos

The Aluminium Cross was created back in 1980, when Wil was invited to meet Mr James Dalgety from Pentangle Puzzles after writing to Pentangle about their puzzles. He felt that with such an invite he should create something to take with him. Back in 1980 he made only a few samples of the puzzle, and it has taken 32 years for him to make it available on a larger scale. Looking at the puzzle, it doesn’t look very challenging. There are two bars of aluminium and two rods going through them, so it shouldn’t be too difficult to take apart? It’s at this point it’s worth noting that when Wil announced the availability of this puzzle again, he showed pictures of the puzzle open and closed. That’s right … he shows the puzzle open. Anyone who is able to show you their puzzle solved, and it still be a challenge to take it apart has a good puzzle on their hands. For that reason I don’t hesitate to do the same in this review and show you the same as Wil did.

Aluminium Cross by Wil Strijbos

Aluminium Cross by Wil Strijbos

Even having seen the puzzle already apart, I can confirm that there are no clues there. If anything all it does is serve to intrigue and confuse. I know having seen the images from Wil himself it just made me want one even more.

When I received the puzzle, my parents were over from Scotland on Vacation, and my Dad who is also a puzzler was quite interested as well. At first, everything is locked solid and none of the pieces will slide. Over dinner, I sat and played as we talked and gradually by twisting and turning the puzzle, first one bar moved, then after more work I could remove it. Yet more work was required to finally take the two parts of the cross apart and see how the puzzle was constructed. I will admit that I wasn’t paying as much attention as I normally do when solving a puzzle given that I was enjoying dinner with my family.

To my surprise I had taken the puzzle apart in under 15 minutes. And that is where the fun started. I had to put the puzzle back to the start, so my Dad could open it. I then spent the next 40 minutes trying to work out how I had taken it apart to be able to put it back to the starting position, and ended up having to take it apart again several times to see how each of the elements interacted. My input to the dinner conversation was significantly less than it had been while I was opening the puzzle, and there were a few grunts as the puzzle eluded my attempts to reassemble it. This puzzle is just as challenging to restore to its original state as it is to take apart.

In all there are six elements to the puzzle which need to be understood to solve it. It’s a great puzzle, and as a first design it makes my efforts seem fairly meagre. Having handed the puzzle to my Dad, he opened it fairly quickly, but ended up handing it back to me to put back together. I’ve given it to a few other friends and they have all enjoyed playing with it and agree that it’s a great puzzle.

The first run of the Aluminium Cross sold out very quickly, but I know Wil has batch two ready and I have no doubt that if they continue to sell well he’ll make more.

I’ll be reviewing Wil’s other aluminium puzzles soon, so stay tuned for more from Wil Strijbos. If you’d like to purchase any of Wil’s puzzles, or find out what other puzzles he has in stock, feel free to get in touch, and I’ll send you Wil’s details. He currently doesn’t have a website, but does maintain a mailing list with lots of info.

Oskar’s Blocks

Oskar’s Blocks, also known as Oskar’s Cubes is another design by Oskar Van Deventer, can be found in both wood and metal versions. This version is made by Bits and Pieces from chrome plated metal and is available from Puzzle Master. Thanks to Puzzle Master for sending me this puzzle to review.

Oskar's Blocks

Oskar's Blocks

As you can see, this is a good looking puzzle from the well known and prolific designer Oskar Van Deventer. It’s a fairly small puzzle, with each of the three cubes measuring 15/16″ in size, to give a fully assembled size of just under 1.5″. Given that the puzzle is metal, it has a good weight for its size, and while the pieces aren’t a tight fit, they do hold themselves together well enough to not fall apart when you place it on a single cube.

Oskar's Blocks

Oskar's Blocks

With only three pieces, you might be forgiven for thinking this is an easy puzzle. Puzzle Master ranks it as Level 7 – Challenging (out of 10), and I have to say it’s spot on. This isn’t the most challenging puzzle you’ll come across but take the pieces apart, roll them across the floor, come back in half an hour, and you’ll find it a challenge to put back together unless you’ve memorised the slots on each piece.

Oskar's Blocks Pieces

Oskar's Blocks Pieces

With each of the pieces being dissimilar, it does add to the challenge of this puzzle. Given the number of ways that each of the pieces can interact with each other, getting the first two pieces in place to allow the third to slide in and lock the puzzle together is a good challenge. I spent around 15 minutes after having scrambled the pieces, and left them for a while to put it back together. The more times you solve it, the easier it becomes, but I think that is true of many puzzles out there. The puzzle comes simply packaged from Bits and Pieces in a white cardboard box, with a solution included if you’re really stuck.

Overall, this is an excellent puzzle. It’s well made, solid and nicely finished. With a price tag under $15, this is well worth picking up. Despite being pocket sized, I’d advise against keeping it there given the sharp corners.

Wunder Puzzle Series

In a recent sale on Cubic Dissection, Eric Fuller had a number of interesting puzzles available. I missed most of the items there, but did spot the Wunder Puzzle Series. Initially, I purchased only the #2, which was listed as the hardest of the set, but having the puzzle in my hands (and not having solved it after 2 weeks of trying) I realised that was a mistake and ordered the other two puzzles.

The Wunder Puzzle Series from Eric Fuller

The Wunder Puzzle Series from Eric Fuller

The story behind this set of puzzles is an interesting one, but rather than me try to retell it, here’s what Eric has to say about the series.

I saw a picture on facebook of an interesting variation on the classic joint puzzle…Peter Wiltshire of Canada had scored it on Ebay. I shot him a message and he was kind enough to lend me the original (shown on a white background below) so I could make some copies. When I got it in my hands, I started thinking about various different locking mechanisms that could be used, and decided to make the original plus two very different variations.

The Original Wunder Puzzle

The Original Wunder Puzzle, image from Cubic Dissection

As I mentioned at the start, I had only ordered #2, thinking to myself, I’m an experienced puzzler, I can solve the hardest one. At the time I couldn’t justify all three, so why buy an easy puzzle, right? I’m pretty sure I’m not the only puzzler out there who things like that. (See what Allard has to say in his review given that he did the same as me)

Well I started trying to take #2 apart, and all I could make it do was one end cap would spin, and it would squeak slightly. I played on and off for around 10 minutes a night for nearly two weeks and made little progress. I did find that it was possible to get the end to ‘lock’ but that didn’t seem to help me open the puzzle. Slightly frustrated, I’d put it back on the puzzle shelf each night, and left it until the next night.

When I was at Stan Isaacs puzzle party last month, I spotted that he had all three puzzles sitting on a desk. I picked up what turns out to be #1, and solved it fairly quickly. I didn’t have attempt to open the original Wunder puzzle, but decided to order the remaining two puzzles I didn’t have as I really liked the mechanism on #1.

This is where I have a gripe with the woods Eric chose. The original Wunder Puzzle was a very dark wood, with a very light wood as you can see from the photo above. It’s hard to tell if the original puzzle was walnut or some other dark wood, or if the wood on one half was stained. Anyway, when Eric re-made the original mechanism, he chose a lighter bubinga and made the #1 mechanism from walnut. Personally, I think it would have been nicer to make the original in walnut, and his variation in the other woods. Yes, it’s a small gripe, but I am constantly confused as to which is which!

Eric's remake of the original Wunder puzzle

Eric's remake of the original Wunder puzzle

So back to the puzzles themselves. Each of the puzzles is 1″ x 3.4″ long, and are really beautiful pieces. They all have very precise geometry and dimensioning, such that the parts come apart perfectly smoothly, but require you to move them in exactly the right way or they will stay firmly locked in place. Limited to 30 of each puzzle, this is a fairly small run of puzzles, and looking at the work that went into them, I can see why.

The Original Mechanism has been recreated by Eric in Carolina Ash and Bubinga (see my small gripe earlier). Looking at the joint on the side of the puzzle, there really seems like no way this can come apart. The puzzle seems almost like a solid piece which has been glued together. I can assure you that no glue was used to hold the pieces together. The locking mechanism on this puzzle is fairly simple, but fairly clever. Many people who play with it may not find how to unlock it as there are virtually no external clues, unless you have a compass handy! There are still a few available here at the time of writing if you’re interested.

Wunder Puzzle #1 by Eric Fuller

Wunder Puzzle #1 by Eric Fuller

The first variation that Eric created is probably my favourite of the series. Made from Carolina Ash, Black Walnut and Sapelle, it’s a much simpler mechanism that the original or #2, and for my money has the nicest movement. Most people who pick this one up will solve it, and probably fairly quickly. Don’t let that put you off, this is a beautiful puzzle, and the look on someone’s face when the parts separate is worth it. At the time of writing, there are still a few of these available from Cubic Dissection and I’d highly recommend it to anyone. At under $50, this is a great puzzle.

Wunder Puzzle #2 by Eric Fuller

Wunder Puzzle #2 by Eric Fuller

So back to Wunder Puzzle #2. Made from Carolina Ash and Paduak, the bright red of the Paduak really makes this puzzle stand out. It’s no Wunder, given it’s appearance, and the claim of being the hardest of the set, this puzzle sold out fairly quickly. Just a small side note, the Paduak version while a beautiful vibrant red colour currently, will gradually darken to a dark brown over time with exposure to light. Interestingly, the insides of the puzzle will remain that vibrant red, so you’ll get a nice surprise when you open the puzzle!

After a day of doing fairly well at solving puzzles, (I’d opened the Box with a Tree, Chip and Free Dial – reviews coming soon) I decided to go back to #2. After all, I was on a roll! Well, after about 15 minutes I had it open! The mechanism on this puzzle is devilish. It’s not easy to open, and very easy to relock when you’re trying to open it. Eric has made a very clever variation, which takes the original a few steps further. It’s a nice puzzle, but certainly not my favourite. This will keep you guessing for quite some time, until that ‘Aha’ moment, and things come apart.

As it happens, I did manage to open #2 before the others in the series arrived from Eric, however I am happy to have the full set. It’s a nice progression of puzzles, and they look great. I’d personally say that the order of difficulty is #1, followed by Original, followed by #2.

This is a great set of puzzles, and very nice to see new life being given to what was clearly a very old puzzle. I’d highly recommend these to anyone looking for something a little different for their collection.

Note: When I was proof reading this review, I noticed something interesting. If you look closely at the Original puzzle Eric copied, and the remake, the angles used are not the same. Eric’s version while similar isn’t a copy of the original puzzle. If you look closely, you’ll see the angles are inverted.

Cast Loop

This entry is part 1 of 8 in the series Hanayama Cast Puzzles

Cast Loop is the second newest puzzle in the Hanayama Cast series of puzzles, designed by Finnish puzzle designer Vesa Timonen based on an original puzzle ring he created for his girlfriend. It is available from Puzzle Master along with many more puzzles from the Hanayama cast series. The object of the puzzle is to create a closed loop. Thanks Puzzle master for sending me this puzzle to review.

Cast Loop

Cast Loop

The puzzle is packed in the standard Hanayama black and gold packaging, and is held in the box in the position seen above. By shipping it this way, you’re not given any clues as to how to solve the puzzle, as separating the pieces doesn’t show you how to solve it. If anything it may mislead you, and trick you into not seeing the solution. Quite a clever way to package the puzzle. It also ships with a leather thong, so that once solved, the puzzle can be worn as a necklace. It does hold together well, so this would be a possibility, but we’ll get to that.

This is a great looking puzzle, with the chrome plated finish really making the puzzle stand out. The puzzle is around 2 3/4″ in diameter so sits nicely in your hand, and being a cast puzzle has a solid weight to it. This really feels like a high quality puzzle.

Cast Loop Magnets

Cast Loop Magnets

Taking the puzzle apart, you’re left with what looks like two mirror image pieces. The magnets on the angled ends are strong enough to hold the puzzle pieces firmly together, so there’s no worries about the puzzle accidentally coming apart once solved unless you want it to. To that end I think it would be possible to wear the puzzle as jewellery, just don’t expect to see me wearing it any time soon.

Cast Loop Symmetry

Cast Loop Symmetry

One of the things I love about this puzzle is the symmetry when solving it. Even though there are minimal moves needed, the puzzle looks great throughout. This is listed as an easy puzzle both by Hanayama where it is a 1 on their scale (1-5) and 5 on Puzzle Masters scale (5-10). It is an easy puzzle, but the beauty is that it is designed in such a way that you need to really think about what you’re doing to be able to solve it. The obvious way to combine the pieces won’t get you a solid loop.

Knowing how to solve the puzzle, I found myself idly playing with it, opening and closing the loop without really looking at it. Sitting in long meetings at work, it gave my hands something to do rather than just spinning my pen.

Cast Loop Solved

Cast Loop Solved

This is a stunning puzzle, and is one you really should have in your collection. If you don’t already, then go buy this, you’ll not regret it!