Revomaze Clear Sleeve – Followup

This entry is part 7 of 11 in the series Revomaze

A little while back I wrote about the process of turning a clear sleeve for the Revomaze puzzles, however I hadn’t really completed the project at that time. I didn’t have springs, and I was still trying to figure out how to put a spring in there so that I could complete the project and have a fully working sleeve. I’ve now finished the process, found springs, a way to put them in the sleeve, and have a set of fully working sleeves. Read on to find out the end of the story…

The Finished Sleeve - Photo courtesy of Allard

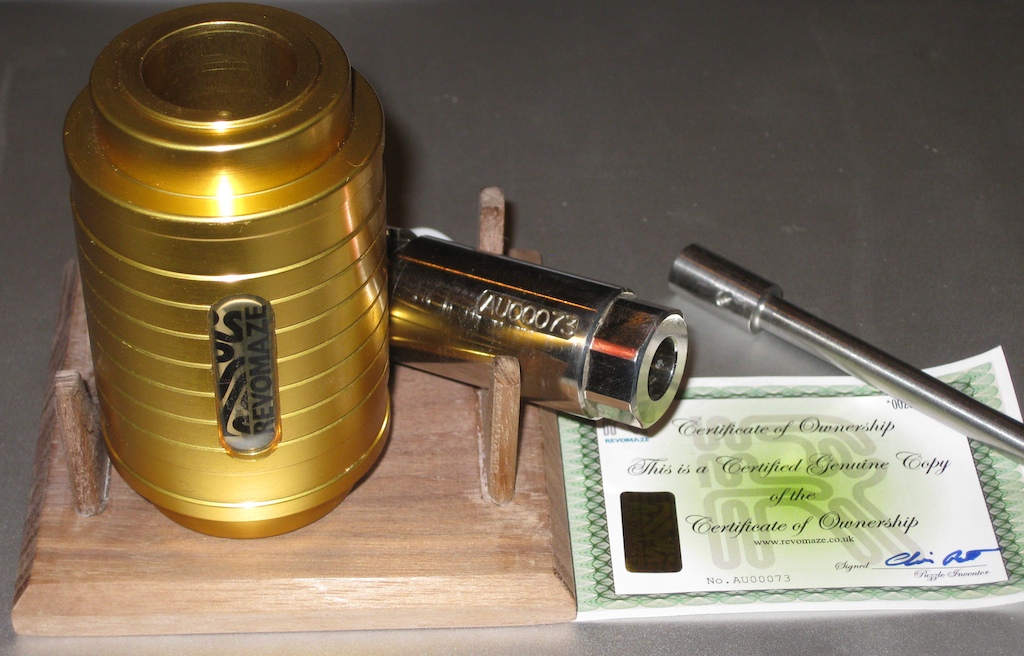
The Finished Sleeve – Photo courtesy of Allard

Thanks to Allard for the excellent image above. For more of his thoughts and a clear perspective, go have a look at his blog.

Before going off and making many more of the sleeves, I had to make sure that it was possible to make it into a working puzzle. That meant I had to solve the issue of the spring. From the Revomaze website, there is a pin and spring kit listed in case you managed to lose the set from your puzzle. Sadly they were showing out of stock and to be fair, it was a fairly expensive route to take, given that I only needed the spring. I decided to contact Chris Pitt, to see if he could help, or at least help out with dimensions of the spring and also how deep the spring hole is drilled into the sleeve. Sadly I never did receive a response back from Chris, so I had to look at alternate avenues.

Fortunately, a good friend had a spare spring or two and offered to measure it for me so that I could try to find a replacement. He even went so far as to measure the length compressed, and of course managed to have the tiny thing launch itself from the calipers and get lost in the carpet.

Top to bottom:  Threaded plug, my spring, official spring, official pin.

Top to bottom: Threaded plug, my spring, official spring, official pin.

It turns out that the spring measurements are: Outer diameter 2.90mm, Length 5.98mm and Compressed length 3.9mm. It really is tiny, and therein lies a problem. It’s a completely custom size. I spent a lot of time hunting online spring makers to get an exact match (and that’s without knowing the compression load) and just couldn’t find one. I did finally get something that’s very close and decided to settle on it, but even then it wasn’t cheap. To buy just one of these is $7 each! The price drops as you order in bulk, but still not a cheap part.

As you can see from the photo above, the spring I found is slightly thinner in terms of the wire thickness, but pretty close in the other dimensions. The 1 euro coin should give you a feel for just how small these are.

A week later the spring arrived, and I was a step closer to a working maze. I still had the issue to work out the drill depth for the spring/pin hole. While I had been waiting there was some talk on the Revomaze forums about how to do this, and Thayneq suggested having the pin/spring being removable. Well I went off and experimented with a tap to be able to thread the outer sleeve, and put a screw plug in there. Turns out that a 6-32 tap is too small for the pin, and a 8-32 is too large. In the end though this worked to my advantage. The pin itself is 2.90mm wide, so I was able to drill a hole all the way through one side of the sleeve for the pin, then drill 3.7mm using the larger drill bit to take an 8-32 thread and plug.

This actually solves three problems. Obviously the pin is now removable, so if anything goes wrong when you’re solving a maze, just remove the pin. Secondly, I’ve not had to drill all the way through the sleeve from the other side and then plug the hole. This is the way the official sleeves are made, and the plugged hole is then covered with the Revomaze sticker. As you know I’m not affiliated with Revomaze in any way, and don’t have stickers, so the ‘plug’ was just going to be an eyesore. I’m also pretty sure that I don’t have a long enough drill bit to get all the way through either, so that was a nice bonus. Finally, the screw plug allows the tension of the spring to be adjusted so that the movement in the maze ‘feels right’.

Note: The Image below is deliberately dark to ensure that no solution details for the maze are given away.

The plug covering the spring without giving anything away of the maze solution.

The plug covering the spring without giving anything away of the maze solution.

With all the pieces in place, I had to take the plunge and try it on one of my test sleeves. I put the ridged sleeve I had in the vice, carefully drilled it, and then re-drilled for the plug. Taking the pin from my blue maze, popping that in the hole, followed by the spring and then the plug I was able to check the compression of the spring, and compare that to the depth the pin sat on the official sleeve. After some fine adjustment of the screw until I was happy, I took the pin back out; assembled the blue core and inserted it into the sleeve.

Having now sent a few of these out, my friend with the spare spring has tried both the official spring, and the one I found, and prefers mine because the spring compresses a little more meaning that the plug can be screwed in a little further. He’s also done some other testing, but I’ll come back to that later.

After a little jiggle the pin dropped into the hole, and I was able to turn the maze and reset it. That familiar click left me with a huge grin on my face, and of course this time I could see exactly what had happened. The question now was whether the maze was solvable!

Very cautiously, I started to navigate the maze. Of course I’m now holding the puzzle ‘upside down’ and looking at the pin rather than the sticker. Despite working with the ridged sleeve, and there being a fair bit of distortion along the length of the maze, the section under the pin is perfectly visible, and it’s easy to navigate. At the first trap, I fall off, and hear that familiar click. Somehow it seems even more satisfying being able to see the pin fall off! After a couple of tries, I make it through the maze, past the tricky section with ease, and the pin easily drops back into the core, and I can remove it from the sleeve. IT WORKS!

As with anything in science, doing it once isn’t good enough, it has to be repeatable, so after picking the pins up from the floor (Ed: You’d think with the number of these I’ve solved I’d not drop the pins by now) I re-assembled the core and put it back in again. Playing around I tried moving to various parts in the maze, and dropping into a reset and restarting; each time grinning because I was controlling the click. Having navigated to the end again, I tried to remove the pin, and found it didn’t want to come out. Puzzled I tried the usual tapping and jiggling, but it wasn’t dropping. Of course I could see the pin and couldn’t work out what was stopping it. No worry though I unscrewed the plug, and removed the pin that way …

… Then realised what an idiot I’d been. Rather than turning the puzzle ‘upside down’ so that the pin fell into the core, I’d been trying to get it to drop into the sleeve hole. Just shows how being able to see what you’re doing doesn’t always help!

So with the proof of concept working, I took a quick video to show the operation and sent that to a couple of close friends. Now I had to start making these as the requests were coming in pretty quickly!

Some of the production sleeves, with a much clearer view

Some of the production sleeves, with a much clearer view

Something which had bothered be about the initial two sleeves I’d made was the ‘bubbles’ which are visible on the inside of the sleeve. This occurs due to the high temperature created by the friction when drilling out the core, but I wanted to try to reduce that and get as close to a clear, unobstructed sleeve as I could. With a little bit of work, and some liquid cooling for the drill bit I think you’ll agree I succeeded, and the sleeves are now much clearer. Just look at that shot at the top of this post from Allard. His images really show off how clear the sleeve is, and I have a good few more from him that I just can’t show as they give huge hints to the solution of the revomaze shown.

Using the saw as a staging area for production

Using the saw as a staging area for production

As you can see, production is now underway. Given that these are all hand turned, and finished, it still takes a good few hours per sleeve, but from the feedback I’ve had from the people who have one, they’re pretty happy, and that makes me pretty happy too.

One thing to point out is that the tolerances on my core are slightly larger than those from the official source. Nothing in the Revomaze design is standard sizes. The core is custom, the sleeve is custom, the spring is custom, the pin is custom, and as such you can’t buy tools which match the dimensions. As such I have had to make things as close as possible, but close is not exact. Having played with some of the mazes, Silver, Lime and Handmade as specific examples, there are elements in these mazes which do not work exactly as expected due to the larger gaps in the internal sleeve dimension. It is possible to solve these mazes, but some extra care is required, and some parts of the solution become trickier than with the official sleeve. I do know that Blue, Green, Bronze, Black, Orange, Gold, Red all work with no issues and really look quite stunning when displayed in these sleeves.

There is one further extension that I am looking at. I had a request for transparent colour matched sleeves for each maze. That requires custom casting of coloured acrylic, so for now it’s further away from reality. I do have paint based pens which are designed for working on acrylic and may add colour bands to the sleeves so you can see which maze is in a sleeve from a distance, but that’s still to come.

Hope you’ve enjoyed the look at the project, and keep an eye out for a time lapse video of the process coming soon…

Back after a short downtime

Hi all,

Sorry for the vanishing act my blog and other websites performed over the last week. Seems my Domain registrar decided to move my DNS to a new ‘more secure’ server, and that automated process took a week!

Well, things seem to be back to normal now, and I’ll get right on some more reviews for you. Most likely first up will be a follow up to the Revomaze Clear Sleeve project, which is now complete, and fully working with springs and functioning cores. Some of you out there have even received your copy, so if you’re waiting for one, I’ll be in touch soon, and if you’re on the fence then perhaps it will convince you to order one.

Till next time …

Sandfield’s Banded Dovetails

Back in August last year at IPP, I had the pleasure of meeting Robert Sandfield and talking to him about his puzzles, as well as picking up a copy of his Banded Dovetails, and ReBanded Dovetails puzzles.

Sandfield's Banded Dovetails or is it the Locked Draw Puzzle?

Sandfield’s Banded Dovetails or is it the Locked Draw Puzzle?

First up is his Banded Dovetail puzzlebox. Designed by Perry McDaniel, and crafted by the very talented Kathleen Malcolmson. Crafted from Mahogany, Alder and Prima Vera, I think you’ll agree that this is a great looking puzzle box. As is the Sandfield brothers trademark, there’s dovetails in there, with what looks like two bands which have been pinned to the outside of the box, creating an impossible joint. Of course, it wouldn’t be much of a puzzle if it were impossible, but the impression is very convincing. The puzzle measures 3.2″ x 2.25″ x 1.5″ so its small however I think the size really adds to the charm of the puzzle.

The goal is simply to open the box, but when is it ever simple when someone hands you something telling you it’s simple? When you pick up the box you’ll quickly find that shaking it will reveal something rattling around in there. Whether that’s useful or not it’s hard to tell, but any clue with a locked box is useful right?

This one took me a good hour or more to figure out. All the things I had thought of were entirely unhelpful and didn’t get me any closer to solving the puzzle. Really the thanks for that go to Kathleen who’s made this so well that there’s no clues at all as to what’s going on. I think it’s made even more impressive when you realise how many moves are required to open the puzzle.

The bag for the Banded Dovetails

The bag for the Banded Dovetails

As well as being a great puzzle, there’s also a bit of a story behind the puzzle too. If you have a look at Brian’s review of the puzzle, you’ll see he lists it as IPP 28 (Prague) from 2008. Allard’s review lists it as IPP 29 (San Francisco) from 2009, and my bag has IPP 30 (Japan) 2010 listed and a different name for the puzzle! So what was really going on? Sadly I can’t tell you, but it was an IPP 29 exchange puzzle. Both Allard’s bag, and my info sheet which came with the puzzle list IPP 29, and have IPP 28 crossed out. Whatever happened, I’m glad that this one made it out as it was worth the wait.

This is a real gem, and if you can get your hands on one, don’t hesitate!


Sandfield's ReBanded Dovetails

Sandfield’s ReBanded Dovetails

During the Exchange, Robert’s puzzle this year was the ReBanded Dovetails. When he exchanged this puzzle box, he mentioned that he’d had Kathleen remake the boxes as apparently some people had managed to open the Banded Dovetail, so this was to resolve that issue. A fun little story, and a nice way to present the new puzzle.

As you can see, the appearance is very similar to the Banded Dovetails puzzle. Made by Kathleen, and designed by both Robert Sandfield and Kathleen Malcolmson you know that there’s going to be something clever going on. This one is made from Baltic Birch plywood, Walnut and Lacewood. Plywood isn’t the sort of material that you’d expect to find in a puzzle box, but given the striking striped appearance and great finish, I really like the look of it. The wonderful snake skin like appearance of the lacewood really sets the box off nicely. Measuring 3.2″ x 2.5″ x 1.5″ it’s slightly larger than the Banded Dovetails, but only slightly. Of course the outer appearance is where any similarity ends.

Again when you pick it up, there’s a rattling from inside, and if you’ve already solved the Banded Dovetails, you might think that this gives you a clue. Well, prepare to be disappointed! Requiring a few more moves than the previous puzzle this one is every but as well crafted. I managed to open this one far faster than the first, taking less than 5 minutes, but I enjoyed it every bit as much.

This is a clever and well made box, with a couple of nice tricks up its sleeve and the mechanism is very well hidden. Hat’s off to Kathleen again there.

Both of these are great puzzles, and I’d say don’t hesitate to add them to your collection if you get a chance.

Rhombic Maze Burr

At IPP32 in Washington DC, Derek Bosch unveiled his latest puzzle design, the Rhombic Maze Burr or RMB for short, and took names of people who were interested in ordering a copy. I’ve been fortunate enough to have both of his prototypes to play with for the last few months, and it’s about time I let you see them.

The large and small RMB's side by side.

The large and small RMB’s side by side.

If you’re familiar with Kagen Schaefer’s Maze Burr then this might look a little familiar to you. Indeed it’s a very similar design, but Derek has taken it one level further by transforming the frame from a cube into a much more complicated Rhombic frame. That means that the number of moves to open the puzzle can range anywhere up to 350+ moves.

The goal of the puzzle is to slide the plates and work toward removing the plate which has a slot cut to allow it to be removed from the frame. The plates are dual layered, where the top layer moves in one axis, and is connected by a pin to a lower plate which moves in the orthogonal axis. The lower plate has a pin screwed into it which runs in the maze tracks cut into the top plate. As you move the bottom plate, it sticks out through the frame, preventing the adjacent plate from being moved in that direction. To be able to solve it, you often need to think several moves ahead to make sure you don’t block your progress. It’s much simpler than it sounds and the video should show things much more clearly than I can describe them.

With the same set of plates, much like the Maze Burr, the way the plates are arranged changes the number of moves required to solve the puzzle. Initially Derek had two sizes of the puzzle available, the small and large as seen above. Derek was also offering two different materials, having both a fully 3D printed version, and one with Acrylic plates. Add to that a possible option to change the colours to whatever combination you wanted, and it’s an attractive offer. The large puzzle measures around 4″ at it’s widest, and the small is around 3″. Both are a good size however I’d say given that I have reasonably large hands I prefer the larger size.

Having been able to play for a while I can say that both versions work exactly the same, so the size doesn’t change anything. With the larger fully 3D printed version, the friction between the plates initially was making it a challenge to slide them, however as the plates rub past each other they quickly become much smoother and I didn’t find it to be a problem. Given that I was the first person to really play with this copy, I had some breaking in to do. In some regards it may have been helpful since Derek had configured the larger maze in one of it’s harder configurations so when I found a stiffer plate it tended to mean I was moving in the right direction. With over 300 moves (assuming I didn’t backtrack) it was quite a challenge, but after 4 months of playing I did finally solve it. It’s an epic challenge, but certainly possible. With logical thought and analysis of what needs to be moved, you can continue working in the right direction.

The small version showing how the pieces move.

The small version showing how the pieces move.

The smaller version was configured in a much more manageable setting with around 50 moves required, and I was able to solve it in around an hour. Learning from the simpler configuration I was able to apply that to the more complicated setup as the same principles apply. Of course if you get entirely stuck, you can unscrew the pins and always reset the puzzle so you’re not going to be stuck.

The large RMB with two plates removed to be reconfigured.

The large RMB with two plates removed to be reconfigured.

Since Derek gave me these versions to play with, he has been hard at work and is now able to make the mazes scalable, and has also etched letters into the frame and maze plates to make it much simpler to describe how to configure a particular maze. These modifications will be available when the puzzle goes into production later this year. The puzzle will come with a booklet containing around 50 configurations for the puzzle, and I know Derek has done analysis with 5 additional exit plates although there are no plans at this point to include the additional exit plates. The puzzle has been computer analysed producing 20 Terabytes of data so I can assure you there is no shortage of configurations to keep you busy!

One thing to note is that as you can see, with the Shapeways 3D printed frames the white discolours reasonably quickly and can end up looking quite dingy. One option is to dye the frame a darker colour which should help. Derek has also hinted to me that he may offer a DIY version of the puzzle which would be cheaper, but there’s no details about what that would be at this point.

From the photograph above showing how to reconfigure the plates, you can see that the puzzle is hollow, so there is empty space inside, however the opening to that inner space is rather small.

If you’re interested in a copy of Derek’s RMB, then let me know and I can pass on Derek’s details to you.

Hercules

Hercules, or the 22nd Labor of Hercules, is a Jean Claude Constantin puzzle which he used as an exchange puzzle at IPP 22 where he made copies in wood. This version was made by Bits and Pieces and was available from Puzzle Master.

Hercules a.k.a. 22nd Labor of Hercules

Hercules a.k.a. 22nd Labor of Hercules

This copy of the puzzle measures 4.75″ x 4.75″ x 0.6″ with machined aluminium pieces, and a plastic tray. The anodising on the aluminium pieces makes all but the black piece stand out against the black plastic tray, so this is an attractive puzzle sitting on a puzzle shelf. The pieces are accurately milled, and fit the tray well, with little additional room beyond that needed to solve the puzzle.

For me, the plastic tray is pretty poor. In my copy it’s not very well made, with a number of small lumps of plastic around the inner edge of the tray, and while not flimsy, it does feel cheap next to the aluminium pieces.

As both Brian and Gabriel have pointed out the finish on the aluminium pieces is pretty poor. There are some very noticeable milling marks on all the pieces, and the anodising process has left some uneven colour, which is most noticeable on the blue piece. I have a number of metal puzzles which have been coloured this way, and the is probably the poorest example I’ve seen. Not much to ask to have the pieces finished to a slightly higher standard.

Looks like lots of room in the tray

Looks like lots of room in the tray

That aside, the puzzle is well made to tight tolerances, and as such, the puzzle solving experience is not affected. I do have one small gripe here though. The puzzle comes in a cardboard box which exactly fits the tray and no more. That means that the puzzle comes shipped in the solved state. I would be fine with that, however inside the cardboard box, the puzzle is in a sealed plastic bag, with the solution, face up, on top of the pieces. Really if you want to solve this one yourself, ask someone else to unbox it for you, and hand you the pieces and tray separately, as there’s no easy way to even open the box upside down and have the pieces fall out so you can solve it ‘unseen’.

That aside, the solution provided is particularly inelegant. Much like both Brian and Gabriel, I found an alternate and much more elegant solution to the puzzle, which I believe to be the originally intended solution from what I have been able to see of Jean’s exchange picture. So if you find yourself unable to avoid seeing the solution the puzzle is shipped in, I’d say try for this alternate solution, I think you’ll prefer it anyway!

Overall this is a good copy of the puzzle, and for the price you really can’t argue. Well worth picking up a copy as it’s a great little puzzle, and not too challenging that you’ll find the satisfaction of a solved tray packing puzzle before you pull out all your hair.

Revomaze Gold Extreme

This entry is part 6 of 11 in the series Revomaze

It’s been a while since I reviewed a Revomaze puzzle, and since the last time I talked about them, there’s been a couple of new puzzles released from Ashton Pitt. We’ve had a couple of special editions in the form of an Orange, and a Lime, and the final puzzle in the Series 1 set was released. That puzzle was the Gold, and was shipped almost exactly a year ago.

The Gold Revomaze

The Gold Revomaze Puzzle

I’ve already covered the basic puzzle in my first review of the blue, so for general information on the Revomaze puzzles, I’d suggest reading that post here.

The fifth and final puzzle from Revomaze in the Series 1 is the Gold. This puzzle, like the Bronze and Silver isn’t available as a plastic puzzle in the Obsession line, as it’s not possible to create some of the internals in plastic.

The Gold is rated by Revomaze as having a difficulty of 100/100 (extreme) and an estimated opening time of 250+ hours. The fastest opening so far is listed as 400 hours. It is described as a dynamic maze and is the hardest puzzle to be released to date from Revomaze. Only part of the puzzle is listed as being mechanical. There is also an algorithm, which needs to be solved in order to be able to open the mechanical puzzle. Each Gold is listed as being unique, and I’ll talk a little about that later.

If you’ve read the Silver review, you’ll remember me talking about the “not-a-canyon”, which was an area where the core was able to spin. Something we’d not seen in a Revomaze puzzle previously, and certainly had many of us scratching our heads as to how that could happen. Well Gold starts that way, and really doesn’t get much better.

Very early on in the puzzle, you’ll find yourself going in circles, with the occasional notch you can drop into. You may even find that from time to time that notch isn’t a notch, and becomes a path further into the puzzle. At first it doesn’t seem to make a lot of sense, and if you’re lucky, within a short time, you’ll find yourself with the core as far out as you’ve seen it with any of your other puzzles, but there’s no dot, so you know you’re not finished. And let’s be honest, if the puzzle is rated as the hardest to date, you’d be a little upset if it was that easy.

So you’ve now got the core as far out as you can, but it’s not done much for you, and really at this stage you have little idea what you did to get it here. So you decide to go back to the start, and spend some time trying to figure things out. Of course, getting back is almost as much of a journey as getting to where you are!

The challenge here is to figure out what’s going on and understand what allows you to move from one ‘ring’ to the next. Like any other Revomaze, this puzzle can be mapped although you probably think that’s not true initially. As with any other Revomaze puzzle, I had to sit and map things out, and although it seemed like I’d need to do something special for this maze, it does map out the same as any other and I resorted to my usual Excel based map.

Now as I mentioned previously, the mechanical puzzle is only one small part of the Gold, and that is where many people on the Forums have expressed disappointment, myself included. The reason is that in order to open the puzzle, you need to solve an algorithm, in the form of a set of cryptic clues to be able to get a code which can then be applied to the puzzle to let you open it.

Sound complicated? Well the clues are certainly cryptic, and will need you to think so far out of the box that as of writing this a year after the puzzle was released, no-one has solved the algorithm to the satisfaction of Chris Pitt. That alone tells you all you need to know as far as I’m concerned.

For me, I found the algorithm to be very off-putting. I have loved the Revomaze puzzles from the first one I played with as they are challenging mechanical puzzles. Sadly the Gold is not a mechanical puzzle. It’s a combination lock. You get a code, enter it, and the puzzle opens. That may be over simplifying things, but at the bottom line, it’s exactly what we have.

Chris tried to create a puzzle which could not be opened by cheating, and wanted to have a puzzle were each and every copy was unique. The algorithm allowed him to do that, and with a minimum number of internal parts, each puzzle in the 250 puzzle run could be made unique. Sadly for me, and I know I’m not alone, that also took the Gold away from the original spirit of the puzzle.

When you receive the puzzle, and get the algorithm clues, you’ll also get a three letter code with the puzzle. When you register your puzzle with Revo HQ, you’ll need to send this code as part of the email. From there, you’ll receive another three letter code in return. These are the starting point for solving the algorithm and getting the solution code you’ll need to open the puzzle. Of course without understanding what’s going on in the puzzle, and how you’d apply the code to the puzzle you’re not going to get very far.

You’ll also get a warning that excessive use may damage the puzzle. Given that this was expected to be the most challenging puzzle, with over 250 hours of puzzling expected, what exactly is excessive use. It turns out that the warning was issued because there was some discussion about brute forcing the puzzle by trying every possible combination (in theory 25^3 or 15,625 combinations). I don’t think you’re going to damage the puzzle by trying to solve it, but perhaps trying 15k+ combinations is excessive!

There are clues and useful markers inside the puzzle for the observant puzzler, and there is a lot to learn in the puzzle. I lost track of how long it took me to open the Gold, however I finally opened my copy in August 2012, after playing on and off (mostly off) for eight months. I was number 7 to open the puzzle and there have been only 15 puzzles opened in total so far. Strangely enough the puzzles being opened are a little like busses. There are none opened for ages, and then four come along at once.

Revomaze Gold Open

Revomaze Gold Open

Having opened it, I think it’s fair to say that it is a challenging puzzle, and may well be the most difficult Revomaze released to date. There are certainly fewer people have opened Gold than any other Revo. I don’t think it’s my favourite in the series, and for me Bronze still holds that spot.

Oh, and there is no dot on the shaft if you were looking for one.

The review wouldn’t be complete without me mentioning a few of the issues that have been discovered since the puzzle was released. There have been a few puzzles which had to be returned to HQ for repair, and it is possible to get the puzzle in a state where it is jammed, and you can’t navigate through the puzzle. In most cases, this can be easily fixed without having to return the puzzle, but as with anything that may not always be the case. As with any of the Revo puzzles, excessive force is not required, and could damage some of the parts inside the maze.

I’ve spoken with many other people who have been working on the Gold puzzle, and many people have expressed opinions about their experiences. This puzzle is not for the faint of heart, and will test you far beyond any other puzzle in the series. Just be sure that you’re willing to spend a lot of time thinking and working on the algorithm before you take the plunge and get one. My personal feeling is that the Gold was a let down, and not the pinnacle of an excellent series of puzzles as it should have been. Chris I know has learned a lot from this, and will go on to bigger and better things I’m sure.

If you’re still working on the puzzle, and don’t want to know more, then I’d stop reading now. The remainder of the review is rather candid, and may reveal a few things about the puzzle that you might not want to know. Continue reading