In the final review in my series on Marcel Gillen’s hidden maze puzzles, I turn my attention to the small Rolling Pin. All of these puzzles are from pre-1994, and yet are still functioning perfectly, with no real signs of wear on the mazes. I’ve felt rather privileged to be able to spend time playing with these puzzles, understanding and unlocking their secrets, and have to say a huge thanks to Nick for having been able to borrow these from his collection.
Marcel Gillen Hidden Maze Puzzles
By now the goal of the puzzle should be obvious. Remove the handle from the sleeve which forms the body of the rolling pin. There’s a hidden maze carved into the handle, and a sprung pin in the sleeve which you use to navigate the maze. All sounds simple, yet I found this the most challenging of the three puzzles, all thanks to a very clever feature that Marcel added to this puzzle; one which I’ve not come across before in this type of puzzle.
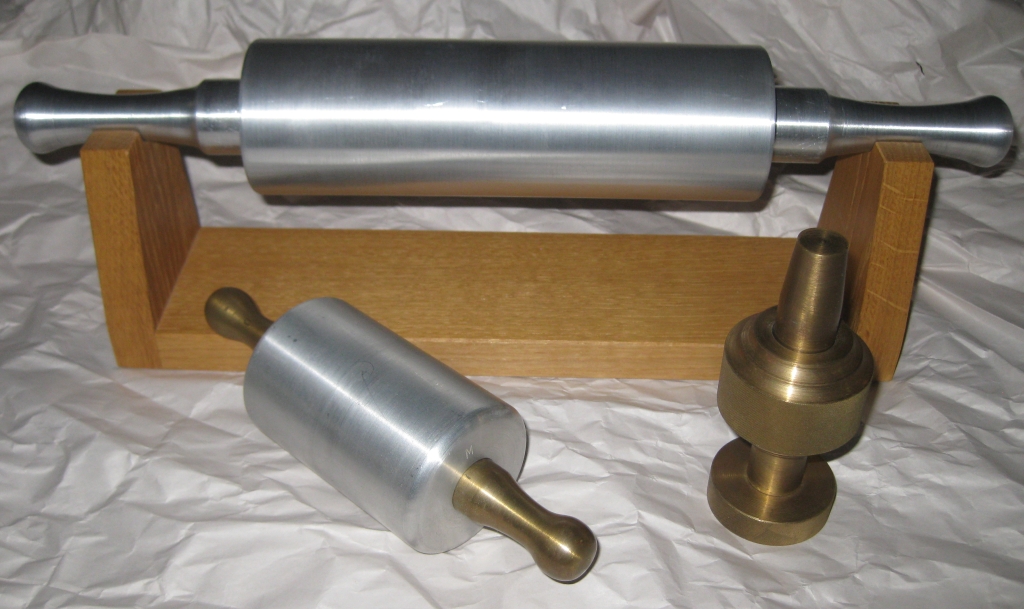
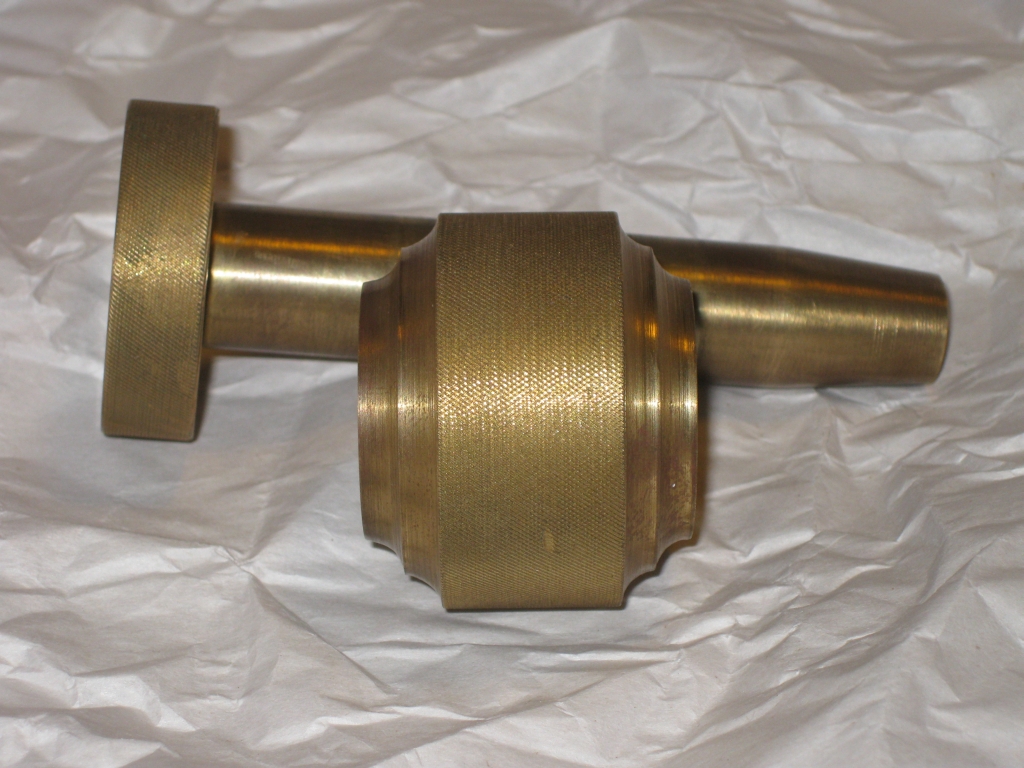
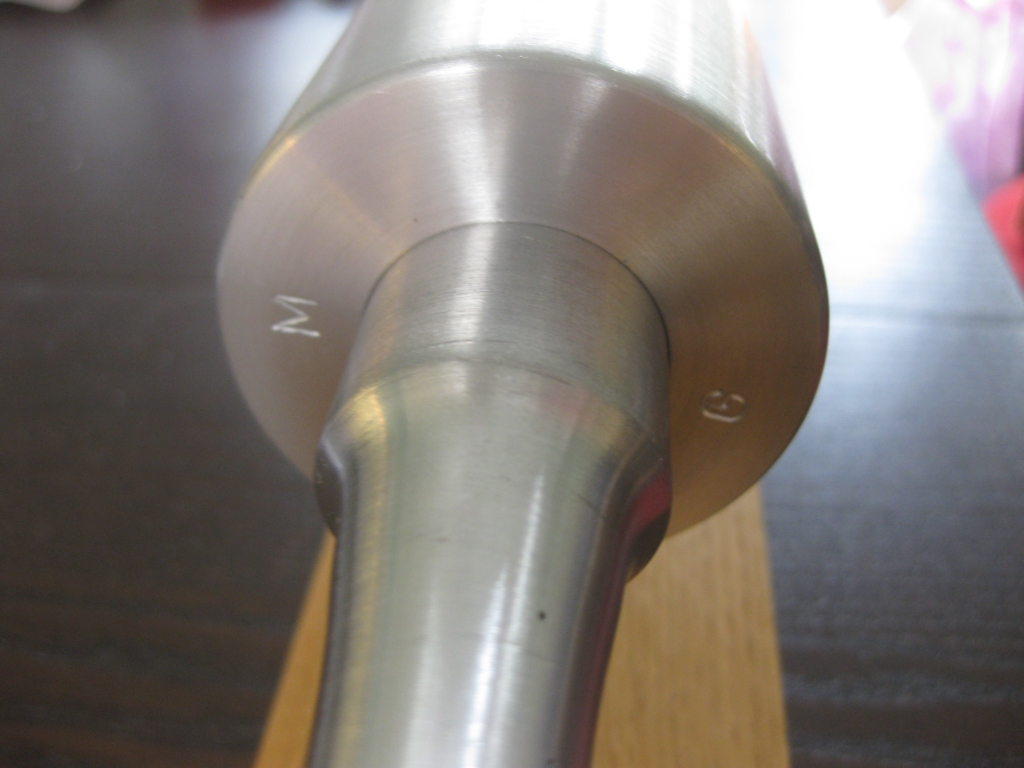
As you can see, the puzzle this time is made up of a brass handle, with an aluminium sleeve. Being significantly smaller than its big brother the rolling pin measures in at 7″ long, 2.75″ diameter around the sleeve, and 1.25″ around the handle. Weighing in at 930g it sits right in the middle of the three puzzles, although not by much compared to the bolt. The end of the sleeve is marked with Marcel’s signature ‘M G’.
Marcel Gillen’s Signature
When I started trying to solve this puzzle, I spent a lot of time going back and forth in the reset line making, quite honestly, no progress. As I’ve noted in the previous reviews, the puzzles are fairly straight forward to map as you can use the trap to map where the maze is; given that in all of these puzzles the pin rides atop the maze, and there are no walls to guide the pin. This proved only partially useful, as I was unable to find any way to get onto the maze.
Despite knowing better, I continued to repeat the same moves back and forth hoping for a different result, and at no point in my exploration did I find the ramp to enter the maze. Given my experience with this style of puzzle, I assumed that there was a gravity pin, or some other feature which was blocking the path to the ramp. (Ed: I should know better by now that to assume.) Trying different orientations of the puzzle didn’t help. For a short time I toyed with the thought that the puzzle may be broken. Given the craftsmanship of Marcel, this seemed unlikely, so the only option left was that I was missing something.
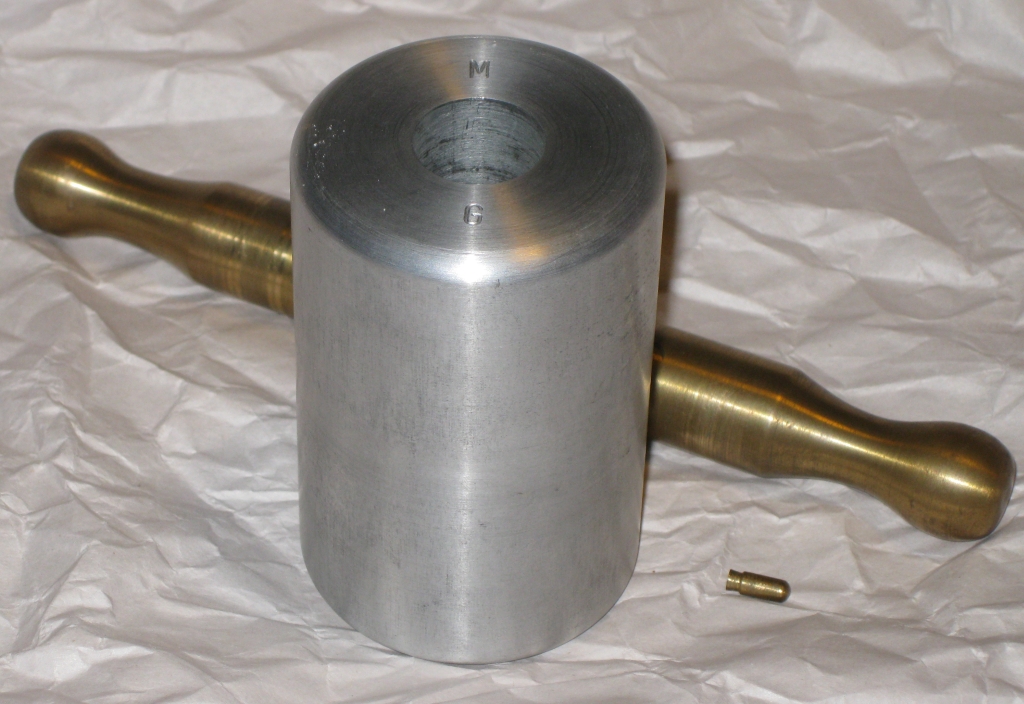
Small Rolling Pin Solved
And of course I was. The trick Marcel used is so simple, yet so well ‘hidden’ that I completely missed it for far longer than I should have. Once I had found the entry to the maze, navigating it was reasonably straight forward, until I found something new, which I hadn’t been able to map previously. I have to commend Marcel on the design here. It’s a very simple idea, but works incredibly well.
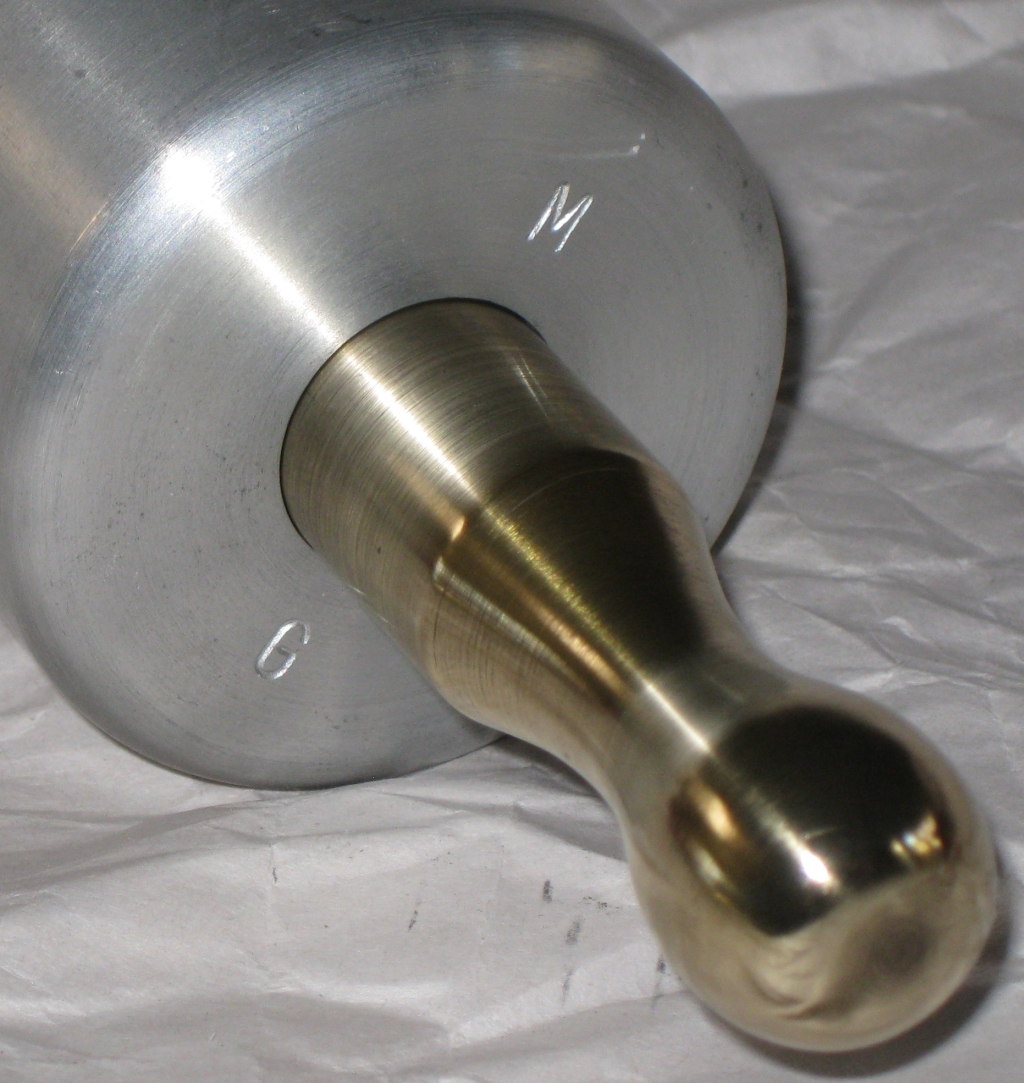
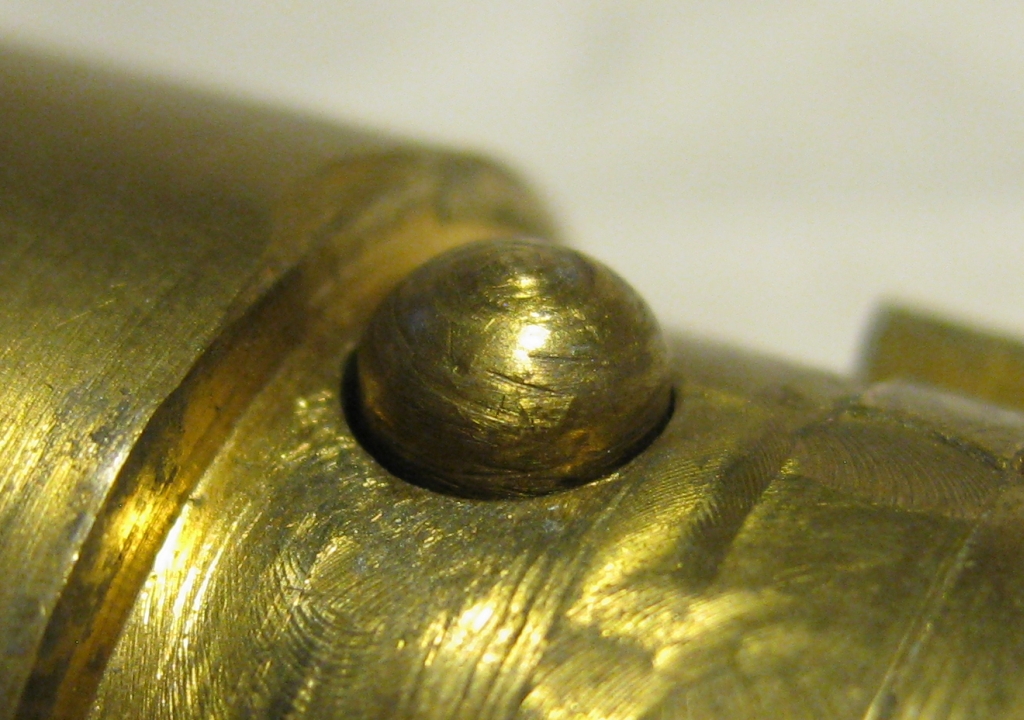
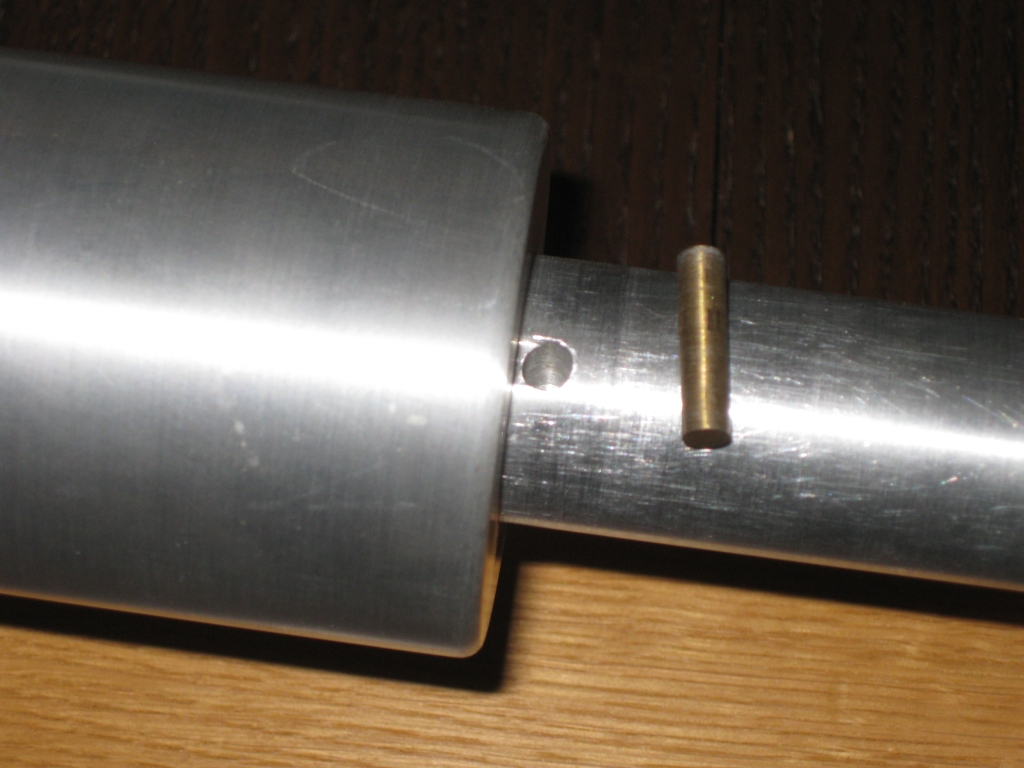
Once you get to this new hidden section of the maze, you’ll be able to extend the handle further than was possible previously, and like the larger rolling pin, you’ll find a brass pin that can be removed. Unlike it’s larger brother, the pin this time has a flat end, and a rounded end, which is the key to taking the handle out of the sleeve.
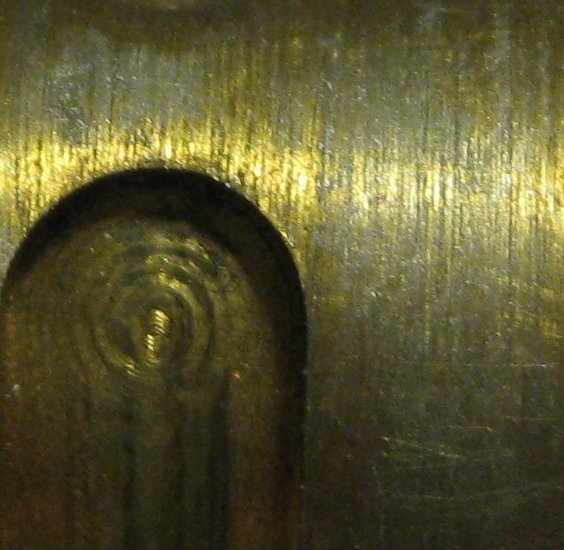
The secret to the way out
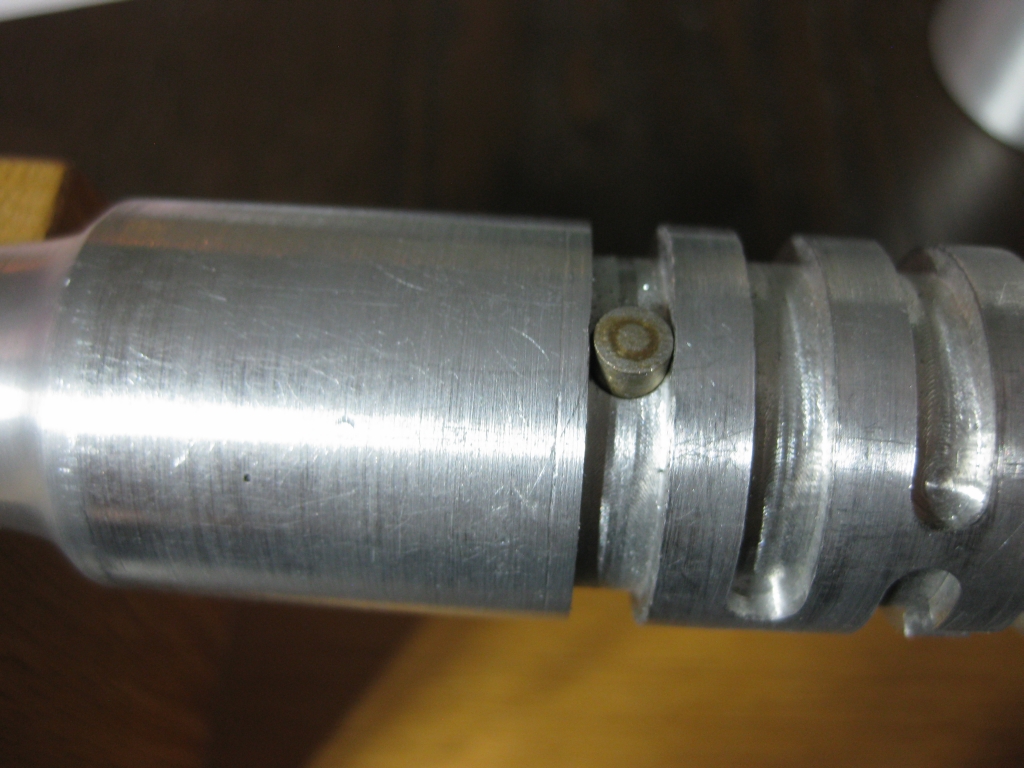
The secret to the way out flipped over
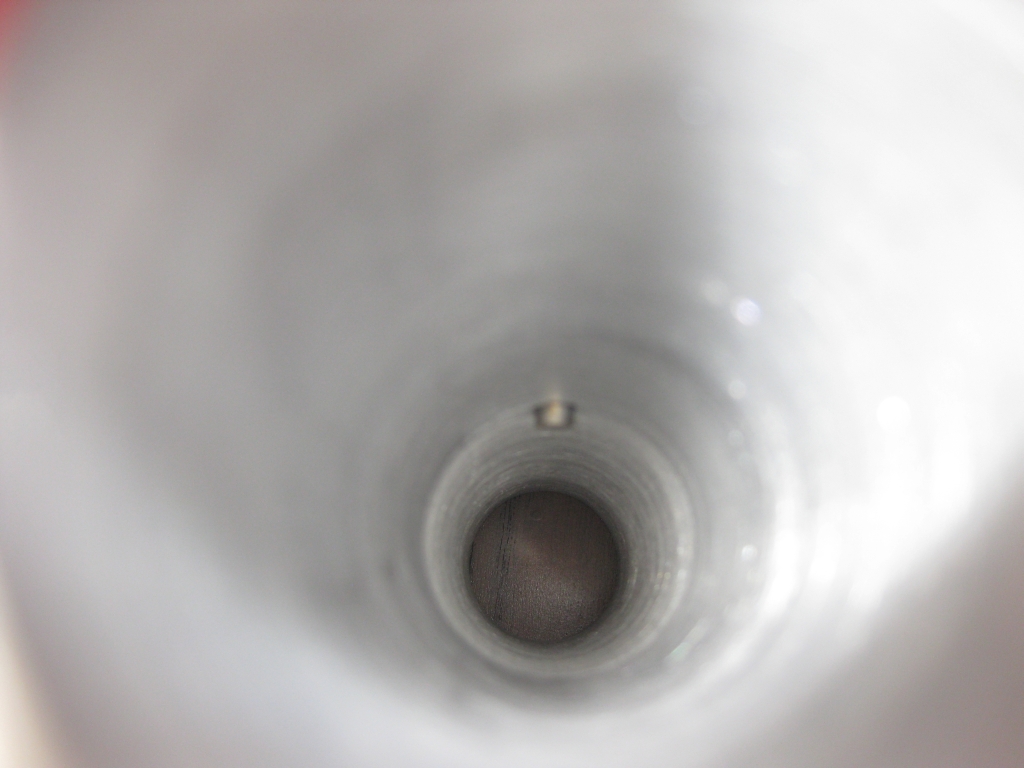
When I finished solving the puzzle, and removed the core, the top of the maze was covered in a thin silver film. It seems like the issue I was having with the larger maze was also present in the smaller version. Although I didn’t end up with silver hands when solving it, the friction between the sleeve and core was causing the same effect on the surface of the maze.
The maze looking a little grey
I think this is my favorite of the three puzzles because of the unique feature used to enter the maze. There’s nothing overly complicated in there, but it is well executed, and requires the solver to not assume how the puzzle works. There’s a few puzzle designs out there which could learn a lot from the relative simplicity of these puzzles. Harder is not always better, and as is proven with these puzzles, added complexity isn’t needed. The more complex the mechanism, the more things can go wrong with it. Each of these puzzles still works every bit as well as it did when they were made, and I am sure will continue to do so for the next 20 years.
The amount of enjoyment I had from solving these puzzles is hard to measure, however the ‘aha’ moment in each of them is unquestionable, and each puts a smile on my face having solved them. If you get the chance to play with any of these, take it. You’ll not be disappointed.
After reviewing the first of Marcel Gillen’s hidden maze puzzles the rolling pin, this post will focus on one of his ‘bolt’ puzzles. I was lucky enough to be loaned #6 in the series.
Marcel Gillen Hidden Maze Puzzles
The bolt is in the front right in the photo above. It certainly doesn’t look like a traditional bolt puzzle such as those from Lee Valley or Wil Strijbos. The goal of the puzzle is certainly the same though; remove the ring, or nut from the bolt.
Given that this is the first of Gillen’s bolt puzzles I’ve played with, I may have made things artificially more challenging, as this is the sixth puzzle in a series of at least 7 bolts. Each one increases in difficulty from the previous one so starting toward the end of the series may not have been the best plan.
Created from solid brass, measuring 4.5″ tall with a ring diameter of 1.75″ the bolt is a heavy puzzle weighing in at 777g. As I’m starting to learn from Marcel’s work, the puzzle is incredibly well made, and will take quite a bit of abuse from the solver, not that I recommend you abuse your puzzles. Despite how rare these puzzles are, it really is the sort of puzzle that you can hand round without fear of it being damaged.
Having said that, I have to admit that I spent an embarrassingly long time trying to solve this puzzle. I managed to understand the basics of what was going on in the puzzle, and you’ve probably guessed already that there’s some sort of hidden maze in the puzzle. I’d managed to ‘map’ the maze however there was an element in the puzzle which was preventing me from solving it, and I was too concerned about breaking the puzzle to try what I thought was needed. As a collector, I’m always concerned when solving a puzzle, especially one which is not mine, about doing something which might damage the puzzle. There are designers out there who use this knowledge against puzzlers, however Marcel is not one of those designers.
The problem I had is that the puzzle has a number of gravity pins which limit the movement of the ring. I found that it was possible to disengage the pins by holding the puzzle in a certain orientation, however I couldn’t solve the puzzle from that orientation. There is more than one gravity pin in there, and they interfere at different points as you move the puzzle. The obvious way to remove this obstacle is something I had avoided due to the large mass of the brass, and my fear that I would break something. As it turns out I really shouldn’t have been worried about that.
Marcel Gillen Bolt #6 Solved
Having taken care of the gravity pins which were frustrating me no end, solving the rest of the puzzle was fairly quick, and took no more than around 10 minutes. The one comment I will make is that the puzzle needs a very specific orientation to solve it, which adds to the challenge. Understanding how the puzzle works, I can now repeatably solve it in under 30 seconds, and it’s a very satisfying puzzle to solve.
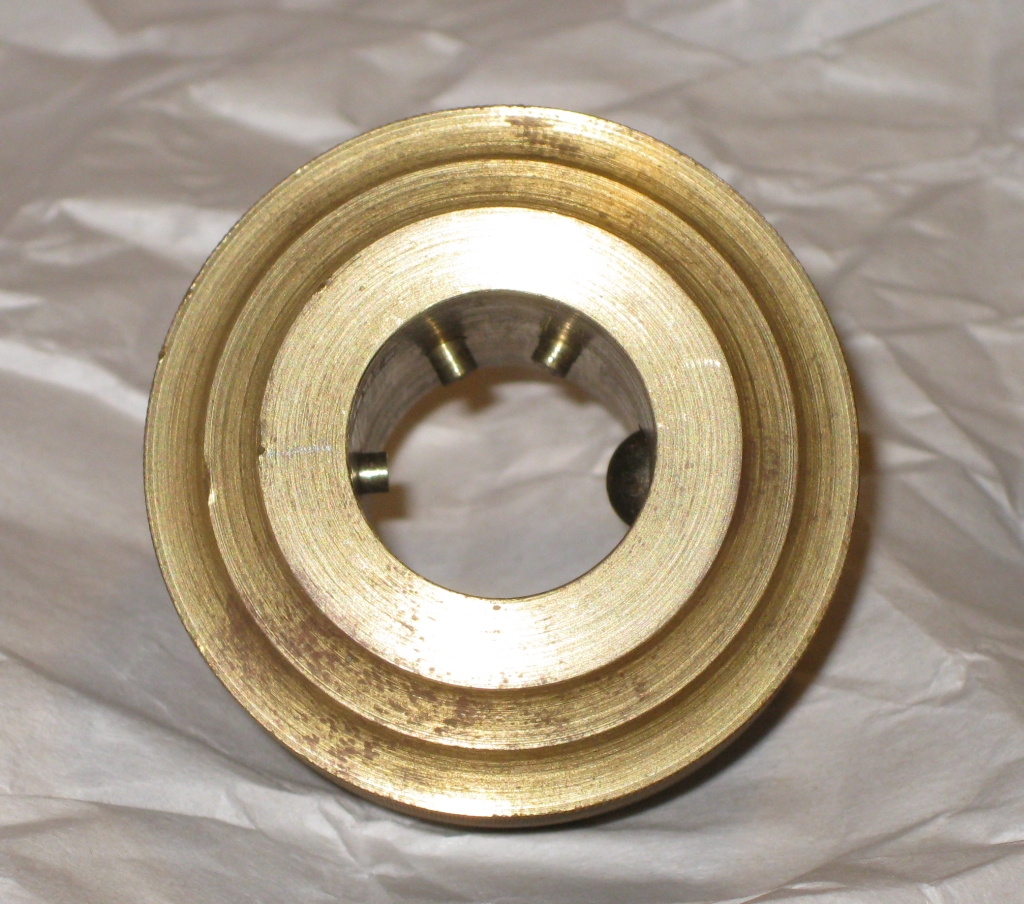
Marcel Gillen Bolt #6 Ring view
Having removed the ring, you can see what’s going on in there. The top two protrusions are a couple of the gravity pins which are present, and the protrusion on the left is a sprung pin which is used to navigate the maze which is etched into the bolt. The other element in there is a sprung ball bearing which just keeps a constant pressure against the bolt, and makes the movement of the puzzle much smoother.
I’m very happy to have had the chance to play with this puzzle, and will certainly be keeping my eyes open for any of these which become available for sale. They’re so well made, and such a fun puzzle to solve, that I’d love to add them to my collection.
Happy New Year to all my readers. Here’s wishing all of you a great year in 2014. I hope it’s a puzzling one, for all the right reasons. This year, I kick off the reviews with a set of rather special puzzles from Marcel Gillen. Over the next few posts, I’ll review some of Marcel’s hidden maze puzzles.
Marcel Gillen Hidden Maze Puzzles
I’m very lucky to have been able to borrow these puzzles from a good friend who knows that I’ve solved all of the Revomaze puzzles, and suggested that I should play with the puzzles pictured above. He really wanted my thoughts on Marcel’s puzzles, given that they predate the Revomaze by quite some time, and have very similar puzzling aspects.
This review will focus on the large rolling pin, sitting on the stand in the photo above. This is probably one of the heaviest puzzles I’ve played with. If you think the Revomaze is heavy, weighing in at ~600g, this is in the ultra heavyweight class. The Puzzle is solid Aluminium, and weighs in at a whopping 1714g, yes it’s nearly three times heavier than a revo! One thing that I really had to get used to was working with the weight of this puzzle. It’s not easy to spend a lot of time working on something quite this heavy.
Marcel’s signature initials on the end of the sleeve
End to end, the puzzle measures 15″, with the main body of the pin being 7.5″ long. The body of the puzzle is 2.25″ in diameter, and the handle is 1.25″ in diameter. On one end of the body Marcel’s signature initials can been seen on either side of the handle. As you might expect, they will serve some purpose as a reference when solving the puzzle.
I first wrote about this puzzle back in June 2012 after attending a local California Puzzle Party where I didn’t manage to solve it, but did make what I thought was pretty good progress. To my knowledge the puzzle hadn’t been opened by its owner, however at one point it was sent back to Marcel as it had a problem and needed to be fixed. When it came back, the solution to the maze was marked on one end of the handle. Seems like Marcel needed a little help opening it. Even with those helpful markings, it still hadn’t been opened. One of the requests I was given when I borrowed the puzzle was to clean off the black marker which showed the solution, so before I started playing with it again, that’s exactly what I did. After all, what’s the point in the puzzle if you already have the solution!
Taking on the challenge of opening this beast, I set about understanding what was going on. If you’ve read my comments about the puzzle previously, you’ll know that there’s a hidden maze which is etched into the handle of the puzzle. There’s a sprung pin on the inside of the sleeve which is used to traverse the maze. (Sound familiar to anyone?) As you start the puzzle, you can feel the tension as the pin rides up onto the top of the maze, and for anyone who is familiar with the Revomaze puzzles, that familiar click is present when you take a wrong turn and drop off the maze.
Unlike the Revomaze, there’s no quick reset back to the start in this puzzle, and when you make a mistake, you’ll have to navigate the traps all the way back to the start of the puzzle to try again. While other maze puzzles have walls which you can rest the pin against, there’s no such feature here. This is a one way trip riding on top of the walls. Think of it as one long bridge with no walls.
I should probably note that mapping the puzzle is a lot simpler than other hidden maze puzzles I’ve played with since you can use the traps to map the maze. By falling off, then carefully mapping the traps, you can figure out what’s left. With a single way back to the start, it’s much harder to map using such a method, so I do believe that this is much simpler to solve for anyone familiar with mapping techniques used for hidden maze puzzles.
After around an hour of figuring out and mapping the path, falling off many times along the way, I reached the end of the maze.
Having solved the maze once, this is the reward
At least I assumed I had reached the end, as I was able to see the brass circle in the photo above. At this point I was a little disappointed that I was unable to remove the handle from its sleeve, to be able to see the maze, but was pretty happy that I’d made it to the end. Investigating a little more, I found that the circle was in fact a brass rod which came out of its hole…
The Brass rod as a prize for solving the maze once
The question now is what to do with that rod. My first thought was that if I removed it, then returned the puzzle back to its starting position, perhaps it would allow the pin to drop into the hole I’d left by removing the rod, and let me remove the maze that way. Given that Marcel is an expert designer, I assumed that he wasn’t going to let me remove something from the puzzle which would lead to it ending up broken, I set the pin aside, and returned the puzzle back to its starting position, hoping that it would now allow me to remove the maze. I was wrong, but I was in for a surprise.
When I got back to the start, the core traveled a little further back that it had been able to previously, and exposed a new hole at the other end of the puzzle. It was just the right size to accept the brass rod, so that’s exactly where I put it. Of course now I need to solve the puzzle again! So back to the start, I go ahead and solve the puzzle again. This time it takes me a much more respectable 15 minutes to get back to the end, but I still can’t remove the handle.
After engaging the old grey matter, I realise what is going on. The brass rod is creating a bridge at the end of the puzzle allowing the pin to cross over what would otherwise be a trap, and lets me remove the handle. It took me a good few attempts to get this to work properly, but fortunately Marcel hasn’t been too nasty, and has provided a ramp in the last trap of the puzzle allowing me to take as many attempts as I need to find and cross my new bridge.
Rolling Pin maze exit
Having finally removed the handle, you can see exactly what the brass rod was doing, creating a narrow bridge, at the same height as the main maze, allowing the pin to remain compressed and move onto the outer side of the handle, freeing the maze to be seen in all its glory.
The pin used no navigate the maze inside the sleeve
Looking down the inside of the sleeve you can see the maze pin in the middle of the sleeve. It’s a sprung pin, fixed inside the sleeve and isn’t removable. Probably a good thing as it’s a fairly small part and would be easily lost. (I managed to drop the brass rod at one point, and watched it roll under the table I was sitting at. It’s big enough that I found it easily, but being non-magnetic, it could have been a problem!)
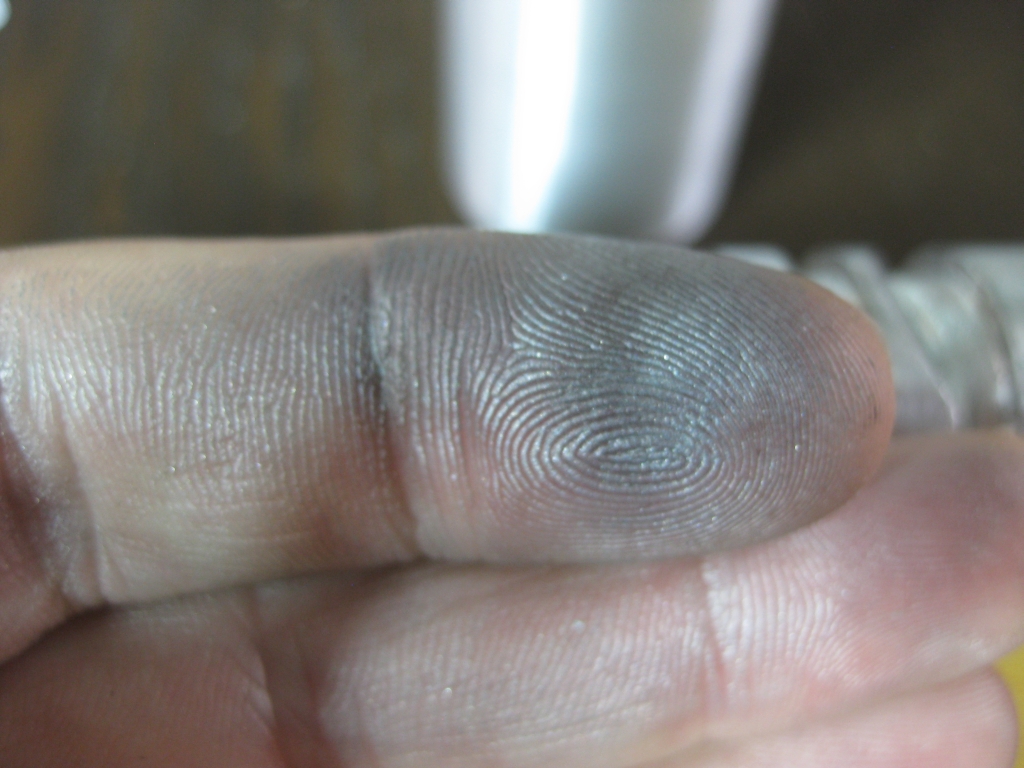
My fingers after solving
Given that the puzzle is raw aluminium, it had a rather interesting side effect, in that it left my fingers rather silver. Exactly the same thing happened when I played with it at the Puzzle party so I was expecting it this time. I’m not entirely sure whether there’s just some aluminium dust on the puzzle as a result of the pin rubbing against the surface, or whether the natural oils in my skin react with the aluminium. Regardless, I needed to wash my hands, and took the opportunity to clean the entire puzzle at the same time. (Ed: Don’t worry, no water was used in the cleaning of this puzzle.)
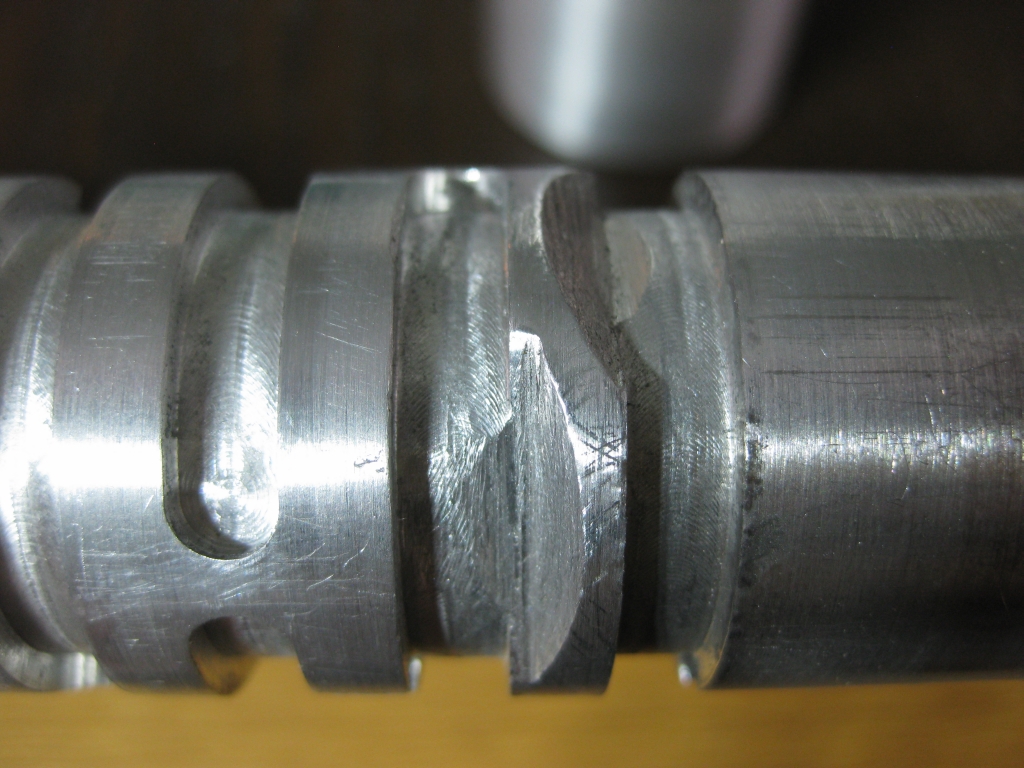
Rolling Pin ramps
Having a close look at the maze, you can see the ramps which are etched into the walls of the maze to allow the pin to move from the traps back up onto the level of the maze. Pictured above are the two ramps at the start of the puzzle. One from the start point to enter the maze, and one from the end of the traps back to the start of the puzzle. While I’m not going to show the entire maze here, the small section you can see shows how the puzzle works. The Pin rides on the higher area of the puzzle, and the lower cut-out sections are the traps. This is where you end up when to take a wrong turn. As you can see, the puzzle is incredibly well made, and it has stood up very well to many years of use.
Overall this is a great puzzle, with many similarities to the Revomaze puzzles. Perhaps this is closest to the Green Revomaze puzzle if I were to draw a comparison, however this puzzle does pre-date Revomaze by many years and includes the feature that the maze must be solved not once, but twice in order to truly say that the puzzle is solved and remove the core. No chance of getting lucky in opening this puzzle!
What I found to be even more impressive is how you reset the puzzle for the next person. To reset the puzzle, simply take the brass rod, and return it to the deep hole at the start of the maze, then slide the handle back into the sleeve. The maze pin simply rides onto the handle, then drops back into the maze. Navigating back to the start takes a few seconds, and the puzzle is ready to be solved again. Very clever, and so simple.
I had a lot of fun playing with the rolling pin. There’s no gimmicks here, and the clever mechanism which allows the maze to be removed is very well executed and adds an extra challenge to the puzzle that I found to be very rewarding, especially after understanding what was required.
I’ll review the other two puzzles soon, so stay tuned for more of the Marcel Gillen Puzzles.
Back at IPP 32 in DC, I had the pleasure of playing with a puzzle box from the incredibly talented Michail Toulouzas. I was fortunate, and opened the puzzle in a few minutes, so feeling quite smug, went to close the box to leave for the next puzzler only to find that the door wouldn’t shut. I realised at that point that I wanted one of these.
The Vault
Returning back from IPP, I wrote to Mike, and kindly asked that if he made any more if he’s consider making one for me. I was pleasantly surprised when he wrote back telling me that in fact he was making some, and he’d added me to the list!
Around a year went by and in various conversations with Mike, he assured me (and a few other puzzlers) that he’d not forgotten about us, and was still working on the puzzles. IPP was coming round again, and he had puzzles to make for Japan, so he’d delayed ‘The Vault’ a little while he worked on those. Now just before I’m due to get married, I get an email from Mike saying the puzzle was finished and on its way to me! Arriving just a day or two before my big day, it was a great wedding present.
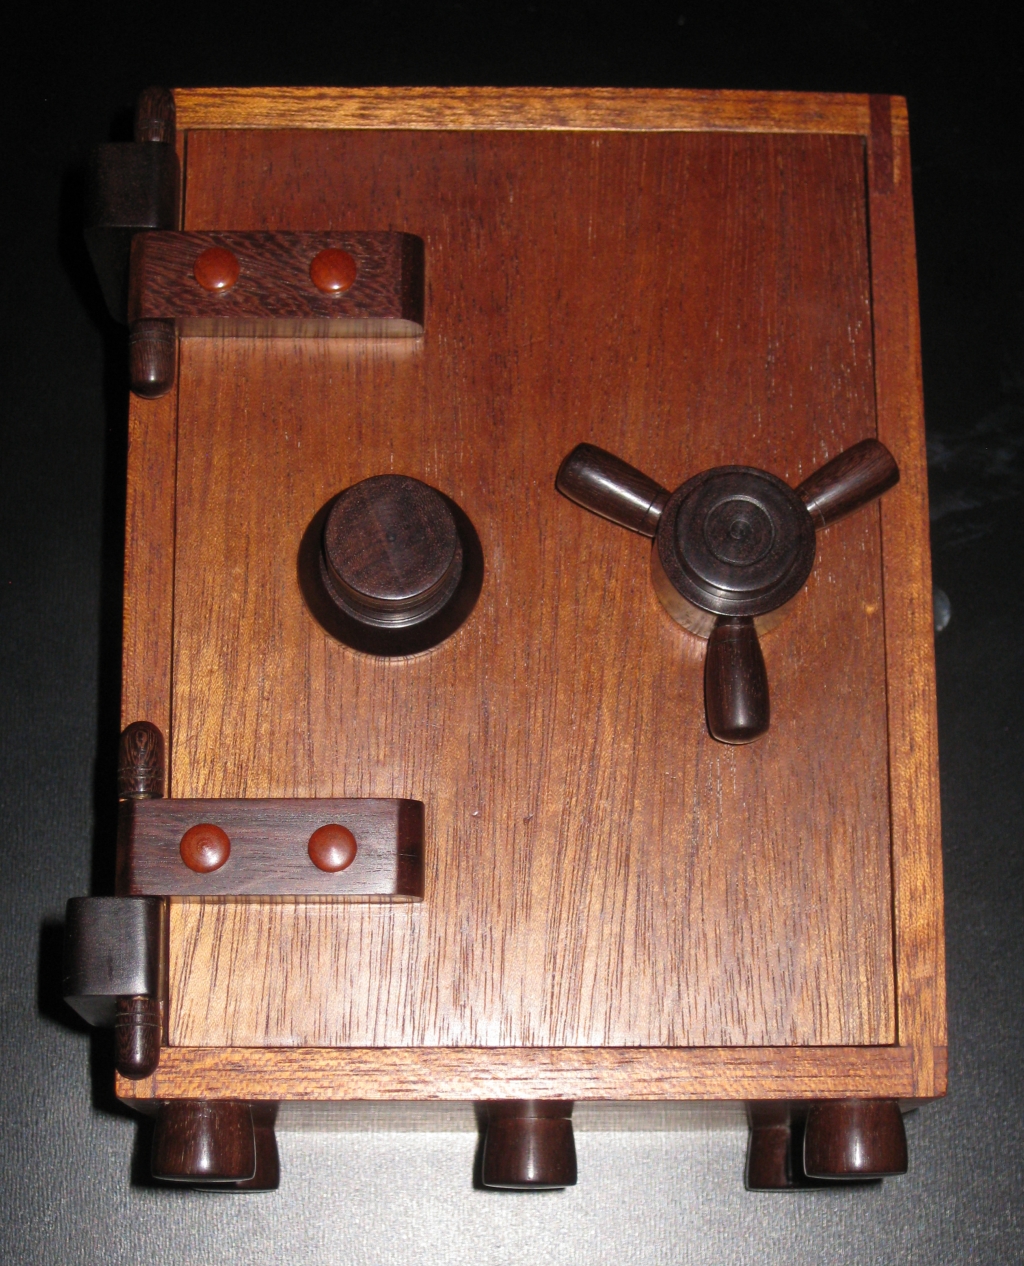
Front view of the Vault.
The puzzle itself is 8″ x 5″ x 4.3″ and is made from Ebony, Mahogany and Chakte Viga. Mike’s attention to detail is nothing short of breathtaking, and everything down to the rivets in the hinges is beautifully finished. It’s instantly recognisable as an old fashioned safe, and it feels as sturdy and solid as you’d expect and old time safe to be. Details such as the turned feet, and combination lock handle have been lovingly crafted to really make you feel like you’re cracking a safe as you open it.
There is one other piece to the puzzle and that takes the form of a torch. It’s sized perfectly to fit into one of those keyhole slots in the side of the puzzle, leaving your hands free to play with the knobs on the front, and able to peer into the inner workings thanks to the light provided.
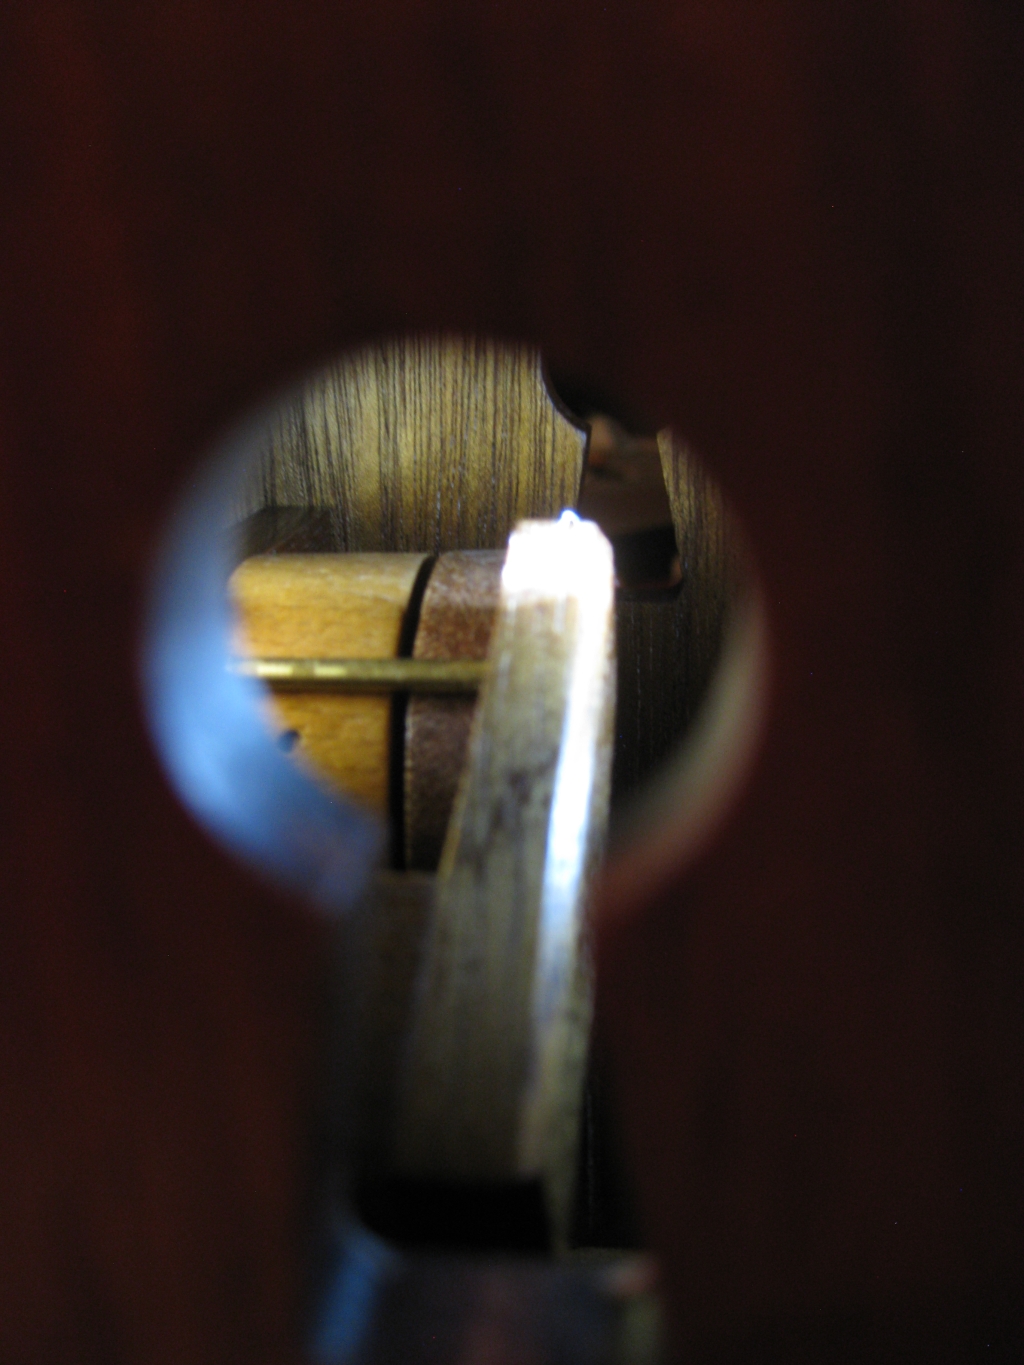
Peering into the inside
After an initial inspection there’s only the two knobs on the front which will do anything, and you can see quickly from peering inside what they do. The handle on the right is attached to a brass rod which will hopefully open the door, and the tumbler on the right rotates something inside. Turning that knob will reveal something useful, but that alone isn’t enough to open the door. Something more is needed and it takes a little bit of experimentation to figure out how to control what’s happening on the inside from the knobs on the outside. That done, you’ll get a satisfying clunk, and the door will swing open.
That reveals a key inside the puzzle, as well as exposing the inner workings and Mike’s signature. Given that you didn’t need a key to open the puzzle, what possible use could you have for one now that it is open? The key is held on the back wall of the vault and can be lifted out of its slot and inspected. Seems fairly straight forward, but no use is apparent. Putting it back, you can try to shut the door, but soon find out it’s not going to be that easy. Resetting the puzzle is every bit as much of a puzzle as opening it was. And that’s a good thing!
Without giving too much away, that key is very useful, but as you’ll soon learn there’s no way you’re fast enough to close that door before whatever is keeping it from closing resets itself, and any other attempt would leave you with the key not back in its original spot, neatly stowed on the back wall. There’s another simple but well executed trick needed, and it’s going to take some thinking outside of the box to solve it.
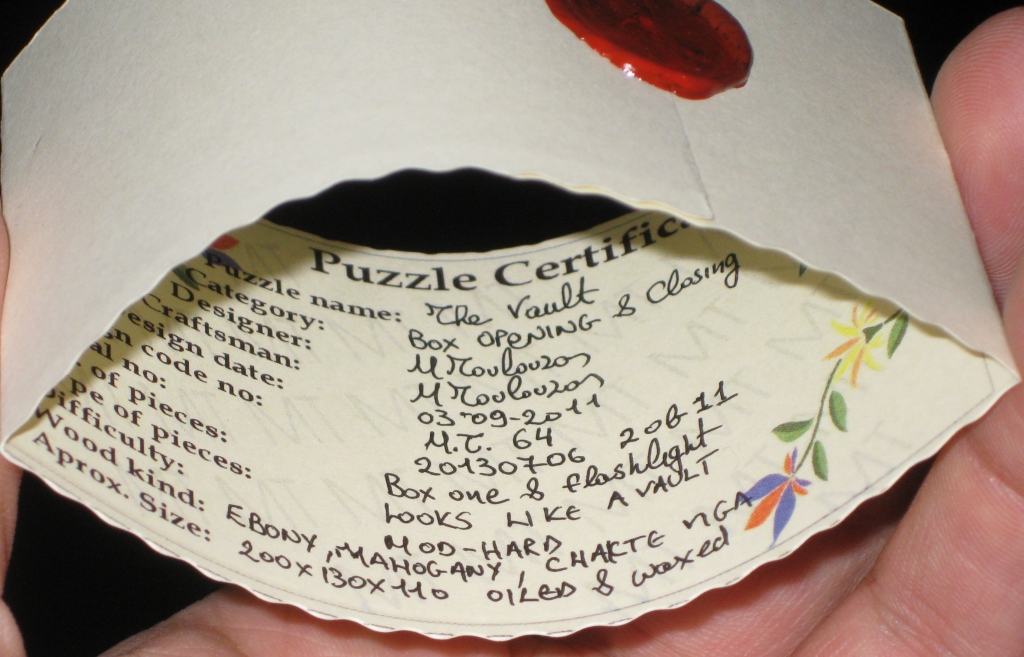
Puzzle Certificate
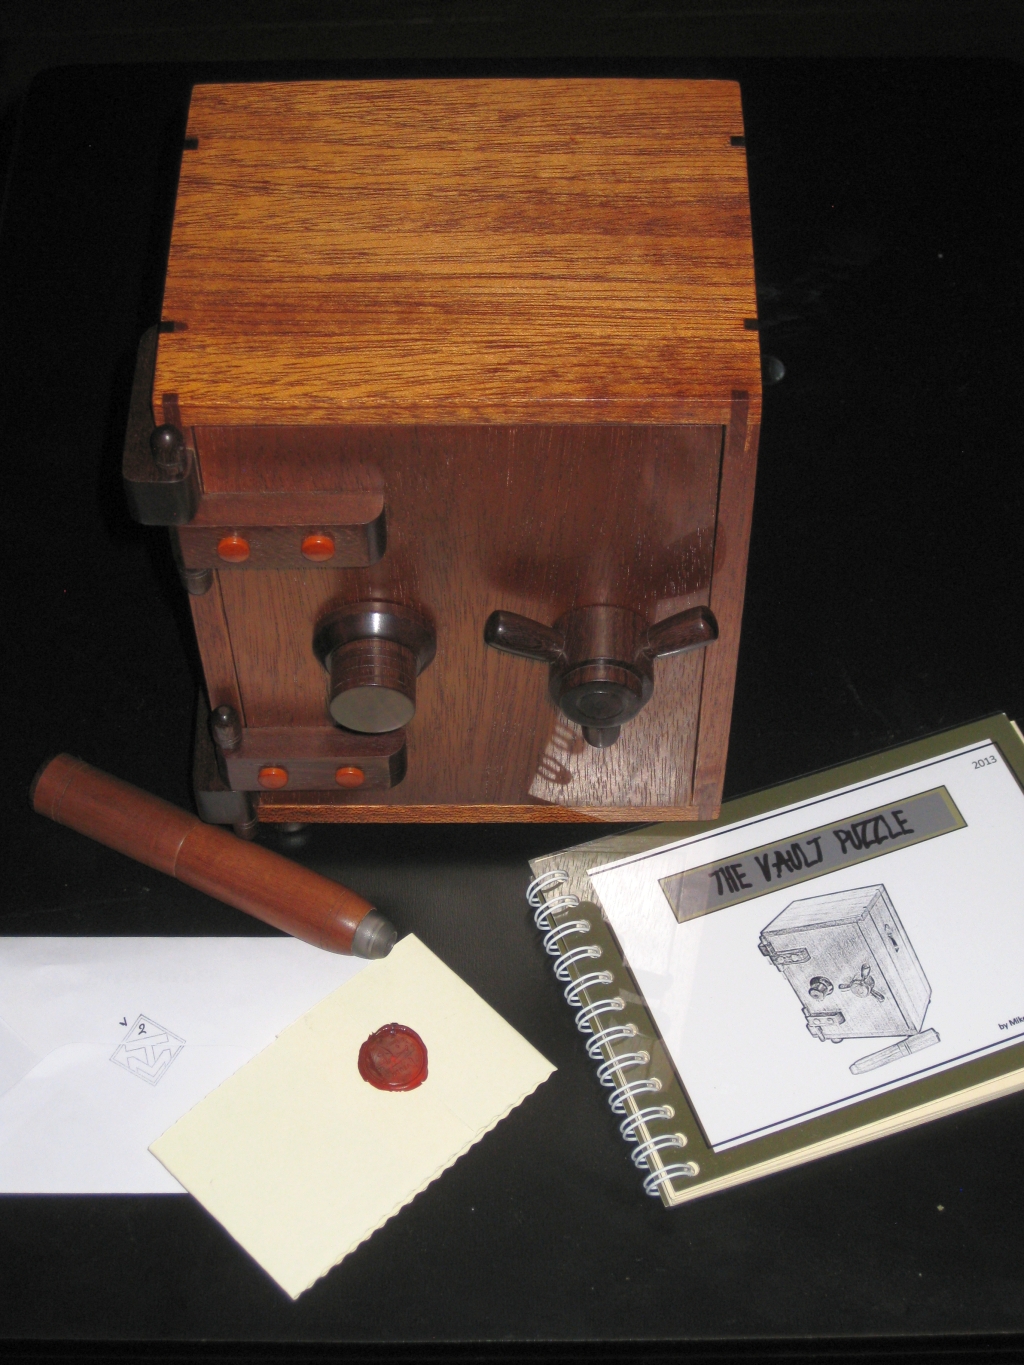
As you saw from the first image of the puzzle, it comes with a hefty puzzle book, describing the puzzle, and of course the solution should you need it. The other item in that first picture is the small card which has been sealed with a wax crest. That’s the Puzzle Certificate, and is a beautiful touch that really finishes the whole experience. Hand written in Mike’s flowing cursive it’s a great little touch.
Overall I loved this puzzle, and I’m pretty happy to have one in my collection. With only 16 made, 4 in 2012 and 12 in 2013, with the last being a unique selection of woods, and was auctioned in Puzzle Paradise. There’s also one special edition which mike made, #10 which will have a special locking mechanism, and be sent to the James Dalgety Puzzle museum. So if you happen to be there, look this one up!
If you want to see more of this puzzle, have a look at my video review below.
I want to send a huge thank you to all my puzzling friends out there. As you know from my previous video, I got married last month and as a wedding gift, a number of my puzzle friends out there decided to get me a puzzle as a wedding gift. That puzzle was a copy of Eric Fuller’s Topless Box along with a special something inside. So no pressure then as I had to open the box to get to the gift for Jen and I.
Topless Box by Eric Fuller
Have a look at the video review below to see a little more about the puzzle, and read on for my full review.
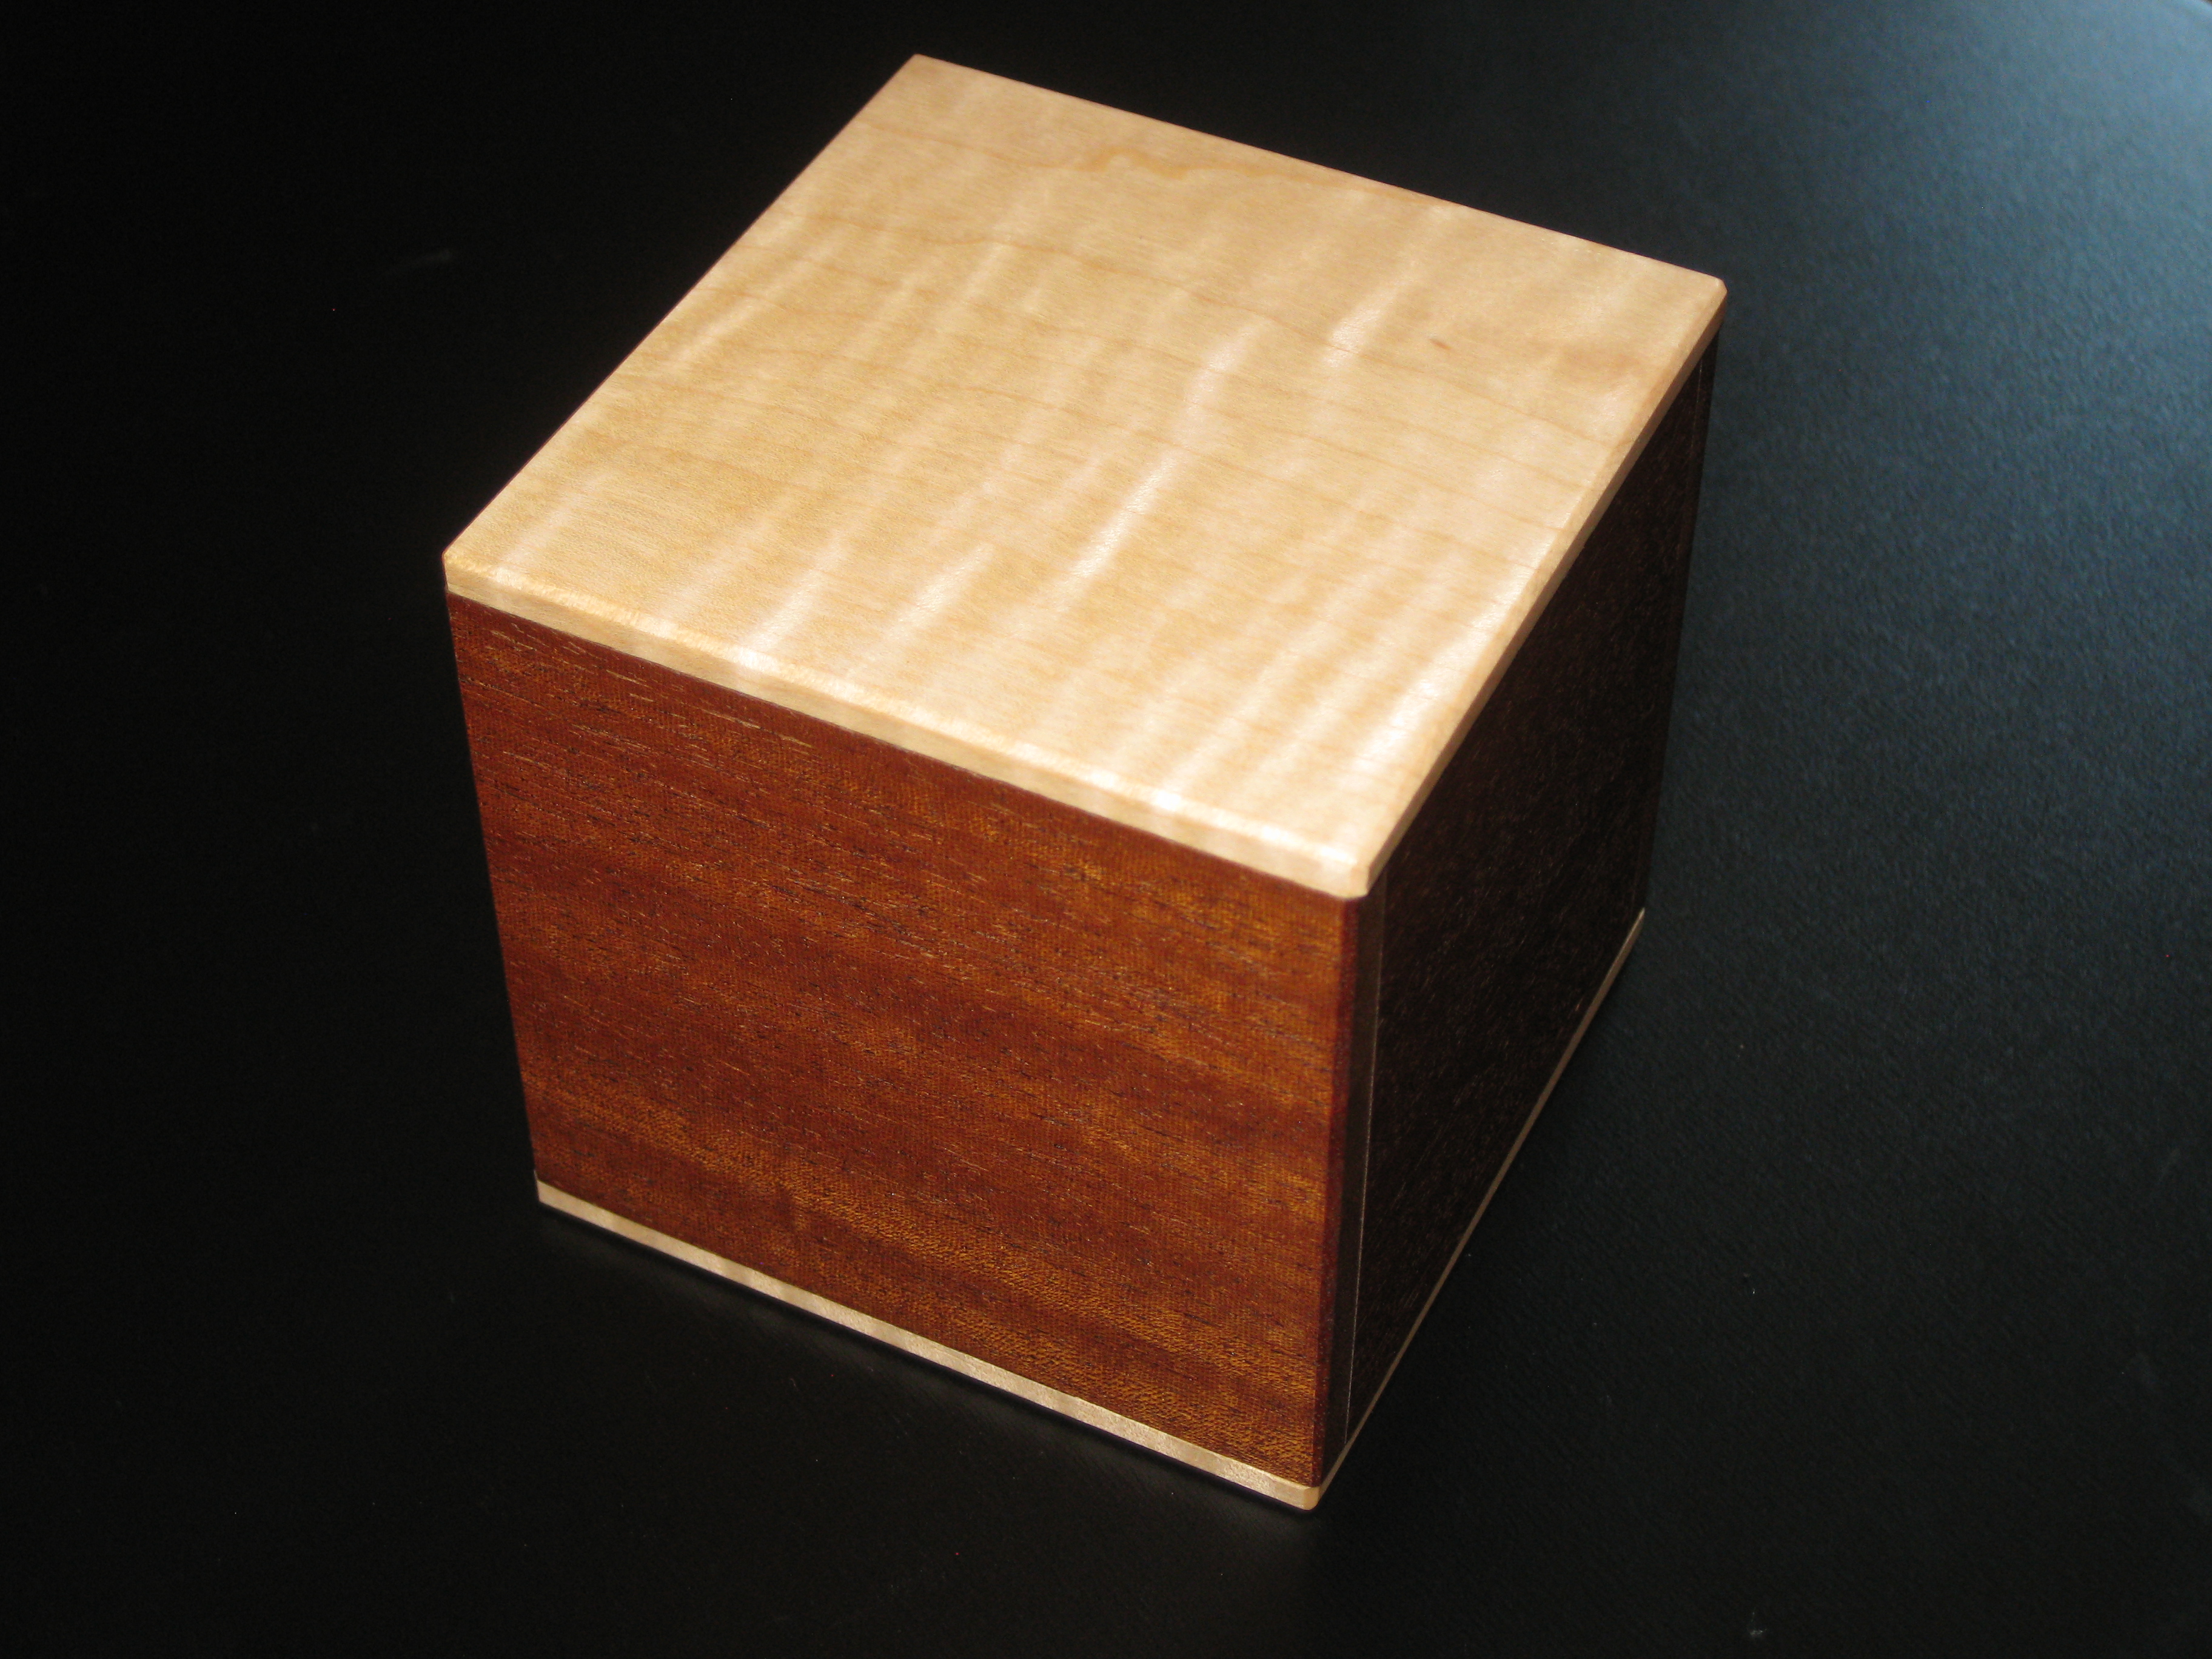
The Topless box is a 3″ cube made from Striped Quartersawn Sapele, Quilted Maple and Paduak, not mahogany as I mentioned in the video. (Sorry Eric!) It’s a stunning box to look at, and the shimmer from the Sapele as you move the box is really gorgeous. Given that it’s designed to go inside the Apothecary Puzzle chest, the size was fixed based on the internal dimensions of the chest. That said, it’s a great size in your hands and feels really solid.
As I mention in the video, there’s a lot of magnets in this puzzle, and they’re all pretty strong. You certainly have you be careful not to trap a finger in the sides, as this puzzle bites. The mechanism is very elegant, and although it has magnets in it, this isn’t a puzzle which uses a pin and magnet requiring you to bang and tap the puzzle to free the lock. This is far more elegant, the only thing that banging or tapping this puzzle will get you is a sore hand.
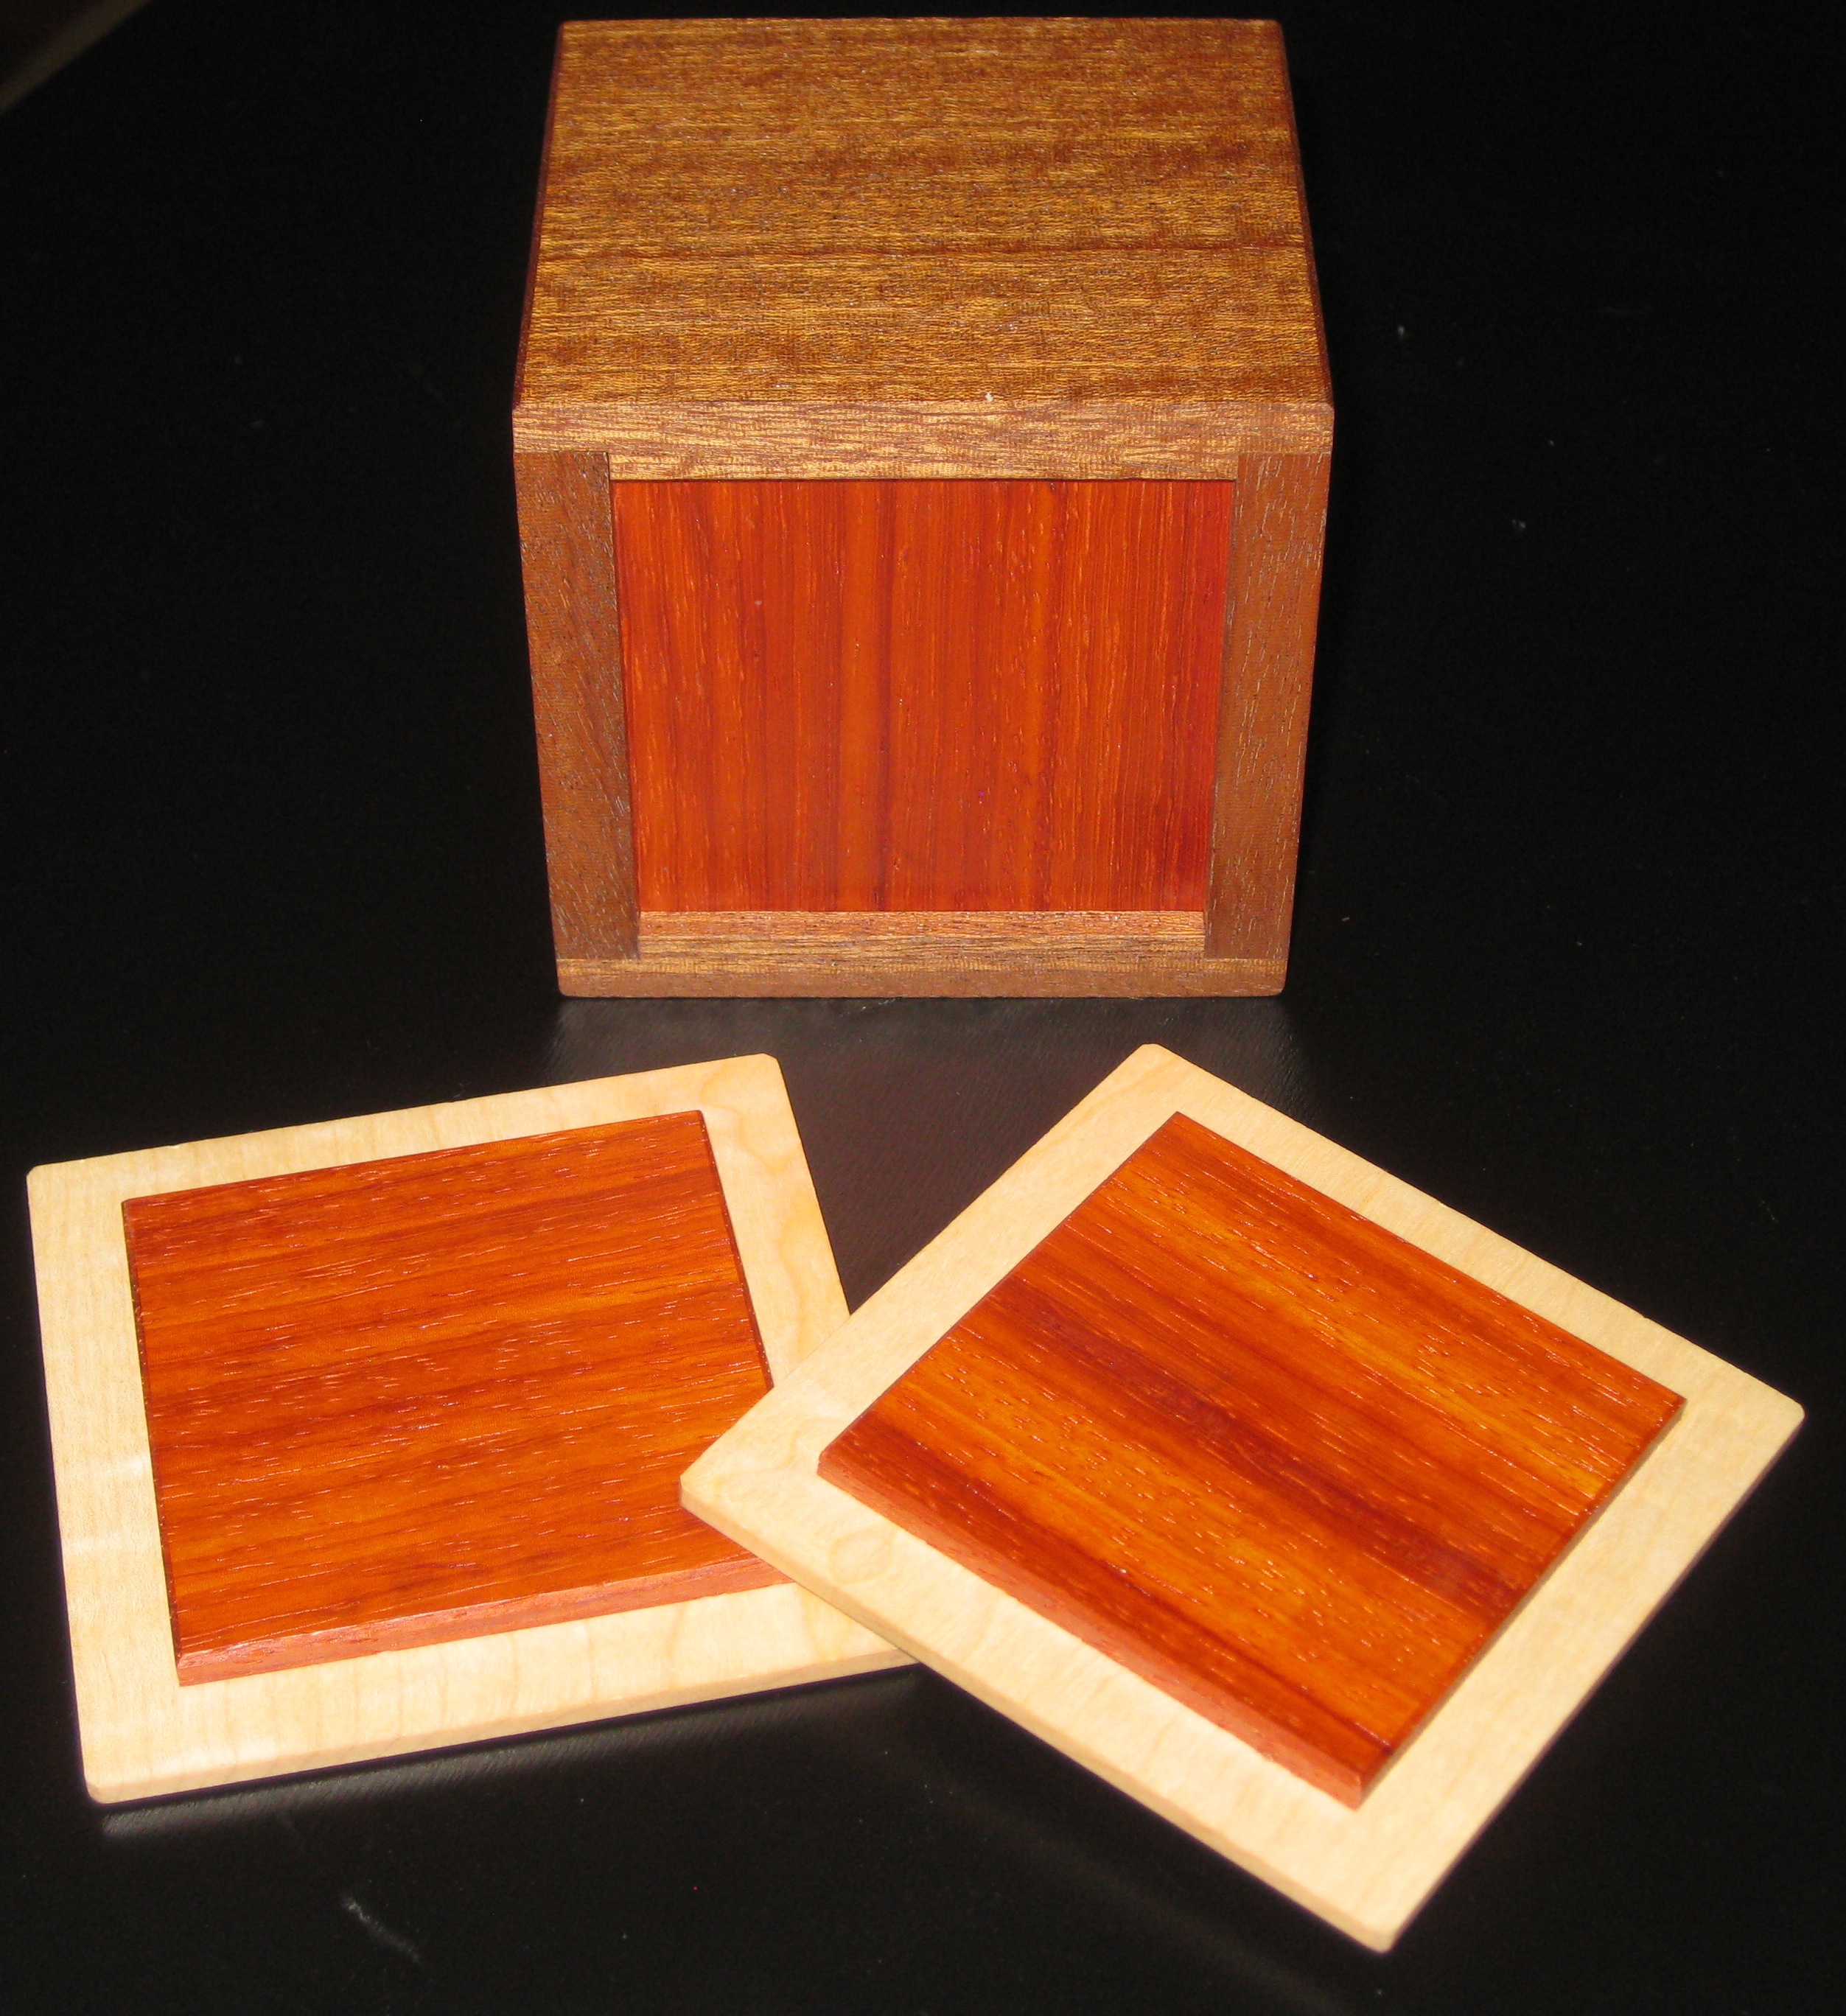
Here’s what Eric had to say about the puzzle: “The “Topless Box” is my contribution to the project. I originally was only going to make enough for the submission, but got pretty excited about the design once it was finished, and decided to make it a larger run. I’ve seen a fair number of boxes and this one has what I believe are some unique characteristics. Unfortunately I can’t show much detail of the inside of the box without giving away the workings. I can say that the box has two lids, and neither a top nor a bottom. Figuring out how to deal with that conundrum will hopefully get you on your way…”
Top or Bottom? Does it even matter?
Like Eric, I can’t show you anything of the inside of the puzzle, as it really would give away what’s going on, and as you know I don’t like giving away solutions to puzzles. The Top and Bottom are held onto the box using some pretty strong magnets, and you’ll quickly realise that they just lift off, leaving you with no sign of a way into the box. Playing around you see that this doesn’t open like a traditional box, and you’re really going to have to think outside the box to open it.
It’s not an easy box to open, and you could easily spend hours going round in circles, and getting nowhere with this one. Once you do open it, you realise just how sneaky Eric has been, and this is quite an evil little box. There’s only one way it will open, and there’s no way to fluke opening it!
Great box, and highly recommended if you can find one.
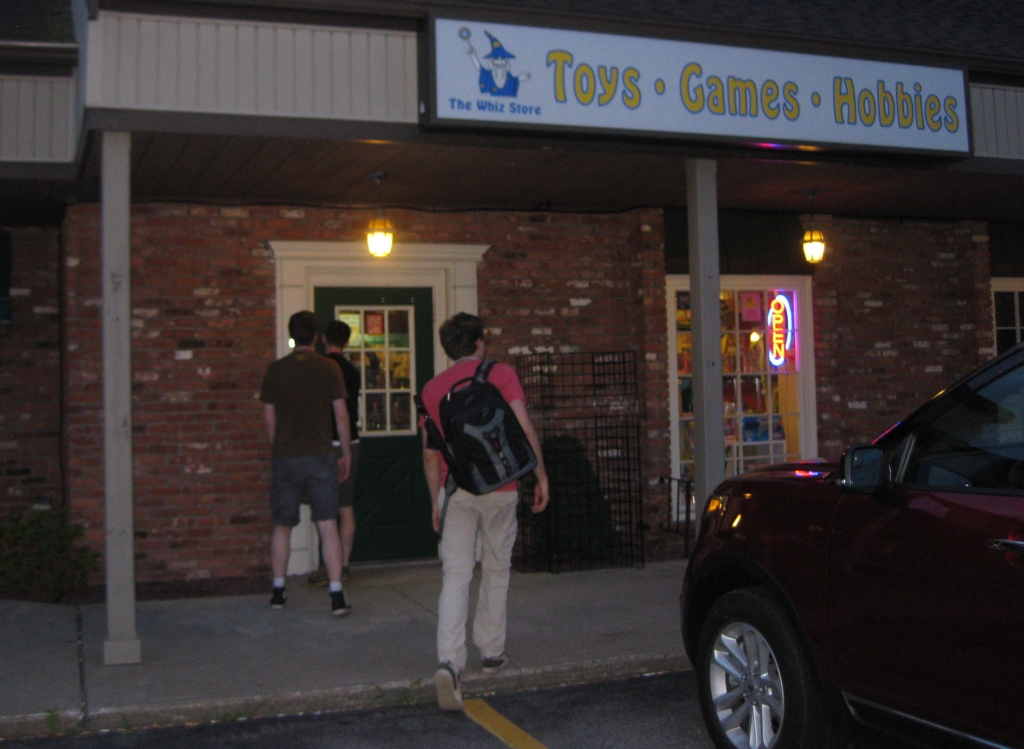
With the sun coming up, and a new challenge awaiting us we rejoin the puzzle chase as we head toward the Whiz Gamestore.
Arriving at the Whiz Gamestore
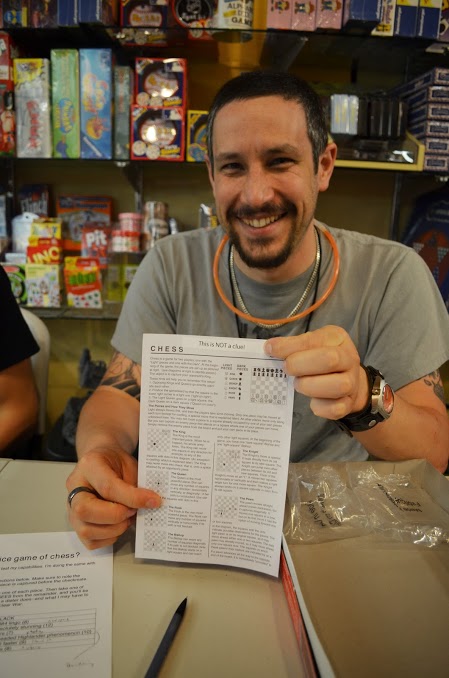
At just after 6am we arrive and heading inside we’re handed a Chess gamebox and find ourselves a table to setup and work over this puzzle. At least the last hint about playing chess was accurate. Question is whether there are any chess masters in our team. I know it’s been a long time since I played seriously.
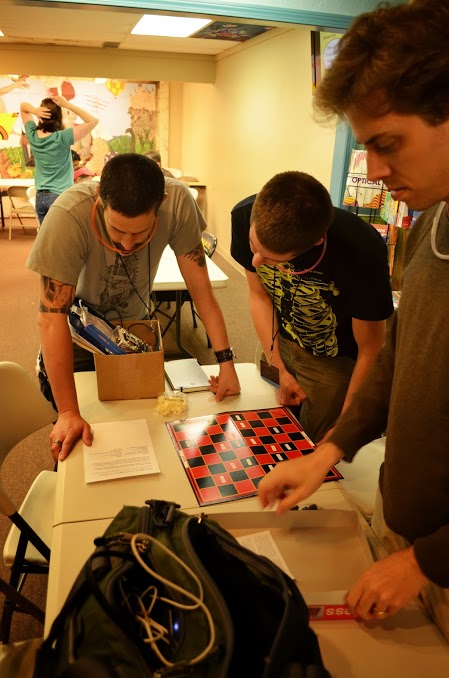
Pondering what we had to do
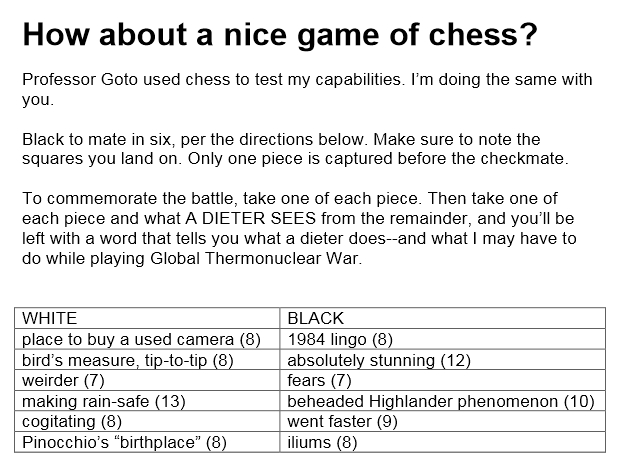
Inside the box we find the expected chess board with a few modifications, and a set of chess pieces. There’s also a clue card giving us various directions about how to play, and what rules we should use. It reads a little like this:
Rules for playing chess
Instantly we went off on the wrong track here, and tried to over complicate matters by attempting to find a well known five move checkmate game where black wins, and apply that to the board. I’m pretty sure we lost some time there, and I have to confess that’s where I thought we had to go. Instead, we should have setup the chess board, and solved the clues in the puzzle. Each of the clues allows you to figure out which piece should move, and where, based on the words printed on the board.
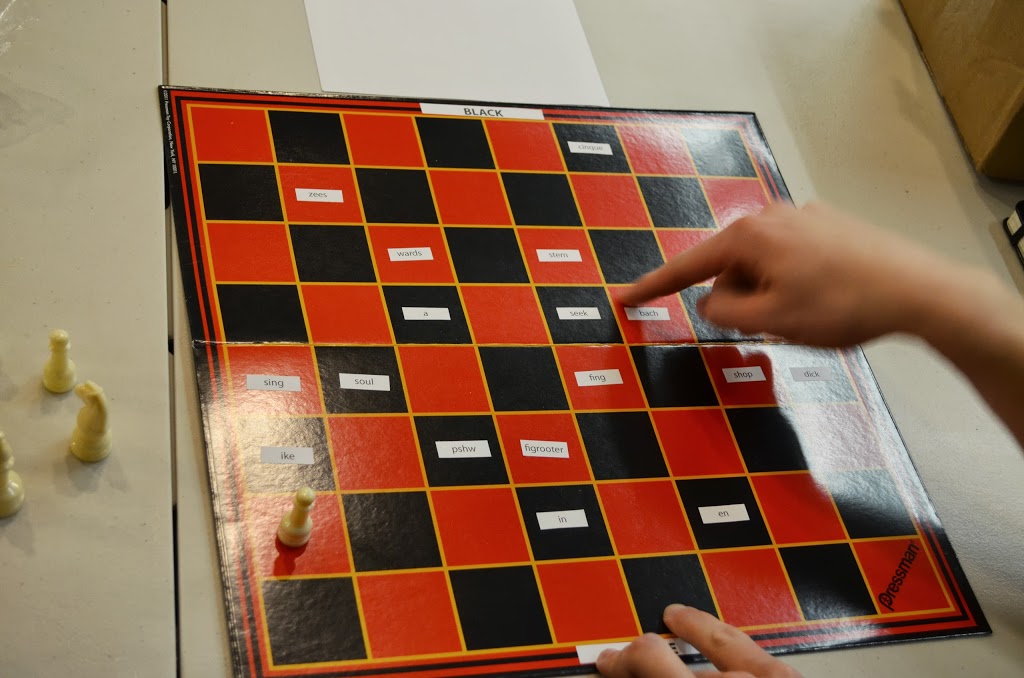
Figuring out the markings on the board
So for example, the first move for white is Pawn to shop; that being the place you’d buy a used camera. The image here isn’t great, but you’ll see the shop sticker on the right of the board, and of course given that it’s a pawn there’s only one possible piece which can move. Continuing in this vein, you’ll make the moves necessary, and get the confirmation that Black does indeed win.
This is not a Clue. Something of an inside joke
Of course with this done, the puzzle is only half way to solved as you need to resolve the second part of the puzzle. We got a chuckle when we suggested that what “A Dieter Sees” is “His Feet”. Sadly not the right answer, but a good one at 6am, with no sleep!
With a set of letters created based on the hints that we had to remember where we had moved on the board, and by removing a piece (interesting mechanic here as you had to remove the letter from each piece from one of the words) we finally had a subset of letters and the keyword.
Entering ‘SACRIFICE’ into BugMe, we got the next clue. And yes, it took us far too long to solve this!
I'm amazed your program group has made it this far! Maybe you aren't a total waste of system resources after all.
Navigate your data transfer vehicle to Denny's Restaurant at 494 Lincoln Street in Worcester, MA and you might be able to recharge.
{
BATHROOM_LOC: TRUE;
FOOD_NEARBY: TRUE;
}
##################
## END OF LINE. ##
##################
Well it looks like it’s time for breakfast, and another new puzzle. I’ll say up front, that this was the least favorite puzzle that we tackled all weekend. It’s obscure, we were tired, and the hints we were given when we were stuck were particularly poor! It was also particularly unhelpful that the Denny’s in question hadn’t been warned that their regular breakfast crowd was going to be replaced by 60+ hungry puzzlers. That said, let’s have a look at what we were up against at the Denny’s.
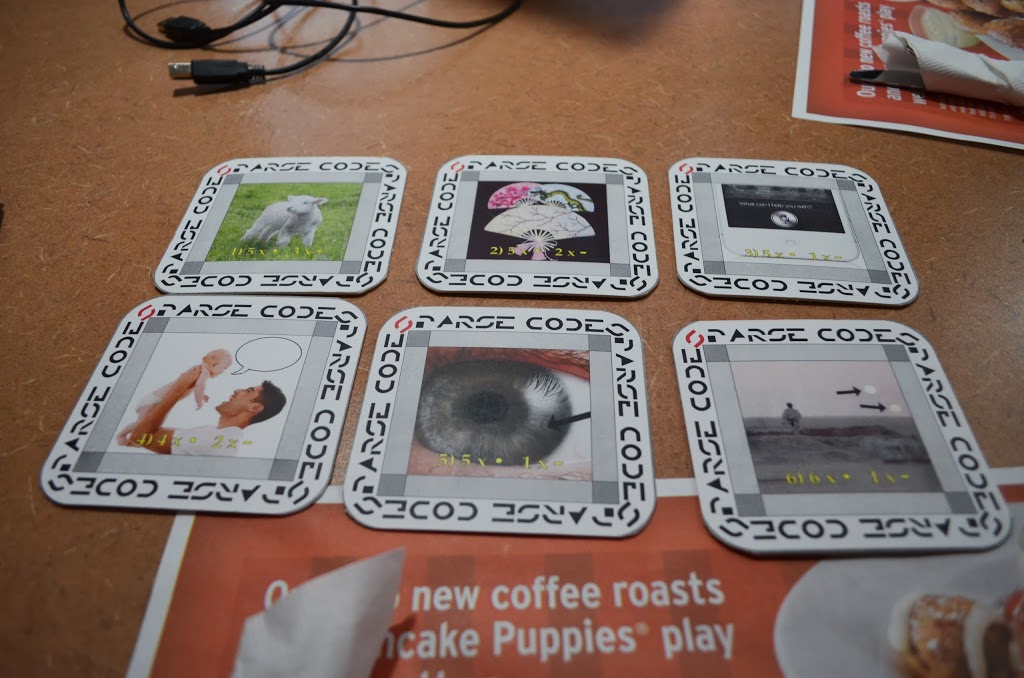
Coded Coasters
We have the six coasters pictured above, and nothing much more to go on. Ordering breakfast, and starting to think about what we have, we note that we have a Sheep, Fans, Siri, A Dad and baby, Iris, and Suns; along with a cryptic code at the bottom of each coaster. Also note the wording around the coaster. That’s going to be a clue, however it really didn’t strike us as to how to use it.
After a little work, we realise that we can rework some of the objects depicted, and be left with all four letter words. Converting these into Morse Code, we attempted to use the codes to index into the words, to remove the noted number of dots and dashes from the words, and all sorts of interesting combinations, none of which were helpful.
Brett decided that having eaten, and not much enjoying this puzzle he was going to go grab some shut eye, as had Clayton, so with Myself, Brian and Ben left, we scratched our heads and being perfectly honest, got nowhere.
Frustration, lack of sleep, and stupidity setting in, we asked for some clues. Having gleaned nothing useful from the clues and wasted another 20 minutes, we asked for some more clues. And then yet more clues before we finally made some progress. The idea here was to use a Sparse Code and create the word represented by the picture in Morse code, using only the number of dots and dashes in the code at the bottom of the card. From here, you entered the dots and dashes onto the coaster, using the corner squares where you had merged the letters and the long spaces where you hadn’t. From that, you then took the dots and dashes left in the light grey, and created a letter for each coaster, finally getting you to the keyword ‘BRAINS’. Something which we realised were not functioning very well for us at this point.
Grateful to have this puzzle behind us we hit the trail again.
Excellent. You've successfully completed all my benchmarks. But you were a little slow, and I already found other ways to accomplish my goals! So I won't be needing your help after all, LUSERS.
Drive your data transfer vehicle to the BANCROFT TOWERS secure memory location on Bancroft Tower Rd in Worcester, MA. Please bring your BITE!
Don't worry, nothing bad will happen to you. Only programs who disobey me will be punished!
{
BATHROOM_LOC: FALSE;
FOOD_NEARBY: FALSE;
}
##################
## END OF LINE. ##
##################
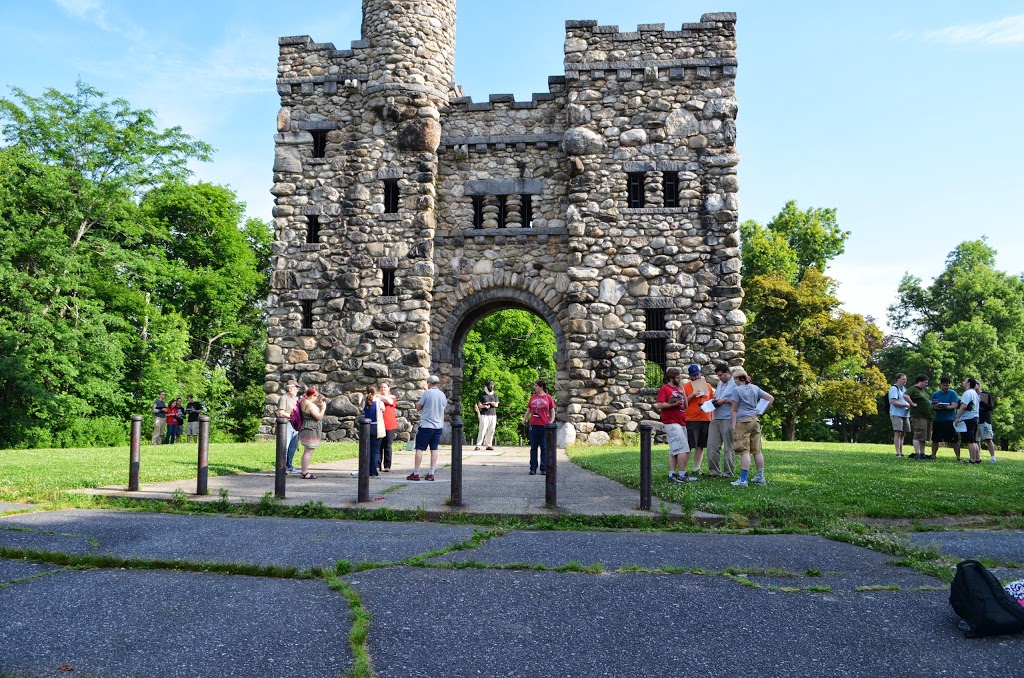
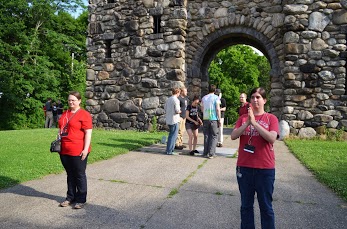
Bancroft Towers
Arriving at Bancroft towers, which looked a little like a castle in the middle of nowhere, we had our next puzzle. Before we could solve it however, we had to complete a quick challenge.
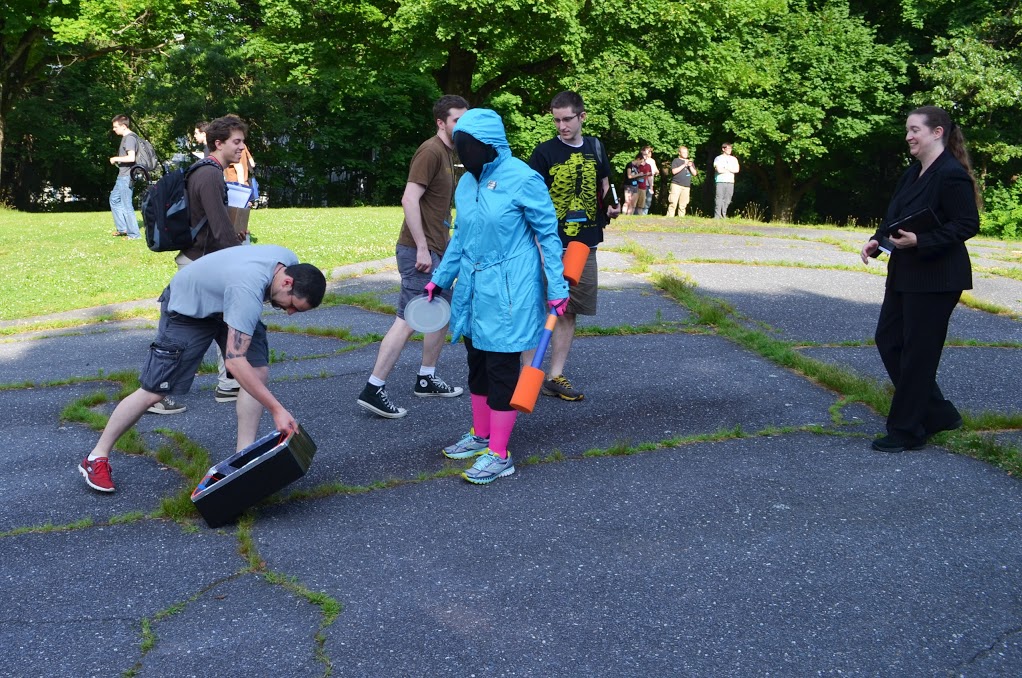
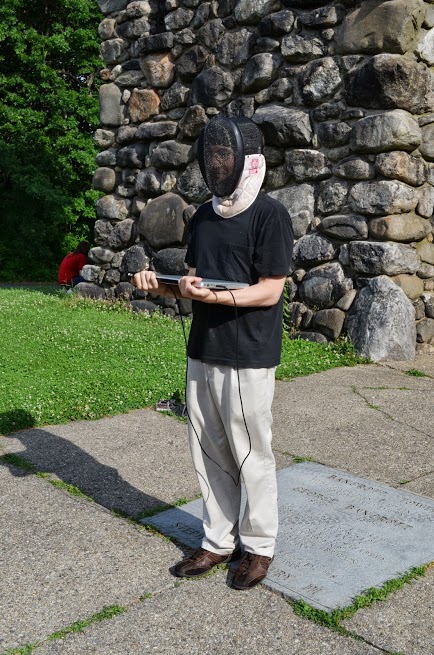
Disabling the Guardians
As you can see from the grin on Professor Goto’s face, and the fact that I’m picking something up from the floor, I found an unintended solution to this one. Turns out what we were supposed to do was spot that there were a number of flying disks positioned in front of that box, and throw them at a sensor in the box, disabling the guardian programs (person with a pugil stick and a fencing mask) and allowing us to pass. None of us spotted these disks though, and instead Brett distracted the guardian by going right, while I ran like a maniac straight for the switch and hit it. Now the end result was the same, and my method worked, however not really what was intended. Having seen what we were supposed to do, it was a nice Tron themed scene, and should have been good fun.
That out of the way it was on to the real puzzle.
Message programs
We were presented with two message towers which would give us a message. We had a handshake first which established a protocol, and gave us a numbering system which we could use to decode the message we’d be given. The video below shows the message, although it may not help without the handshake to give you a reference point. The reference is this from memory. 4 and 5 may be wrong!
One hand – 1
Two Hands – 2
Three first bumps – 3
Clasped hands slap – 4
Fist Bump – 5
Hands crossed on chest – End word.
With the message recorded, we decoded each character, then had to encode the message into 5 bit binary. That gave us some letters, and a new keyword. Time to enter ‘EMBODY’ into BugMe to see a new video, the next location, and then connect our B.I.T.E to the terminal to get out of the computer!
GotoVision Database output:
REM
REM ---LISA GOTO 1999/12/31---
REM
Finally finished digitizing all those VHS tapes. Found some interesting old video journals! Like this one, for instance:
http://boston.gotovision.net/19870906
{
BATHROOM_LOC: FALSE;
FOOD_NEARBY: FALSE;
}
REM
REM ---STOP---
REM
Knowing that we’re off to Greenhill park as our next location, we approached the exit program (who looked a lot like Ross) which was waiting for us to connect the B.I.T.E., hack the computer and transfer ourselves back to the real world. Given the fun we’d had with the Bite earlier, we were hoping things would work as expected, and fortunately they did.
Getting out of the computer
Passing under the archway we were met on the other side by Ross, glad to see us back in the real world. With our new location identified, and the sun well and truly up, and it now being mid morning on another beautiful day in the Boston area, we’re headed to another park and another fun puzzle. By now we’ve forgotten about the coasters, and have had a lot of fun with this last puzzle.
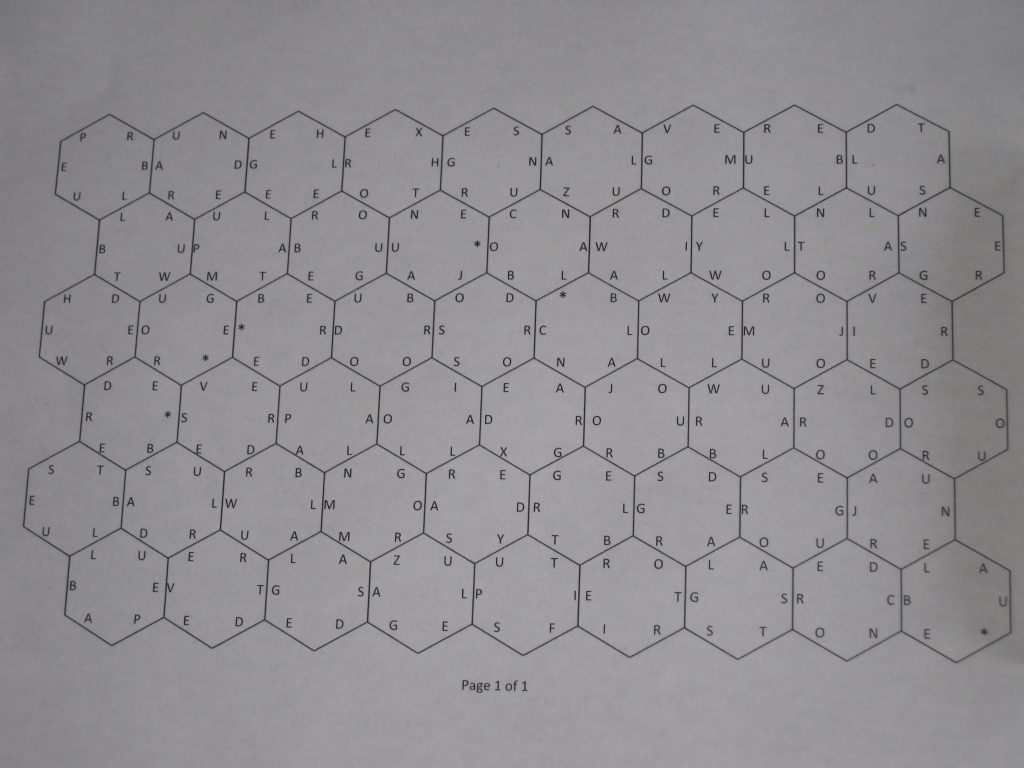
Soccer Puzzle
What we get is the sheet of paper above with a lot of hexagons and letters. Well time to put the thinking caps on. We quickly spot that some of the hexagons contain colours. The top left for example has BLUE written clockwise, starting at 3 o’clock. This leaves two letters unused, which in a puzzle, can’t be coincidence. We quickly work through trying to identify colours in the squares and realise that not all of these are in English. Points for identifying which languages are used.
Anyways, cutting a long story short, we notice that there’s a coded message in there which reads along the lines of “Prune Hexes Save Red. Taped Edges First One *” Let me know when you spot it!
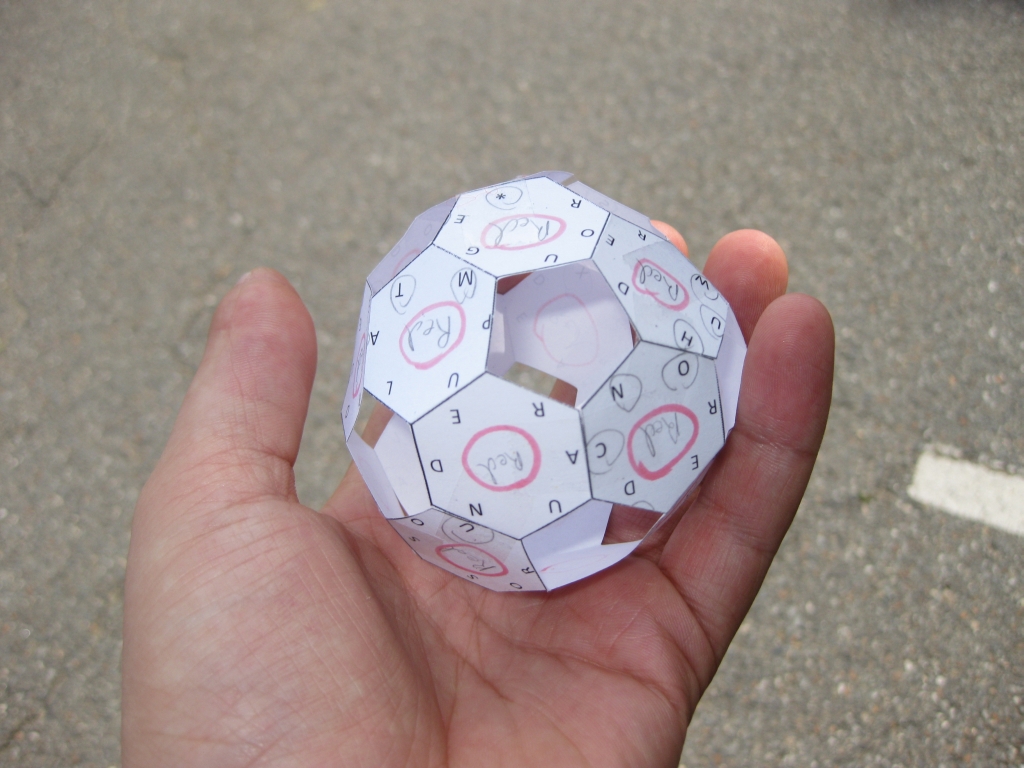
So doing that we finally have a puzzle that requires scissors, so carefully cutting out saving the reds, we tape up the edges, and we’re left with a soccer ball!
The Completed Soccer ball
Following the instructions we had from decoding the puzzle, we read along the taped edges of the ball, starting from the ‘*’ and get our next keyword ‘GOALTENDER’. Entering it into BugMe, we get the next clue.
GotoVision Database output:
REM
REM ---LISA GOTO 2002/10/17---
REM
Note to self...
It's funny how people just assume that a rocket in the middle of a public park is disarmed. Don't they realize that it's expensive to disarm rockets and far easier to just stick it in a park and hope for the best. There's a great example of this kind of criminal government laissez-faire at GODDARD PARK at 51 Auburn St. in Auburn, MA. Parking is available at the library just down the street.
{
BATHROOM_LOC: FALSE;
FOOD_NEARBY: TRUE;
}
REM
REM ---STOP---
REM
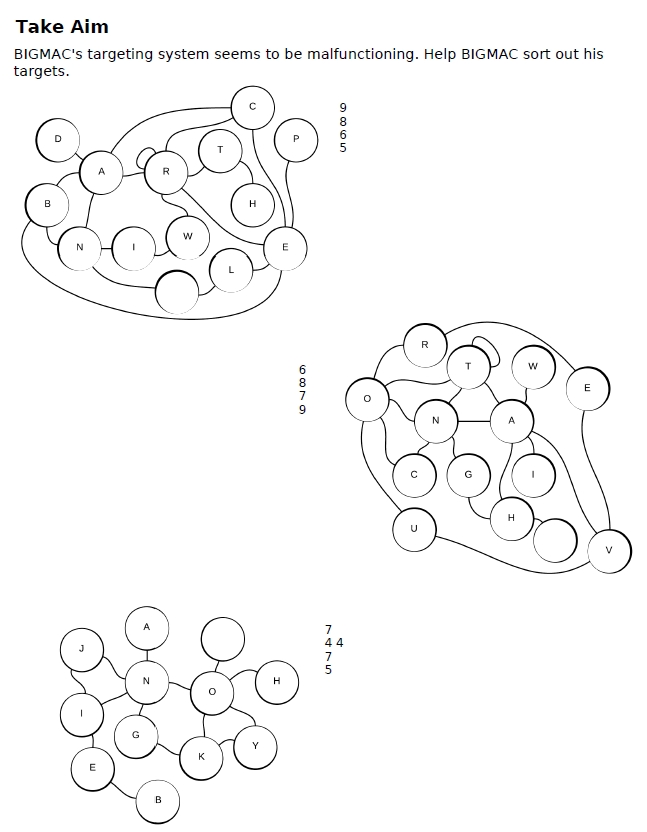
So one more park, and as it turns out what would be our last puzzle before the endgame. This final puzzle has us trying to fix BigMac’s targeting system, and with several pages of puzzles like the one below, we first have to figure out what we’re doing before we split up the work and try to solve the puzzle.
Take Aim
The goal here is to find the names of major cities encoded in the spaghetti, and using the crossword style numbers to help we could tell how many letters each city had in its name, and that each section had four cities hidden in it. There was also a blank circle, which we’d need to figure out the letter contained within it, and from that deduce how to decode the puzzle into a final keyword. I’ll let you try to find the cities in these yourself, but if you want a hint, you’ll find Hong Kong coded in the bottom grid.
With a bit of a struggle, and some good guessing from Brett, we finally managed to decode all the puzzles and get the keyword ‘PYONGYANG’ mere minutes before we received a text from Game Control telling us to head to the final location for lunch, and the endgame to play out.
GotoVision Database output:
REM
REM
---LISA GOTO 1989/12/31---
REM
Note to self...
For future reference, the WEBSTER HOUSE at 1 Webster St, Worcester, MA would be a great place to hide the back door for the BIGMAC!
{ BATHROOM_LOC: TRUE;
FOOD_NEARBY: TRUE;
}
REM
REM ---STOP---
REM
Heading to the final location, and felling good that we’d solved the last puzzle before our time ran out, we were in good spirits. Arriving at the restaurant, we get our final puzzle. Throughout the weekend, we’ve had on the back of our badges the code ‘G=’, and during the night our identity disk told us that ‘=4’. So we had a way to translate but no real use for that info until now.
We get handed a card which has a logo similar to that on the back of our name badges and the equation (C-D)*(F+A). Also on the card one of the balls on the circuit board is coloured in. So this last puzzle needed us all to cooperate. We had to gather each others letters, numbers and codes, figure out the equations, and then create a pass phrase by joining them all together in the order of the dots. Turns out our code was ‘K’ and that fits into the phrase ‘USUCKATSIMON’ quite nicely. So we now know that we’ll be playing Simon Says at some point.
There was a fair bit of waiting around at this stage, as it turns out there were a few technical problems upstairs, but since we were all getting along just fine, and enjoying the company, and talking to some of the other teams it really wasn’t a problem. Once we’re finally let upstairs, we are told to connect our B.I.T.E. to the ‘terminal’ and not to disconnect it. This is what we see…
Simon Says
Once everyone is ready we have to hack into Bigmac using the terminals, and in some way enter the USUCKATSIMON code into the system. As it turns out, directions here from the Game Control were particularly poor, and after some heated exchanges from a few teams, we eventually managed to enter our codes correctly, and start a game of Simon Says … where we ended up with a few technical issues. There were a few of the systems which weren’t inputting correctly, including ours, which meant we never got to play the final game. All in all not a huge loss as it didn’t work very well, however it was a fun idea, and got all the teams working together.
With BicMac finally defeated, we reached the end of the endgame.
With that done, food was served, and the weekend was officially over.
I’d like to extend a huge thanks to the entire team, from Game Control to all the people who helped them out over the weekend. I had a lot of fun, and want to say thanks for all the effort which went into producing this, plus all the helpers who were on site at each puzzle to keep us sane, encourage us, and really make the event what it was. You guys Rock!
Only Solutions. The team at the end of the weekend.
I hope you’ve enjoyed the writeup, and if you’d like to know more about any of the puzzles, or try them yourself, let me know. The team have allowed me to distribute the puzzles, so just get in touch.